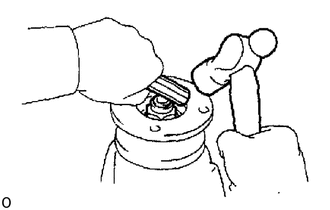
AXLE AND DIFFERENTIAL DIFFERENTIAL CARRIER ASSEMBLY REASSEMBLY
PROCEDURE

 1.ADJUST DIFFERENTIAL SIDE GEAR BACKLASH
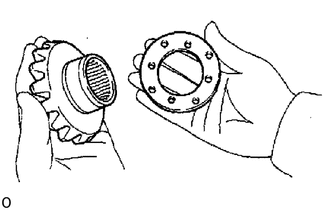
Install the thrust washer on the side gears.
- HINT:
-
Using the below table, select thrust washers which will ensure that the backlash is within specification.
Install the side gears to the LH case.
Install the 4 pinion gears and thrust washers to the spider.
Install the pinion gear and spider to the LH case.
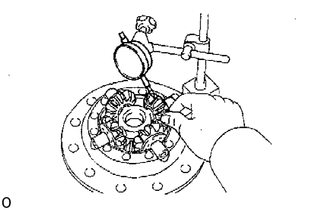
Hold the side gear, measure the side gear backlash.
- Backlash:
0.02-0.20 mm (0.0008-0.0079 in.)
- HINT:
-
Measure the backlash at the RH case and LH case.
If the backlash is not within the specification, install a thrust washer with a different thickness.
- HINT:
-
Use washers of the same thickness on both the right and left side.
Thrust washer thickness Thrust washer 1hickness 1.60 mm (0.0630 in.) 1.90 mm (0.0748 in.) 1.75 mm (0.0689 in.) 2.05 mm (0.0807 in.)
Install the side gear and thrust washer to the RH case.
Apply gear oil to each part.
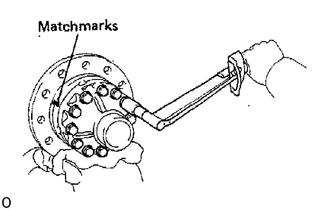
Align the matchmarks on the LH and RH cases.
Tighten the 12 bolts.
- Torque:
78 N*m (800 kgf*cm, 58 ft*lbf)
41301A
2.INSTALL SIDE BEARINGS
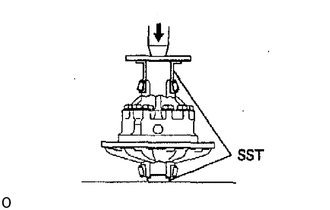
Using SST and a press, press the bearing into the differential case.
- SST
- 09316-20011
- SST
- 09950-40011
3.INSTALL RING GEAR ON DIFFERENTIAL CASE
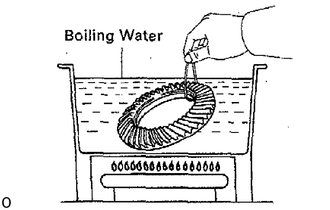
Clean the contact surfaces of the differential case and ring gear.
Heat the ring gear in boiling water.
After the moisture on the ring gear has completely evaporated, quickly install the ring gear to the differential case.
- HINT:
-
Align the matchmarks on the ring gear and the differential case.
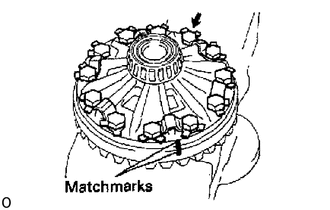
Install 6 new lock plates and temporarily install the 12 bolts so that the bolt holes in the ring gear and differential case are not misaligned.
- NOTICE:
-
The ring gear set bolts should not be tightened until the ring gear has cooled sufficiently.
After the ring gear has cooled sufficiently, torque the ring gear set bolts.
- Torque:
162 N*m (1,650 kgf*cm, 119 ft*lbf)
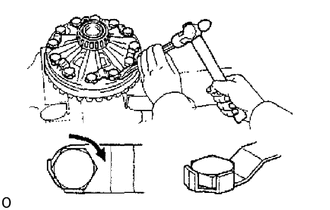
Using a hammer and drift punch, stake the lock plates.
- HINT:
-
Stake one claw flush with the flat surface of the nut. For the claw contacting the protruding portion of the nut, stake the half on the tightening side.
4. CHECK RING GEAR RUNOUT
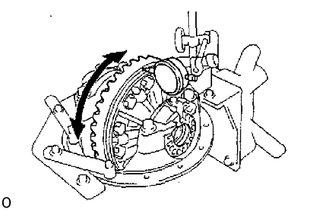
Install the differential case in the differential carrier and tighten the adjusting nut just to where there is no play in the bearing.
Click hereDrivetrain>AXLE AND DIFFERENTIAL>DIFFERENTIAL CARRIER ASSEMBLY>REASSEMBLY
Using a dial indicator, measure the runout or ring gear.
- Maximum runout:
0.10 mm (0.0039 in.)
5.INSTALL DRIVE PINION BEARING OUTER RACES
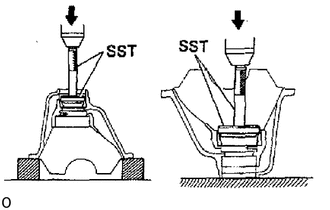
Using SST and a press, install the outer races.
(Front)
SST 09608-35014 (09608-06020, 09608-06120)
(Rear)
SST 09608-35014 (09608-06020, 09608-06160)
41201A
6.INSTALL DRIVE PINION REAR BEARING
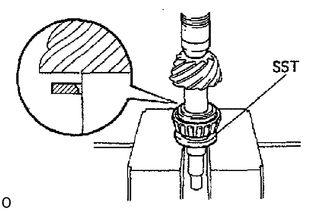
Install the plate washer on the drive pinion.
- HINT:
-
First fit a washer with the same thickness as the washer which was removed, then after checking the tooth contact pattern, replace the washer with one of a different thickness if necessary.
Using SST and a press, install the rear bearing to the drive pinion.
- SST
- 09506-35010
7.ADJUST DRIVE PINION PRELOAO
If Replaced Drive Pinion Bearings:
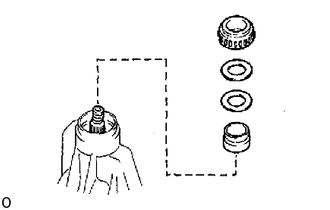
Install the following parts:
Drive pinion
Spacer
Shim A [thickness = 3.00 mm (0.1181 in.)]
Shim B [thickness = 1.89 mm (0.0744 in.)]
Front bearing
- HINT:
-
Assemble and install the oil seal and oil slinger after adjusting the total preload.
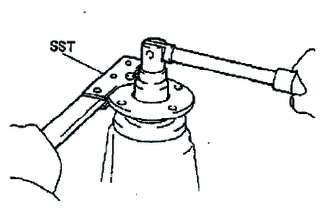
Using SST to hold the flange, tighten the nut.
- SST
- 09330-00021
- Torque:
304 N*m (3,100 kgf*cm, 224 ft*lbf)
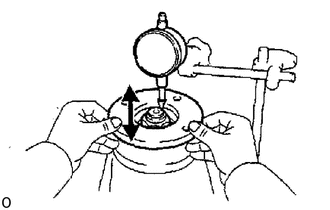
Using a dial indicator, measure and note the drive pinion axial play.
Calculate the value "T".
T = 4.89 mm (0.1925 in.) - (drive pinion axial play)
Select shims A and B so that the sum of the two shims is closest to value "T".
- Adjusting shim thickness:
Shim A thickness [mm (in.)]
[ at intervals of 0.1 (0.0039)]Shim B thickness [mm (in.)]
[ at intervals of 0.01 (0.00039)]1.90 (0.0748) 1.80 (0.0709) 2.00 (0.0787) 1.81 (0.0713) 2.10 (0.0827) 1.82 (0.0717) 2.20 (0.0866) 1.83 (0.0720) 2.30 (0.0906) 1.84 (0.0724) 2.40 (0.0945) 1.85 (0.0728) 2.50 (0.0984) 1.86 (0.0732) 2.60 (0.1024) 1.87 (0.0736) 2.70 (0.1063) 1.88 (0.0740) 2.80 (0.1102) 1.89 (0.0744) 2.90 (0.1142) - 3.00 (0.1181) -
Install the selected shims to the drive pinion.
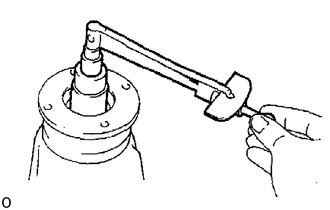
Using a torque wrench, measure the drive pinion preload.
- New bearing preload (at starting):
1.9-2.5 N*m (19-26 kgf*cm, 16.5-22.6 in.*lbf)
- HINT:
-
Measure the preload after snugging the bearing down by rotating it left and right several times.
If the preload is not to specification, adjust by increasing or decreasing the thickness of shims.
- HINT:
-
Use a shim from both Shim A and Shim B to adjust.
If Reused Drive Pinion Bearings:
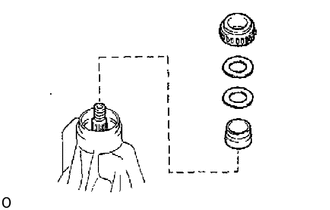
Install the following parts:
Drive pinion
Spacer
Shim A (reused)
Shim B (reused)
Front bearing
- HINT:
-
Assemble and install the oil seal and oil slinger after adjusting the total preload.
Using SST to hold the flange, tighten the nut.
- SST
- 09330-00021
- Torque:
304 N*m (3.100 kgf*cm, 224 ft*lbf)
Using a torque wrench, measure the drive pinion preload.
- Reused bearing preload (at starting):
0.8-1.3 N*m (8-13 kgf*cm, 6.9-11.3 in.*lbf)
- HINT:
-
Measure the preload after snugging the bearing down by rotating it left and right several times.
If the preload is not to specification, adjust by increasing or decreasing the thickness of shims.
- Adjusting shim thickness:
Shim A thickness [mm (in.)]
[ at intervals of 0.1 (0.0039)]Shim B thickness [mm (in.)]
[ at intervals of 0.01 (0.00039)]1.90 (0.0748) 1.80 (0.0709) 2.00 (0.0787) 1.81 (0.0713) 2.10 (0.0827) 1.82 (0.0717) 2.20 (0.0866) 1.83 (0.0720) 2.30 (0.0906) 1.84 (0.0724) 2.40 (0.0945) 1.85 (0.0728) 2.50 (0.0984) 1.86 (0.0732) 2.60 (0.1024) 1.87 (0.0736) 2.70 (0.1063) 1.88 (0.0740) 2.80 (0.1102) 1.89 (0.0744) 2.90 (0.1142) - 3.00 (0.1181) -
- HINT:
-
Use a shim from both Shim A and Shim B to adjust.
8.INSTALL DIFFERENTIAL CASE IN CARRIER
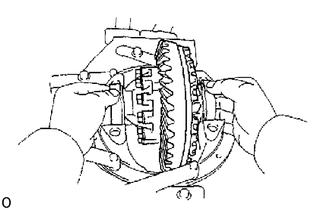
Place the bearing outer races on their respective bearings. Make sure the left and right outer races are not interchanged.
Install the case in the carrier.
- HINT:
-
Make sure that there is backlash between the ring gear and drive pinion.
9.INSTALL ADJUSTING NUTS
Install the adjusting nuts on the carrier, making sure the nuts are threaded properly.
10.INSTALL BEARING CAPS
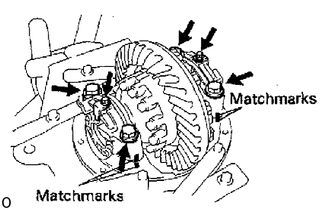
Align the matchmarks on the cap and carrier. Screw in the 2 bearing cap bolts 2 or 3 turns and press down the bearing cap by hand.
- HINT:
-
If the bearing cap does not fit tightly on the carrier, the adjusting nuts are not threaded properly.
-
Reinstall the adjusting nuts if necessary.
11.ADJUST SIDE BEARING PRELOAD
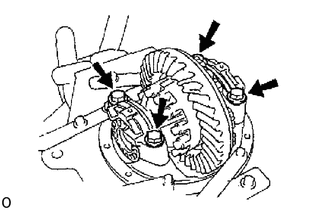
Tighten the 4 bearing cap bolts to the specified torque, then loosen them to the point where they can be turned by hand.
- Torque:
85 N*m (870 kgf*cm, 63 ft*lbf)
Fully tighten the 4 bearing cap bolts by hand.
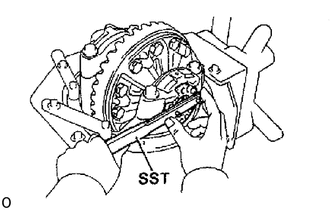
Using SST, tighten the adjusting nut on the ring gear side until the ring gear has a backlash of about 0.2 mm (0.008 in.).
- SST
- 09504-00011
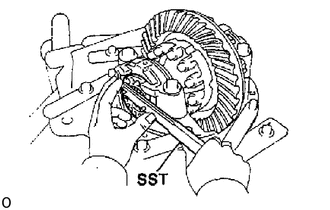
While turning the ring gear, use SST to fully tighten the adjusting nut on the drive pinion side.
After the bearings are settled, loosen the adjusting nut on the drive pinion side.
- SST
- 09504-00011
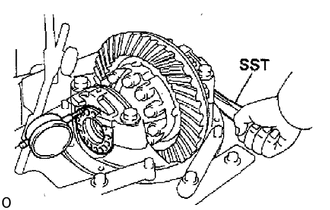
Place a dial indicator on the top of the adjusting nut on the ring gear side.
Adjust the side bearing for zero preload by tightening the other adjusting nut until the pointer on the indicator begins to move.
Tighten the adjusting nut 1 - 1.5 notches from the zero preload position.
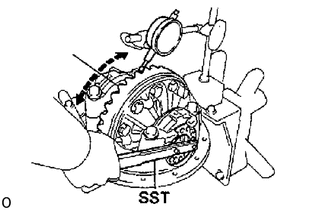
Using a dial indicator, adjust the ring gear backlash until it is within specification.
- Backlash:
0.15-0.20 mm (0.0059-0.0079 in.)
- HINT:
-
The backlash is adjusted by turning the left and right adjusting nuts equal amounts. For example, loosen the nut of the left side 1 notch and tighten the nut on the right side 1 notch.
Tighten the bearing cap bolts.
- Torque:
196 N*m (2,000 kgf*cm, 145 ft*lbf)
Recheck the ring gear backlash.
- Backlash:
0.15-0.20 mm (0.0059-0.0079 in.)
Using a torque wrench, measure the total preload.
- Total preload (at starting):
Add drive pinion preload
0.2-0.4 N*m (2-4 kgf*cm, 1.7-3.5 in.*lbf)
12.INSPECT TOOTH CONTACT BETWEEN RING GEAR AND DRIVE PINION
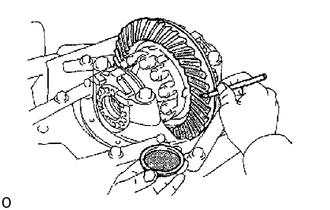
Coat 3 or 4 teeth at three different positions on the ring gear with red lead.
Hold the companion flange firmly and rotate the ring gear in both directions.
Inspect the tooth pattern.
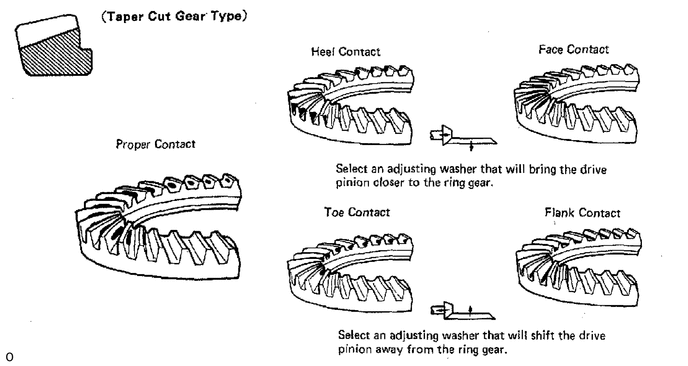
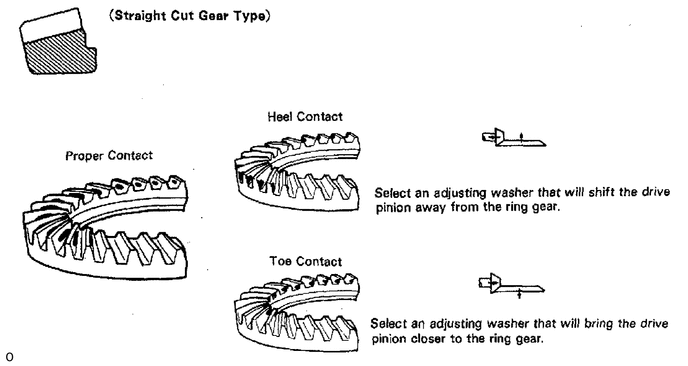
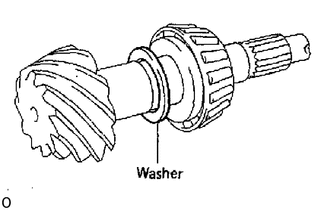
If the teeth are not contacting properly, use the following chart to select a proper washer for correction.
| Thickness [mm (in.)] | Thickness [mm (in.)] |
|---|---|
| 1.05 (0.0413) | 1.35 (0.0531) |
| 1.10 (0.0433) | 1.40 (0.0551) |
| 1.15 (0.0453) | 1.45 (0.0571) |
| 1.20 (0.0472) | 1.50 (0.0591) |
| 1.25 (0.0492) | 1.55 (0.0610) |
| 1.30 (0.0612) | - |
13.INSTALL ADJUSTING NUT LOCKS
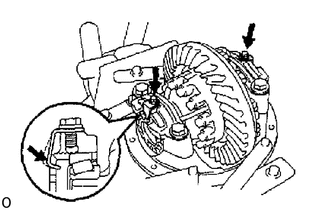
Install the 2 nut locks on the bearing caps.
- Torque:
13 N*m (130 kgf*cm, 9 ft*lbf)
41201C
14.INSTALL OIL SEAL
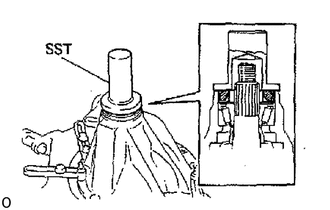
Using SST and a hammer, install a new oil seal.
- SST
- 09309-36010
- Oil seal drive in depth:
1.0 mm (0.039 in.)
Coat the lip of oil seal with MP grease.
41204
15.INSTALL COMPANION FLANGE
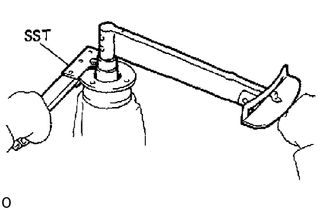
Install the companion flange.
Install the plate washer and a new nut.
- HINT:
-
Coat the threads of nut with gear oil.
Using SST to hold the flange, tighten the nut.
- SST
- 09330-00021
- Torque:
304 N*m (3,100 kgf*cm, 224 ft*lbf)
16. RECHECK TOTAL PRELOAD
Using a torque wrench, measure the preload of the backlash between the drive pinion and ring gear.
- New bearing preload (at starting):
2.1-2.9 N*m (21-30 kgf*cm, 18.2-26.0 in.*lbf)
- Reused bearing preload (at starting):
1.0-1.7 N*m (10-17 kgf*cm, 8.7-14.8 ln.*lbf)
17. CHECK RUNOUT OF COMPANION FLANGE
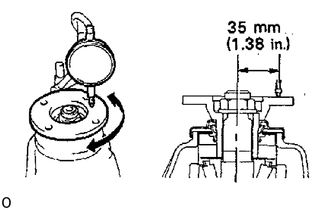
Using a dial indicator, measure the lateral and radial deviation of the companion flange.
- Maximum vertical runout:
0.10 mm (0.0039 in.)
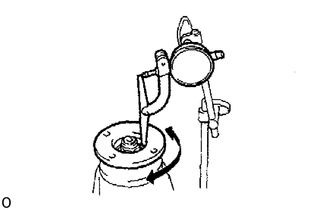
- Maximum lateral runout:
0.10 mm (0.0039 in.)
If the runout is greater than the maximum, inspect the bearings.
18. STAKE DRIVE PINION NUT