SEAT FRONT SEAT ASSEMBLY REASSEMBLY
CAUTION / NOTICE / HINT
- CAUTION:
-
Wear protective gloves. Sharp areas on the parts may injure your hands.
- HINT:
- ·
Use the same procedure for RHD and LHD vehicles.
·The procedure listed below is for RHD vehicles.
PROCEDURE

 71524
1.INSTALL FRONT SEAT CUSHION SILENCER PAD D
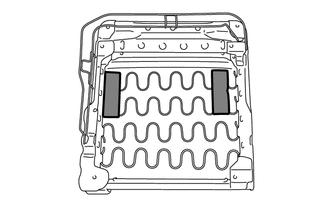
If the separate type front seat cushion spring assembly reused:
Clean the installation area of the separate type front seat cushion spring assembly.

|
Area to Clean |
Install 2 new front seat cushion silencer pads D to the separate type front seat cushion spring assembly as shown in the illustration.

| *1 | Front Seat Cushion Silencer Pad D | *2 | Separate Type Front Seat Cushion Spring Assembly |
71071S
2.INSTALL SEPARATE TYPE FRONT SEAT CUSHION COVER
- HINT:
- ·
When installing the seat cover, refer to the precautions in order to prevent wrinkles from forming.
Click hereVehicle Interior>SEAT>FRONT SEAT ASSEMBLY>PRECAUTION
·Align the seam allowance in a single direction as shown in the illustration.
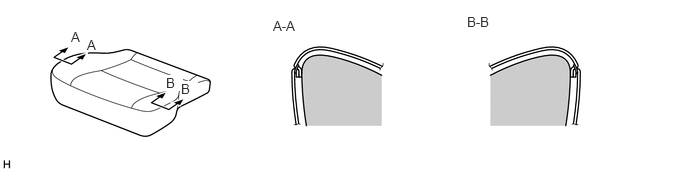 2.844,0.188 3.302,0.385 0.458,0.198 10 false A-A 4.865,0.146 5.323,0.344 0.458,0.198 10 false B-B 0.74,0.302 0.896,0.5 0.156,0.198 10 false A 0.906,0.385 1.063,0.583 0.156,0.198 10 false A 1.729,0.781 1.906,0.948 0.177,0.167 10 true B 1.885,0.844 2.063,1.01 0.177,0.167 10 true B
Set the separate type front seat cushion cover in place.
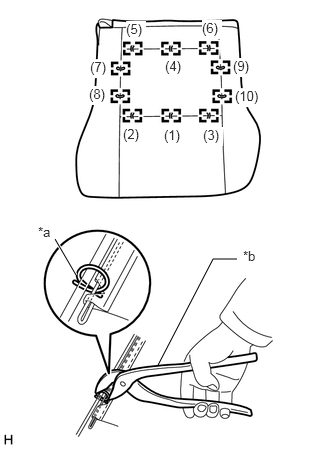
Using hog ring pliers, install the separate type front seat cushion cover to the separate type front seat cushion pad RH with 10 new hog rings in the order shown in the illustration.
| *a | Cutout |
| *b | Hog Ring Pliers |
- NOTICE:
- ·
Do not dirty or damage the separate type front seat cushion cover.
·Be sure to securely install the hog rings as shown in the illustration while preventing wrinkles from forming on the separate type front seat cushion cover.
- HINT:
-
Install the hog rings at the cutouts if they are there.
71610S
3.INSTALL SEPARATE TYPE FRONT SEAT CUSHION SPRING ASSEMBLY
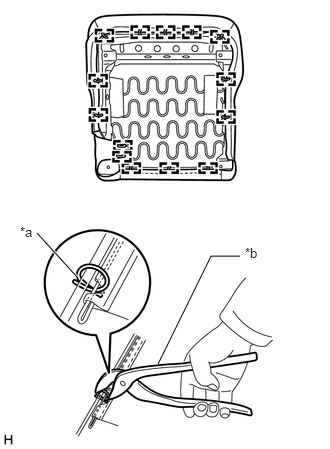
Set the separate type front seat cushion spring assembly in place.
Using hog ring pliers, install the 14 new hog rings as shown in the illustration.
| *a | Cutout |
| *b | Hog Ring Pliers |
- NOTICE:
- ·
Do not dirty or damage the separate type front seat cushion cover.
·Be sure to securely install the hog rings as shown in the illustration while preventing wrinkles from forming on the separate type front seat cushion cover.
- HINT:
-
Install the hog rings at the cutouts if they are there.
72301
4.INSTALL SEAT TRACK EQUALIZING WIRE SUB-ASSEMBLY
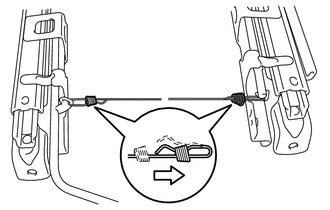
Install the seat track equalizing wire sub-assembly as shown in the illustration.
71149
5.INSTALL FRONT SEAT CUSHION CONNECTING WIRE
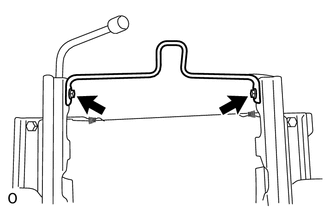
Install the front seat cushion connecting wire with the 2 bolts.
72110A
6.INSTALL FRONT SEAT OUTER TRACK ASSEMBLY RH
- HINT:
-
Install together with the front seat inner track assembly RH.
Set the front seat outer track assembly RH together with the front seat inner track assembly RH to the separate type front seat cushion spring assembly.
Operate the seat track adjusting handle to slide the front seat outer track assembly RH together with the front seat inner track assembly RH to the rearmost position.
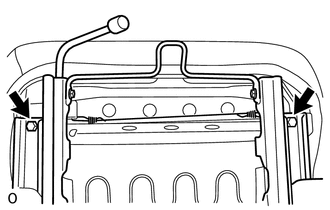
Temporarily install the 2 bolts.
Operate the seat track adjusting handle to slide the front seat outer track assembly RH together with the front seat inner track assembly RH to the front most position.
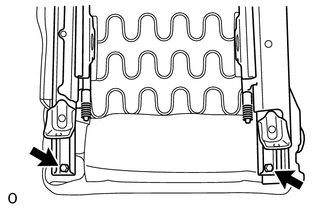
Install the 2 bolts.
- Torque:
29 N*m (296 kgf*cm, 21 ft.*lbf)
Operate the seat track adjusting handle to slide the front seat outer track assembly RH together with the front seat inner track assembly RH to the rear most position.
Tighten the 2 bolts.
- Torque:
29 N*m (296 kgf*cm, 21 ft.*lbf)
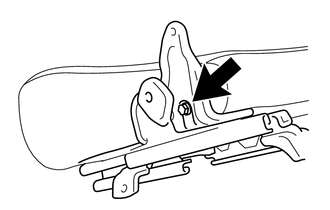
Install the bolt.
- Torque:
29 N*m (296 kgf*cm, 21 ft.*lbf)
7.INSTALL BUSH
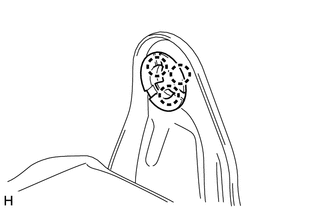
Attach the 3 claws to install the bush.
71521
8.INSTALL FRONT SEAT CUSHION SILENCER PAD A
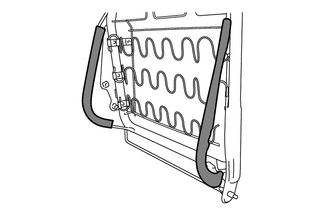
If the separate type front seatback spring assembly reused:
Clean the installation area of the separate type front seatback spring assembly.
|
|
Area to Clean |
Install 2 new front seat cushion silencer pads A as shown in the illustration.
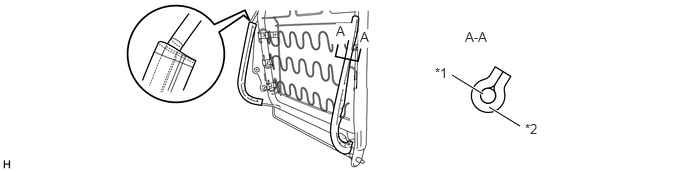
| *1 | Front Seat Cushion Silencer Pad A | *2 | Separate Type Front Seatback Spring Assembly |
72510
9.INSTALL RECLINING SEATBACK ADJUSTER ASSEMBLY RH
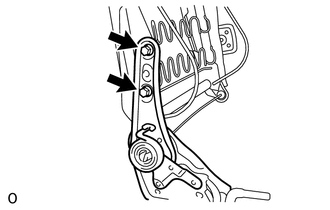
Install the reclining seatback adjuster assembly RH to the separate type front seatback spring assembly with the 2 bolts.
- Torque:
52 N*m (530 kgf*cm, 38 ft.*lbf)
72750D
10.INSTALL LUMBAR SUPPORT ADJUSTER ASSEMBLY RH (w/ Lumbar Support)
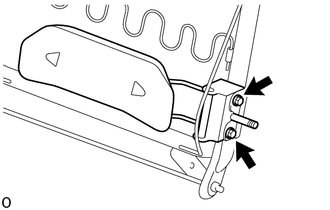
Install the lumbar support adjuster assembly RH to the separate type front seatback spring assembly with the 2 bolts.
- Torque:
6.5 N*m (66 kgf*cm, 58 in.*lbf)
11.INSTALL SEATBACK COVER
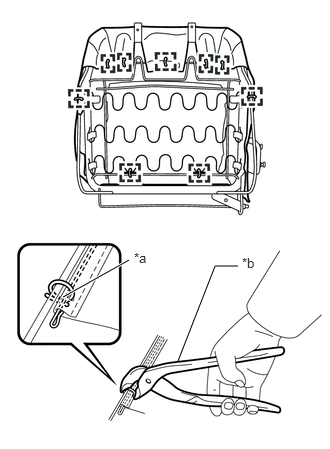
Using hog ring pliers, install the seatback cover to the separate type front seatback spring assembly with 12 new hog rings as shown in the illustration.
- HINT:
-
Install the separate type front seatback spring assembly with the shiny side facing outwards.
| *a | Cutout |
| *b | Hog Ring Pliers |
71551S
12.INSTALL SEPARATE TYPE FRONT SEATBACK PAD
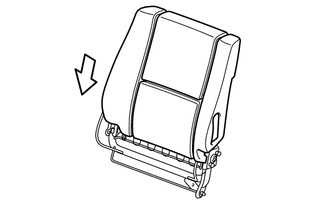
Install the separate type front seatback pad to the separate type front seatback spring assembly.
71073S
13.INSTALL SEPARATE TYPE FRONT SEATBACK COVER
- HINT:
- ·
When installing the seat cover, refer to the precautions in order to prevent wrinkles from forming.
Click hereVehicle Interior>SEAT>FRONT SEAT ASSEMBLY>PRECAUTION
·Align the seam allowance in a single direction as shown in the illustration.
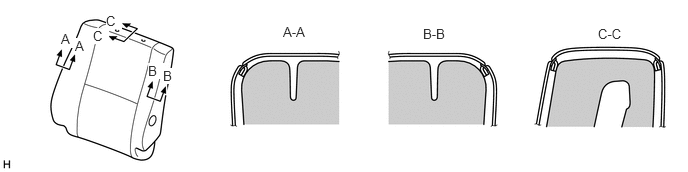 0.635,0.323 0.792,0.5 0.156,0.177 10 true A 0.781,0.396 0.938,0.573 0.156,0.177 10 true A 1.104,0.135 1.271,0.302 0.167,0.167 10 true C 0.969,0.292 1.135,0.458 0.167,0.167 10 true C 1.542,0.656 1.708,0.823 0.167,0.167 10 true B 1.698,0.708 1.865,0.875 0.167,0.167 10 true B 2.948,0.25 3.313,0.438 0.365,0.188 10 false A-A 4.406,0.271 4.771,0.458 0.365,0.188 10 false B-B 6.229,0.271 6.594,0.458 0.365,0.188 10 false C-C
Set the separate type front seatback cover in place.
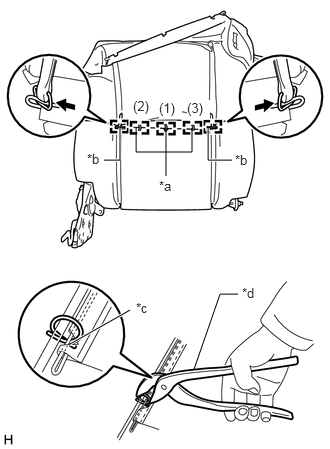
Attach the 2 hooks.
| *a | Hog Ring |
| *b | Hook |
| *c | Cutout |
| *d | Hog Ring Pliers |
Using hog ring pliers, install the separate type front seatback cover to the separate type front seatback pad with 3 new hog rings in the order shown in the illustration.
- NOTICE:
- ·
Do not dirty or damage the separate type front seatback cover.
·Be sure to securely install the hog rings as shown in the illustration while preventing wrinkles from forming on the separate type front seatback cover.
- HINT:
-
Install the hog rings at the cutouts if they are there.
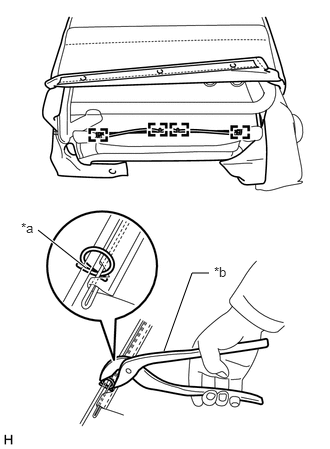
Using hog ring pliers, connect the 2 rubber bands with 4 new hog rings as shown in the illustration.
| *a | Cutout |
| *b | Hog Ring Pliers |
- NOTICE:
- ·
Do not dirty or damage the separate type front seatback cover.
·Be sure to securely install the hog rings as shown in the illustration while preventing wrinkles from forming on the separate type front seatback cover.
- HINT:
-
Install the hog rings at the cutouts if they are there.
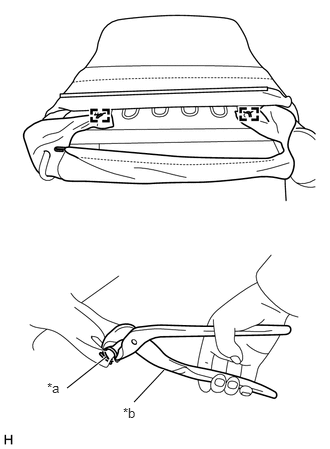
Using hog ring pliers, connect the lower part of the separate type front seatback cover with 2 new hog rings as shown in the illustration.
| *a | Cutout |
| *b | Hog Ring Pliers |
- NOTICE:
- ·
Do not dirty or damage the separate type front seatback cover.
·Be sure to securely install the hog rings as shown in the illustration while preventing wrinkles from forming on the separate type front seatback cover.
- HINT:
-
Install the hog rings at the cutouts if they are there.
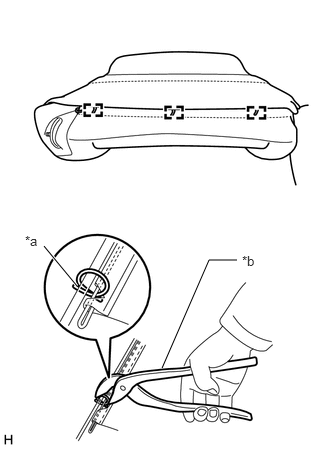
Using hog ring pliers, close the separate type front seatback cover with 3 new hog rings as shown in the illustration.
| *a | Cutout |
| *b | Hog Ring Pliers |
- NOTICE:
- ·
Do not dirty or damage the separate type front seatback cover.
·Be sure to securely install the hog rings as shown in the illustration while preventing wrinkles from forming on the separate type front seatback cover.
- HINT:
-
Install the hog rings at the cutouts if they are there.
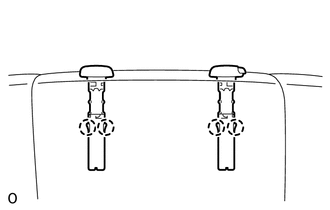
Attach the 4 claws to install the 2 front seat headrest supports.
14.INSTALL FRONT SEATBACK ASSEMBLY
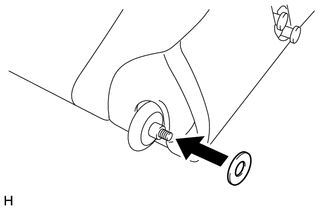
Install the plate washer.
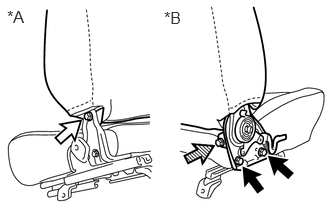
Install the front seatback assembly with the nut, 2 bolts A and bolt B.
- Torque:
- for Bolt A:
52 N*m (530 kgf*cm, 38 ft.*lbf)
- for Bolt B:
29 N*m (296 kgf*cm, 21 ft.*lbf)
- for Nut:
18 N*m (184 kgf*cm, 13 ft.*lbf)
| *A | LH Side |
| *B | RH Side |

|
Bolt A |

|
Bolt B |

|
Nut |
72791
15.INSTALL LUMBAR SUPPORT LEVER (w/ Lumbar Support)
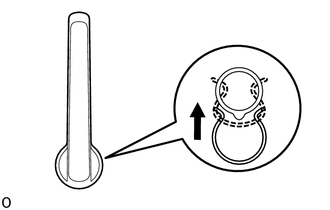
Install the snap ring to the lumbar support lever.
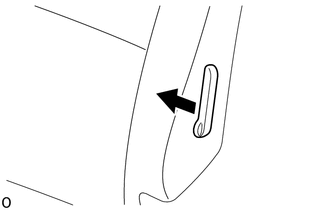
Install the lumbar support lever with snap ring as shown in the illustration.
Lightly pull on the lumbar support lever to check whether it is locked.
71811D
16.INSTALL FRONT SEAT CUSHION SHIELD RH
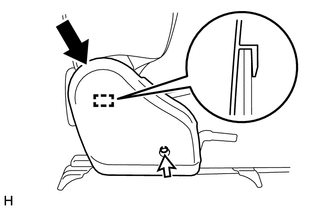
Slide the front seat cushion shield RH in the direction indicated by the arrow to attach the guide to set it.
Install the screw.
72525A
17.INSTALL RECLINING ADJUSTER RELEASE HANDLE RH
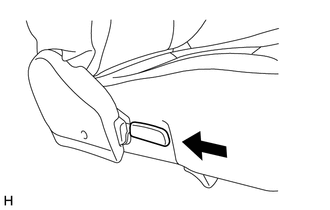
Install the reclining adjuster release handle RH.
71910A
18.INSTALL FRONT SEAT HEADREST ASSEMBLY
Install the front seat headrest assembly.
73230
19.INSTALL FRONT SEAT INNER BELT ASSEMBLY RH
55560D
20.INSTALL SEAT UNDER TRAY LOCK ASSEMBLY
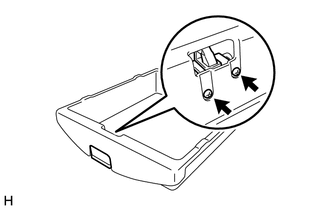
Install the seat under tray lock assembly with the 2 screws.