SEAT REAR SEAT ASSEMBLY(for Fixed Type 4-Passenger Seat) REASSEMBLY
CAUTION / NOTICE / HINT
- CAUTION:
-
Wear protective gloves. Sharp areas on the parts may injure your hands.
PROCEDURE

 79086B
1.INSTALL NO. 8 SEAT CUSHION PAD SUB-ASSEMBLY LH
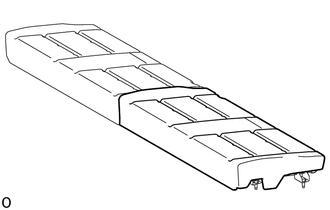
Install the No. 8 seat cushion pad sub-assembly LH onto the No. 8 seat cushion spring assembly.
79085B
2.INSTALL NO. 8 SEAT CUSHION PAD SUB-ASSEMBLY RH
- HINT:
-
Use the same procedure described for the LH side.
79081A
3.INSTALL NO. 8 SEAT CUSHION COVER SUB-ASSEMBLY
- HINT:
- ·
When installing the seat cover, refer to the precautions in order to prevent wrinkles from forming.
Click hereVehicle Interior>SEAT>FRONT SEAT ASSEMBLY>PRECAUTION
·Align the seam allowance in a single direction as shown in the illustration.
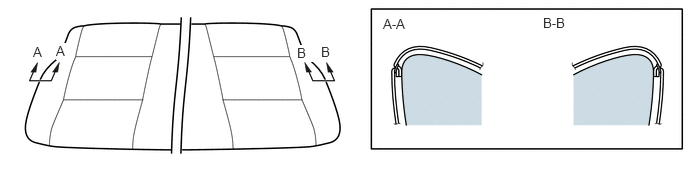 0.344,0.458 0.5,0.656 0.156,0.198 10 false A 0.583,0.448 0.771,0.625 0.188,0.177 10 true A 3.344,0.458 3.5,0.656 0.156,0.198 10 false B 3.094,0.469 3.281,0.646 0.188,0.177 10 true B 3.99,0.167 4.438,0.365 0.448,0.198 10 false A-A 5.656,0.156 6.104,0.354 0.448,0.198 10 false B-B
Set the No. 8 seat cushion cover sub-assembly to both sides of the No. 8 seat cushion pad.
Using hog ring pliers, install the No. 8 seat cushion cover sub-assembly to both sides of the No. 8 seat cushion pad with 24 new hog rings in the order shown in the illustration.
- NOTICE:
- ·
Do not dirty or damage the No. 8 seat cushion cover sub-assembly.
·Be sure to securely install the hog rings as shown in the illustration while preventing wrinkles from forming on the No. 8 seat cushion cover sub-assembly.
- HINT:
-
Install the hog rings at the cutouts if they are there.
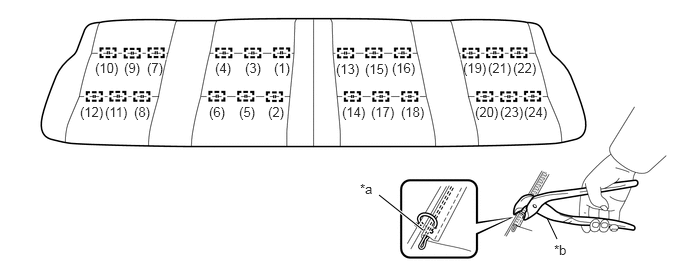
| *a | Cutout | *b | Hog Ring Pliers |
Using hog ring pliers, install the No. 8 seat cushion cover sub-assembly to the No. 8 seat cushion spring assembly with 24 new hog rings in the order shown in the illustration.
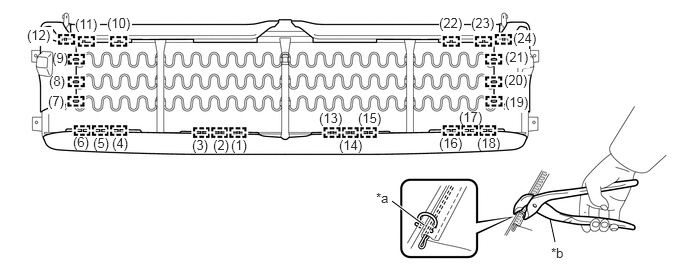
| *a | Cutout | *b | Hog Ring Pliers |
- NOTICE:
- ·
Do not dirty or damage the No. 8 seat cushion cover sub-assembly.
·Be sure to securely install the hog rings as shown in the illustration while preventing wrinkles from forming on the No. 8 seat cushion cover sub-assembly.
- HINT:
-
Install the hog rings at the cutouts if they are there.
73030A
4.INSTALL REAR SEAT LAP TYPE BELT ASSEMBLY RH (w/ Seat Belt)
73040A
5.INSTALL REAR SEAT LAP TYPE BELT ASSEMBLY LH (w/ Seat Belt)
- HINT:
-
Use the same procedure described for the RH side.
73580B
6.INSTALL REAR SEAT INNER BELT ASSEMBLY RH (w/ Seat Belt)
73590A
7.INSTALL REAR SEAT INNER BELT ASSEMBLY LH (w/ Seat Belt)
- HINT:
-
Use the same procedure described for the RH side.
73307
8.INSTALL REAR SEAT INNER BELT SUB-ASSEMBLY (w/ Seat Belt)
79088B
9.INSTALL NO. 8 SEATBACK PAD SUB-ASSEMBLY LH
Install the No. 8 seatback pad sub-assembly LH onto the No. 8 seatback frame sub-assembly LH.
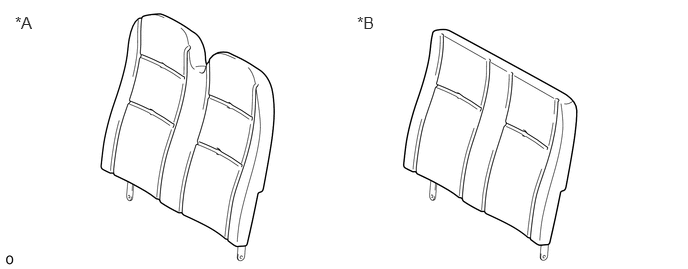
| *A | Middle-back Seat Type | *B | Low-back Seat Type |
79087B
10.INSTALL NO. 8 SEATBACK PAD SUB-ASSEMBLY RH
- HINT:
-
Use the same procedure described for the LH side.
79084
11.INSTALL NO. 8 SEATBACK COVER SUB-ASSEMBLY LH
- HINT:
- ·
When installing the seat cover, refer to the precautions in order to prevent wrinkles from forming.
Click hereVehicle Interior>SEAT>FRONT SEAT ASSEMBLY>PRECAUTION
·Align the seam allowance in a single direction as shown in the illustration.
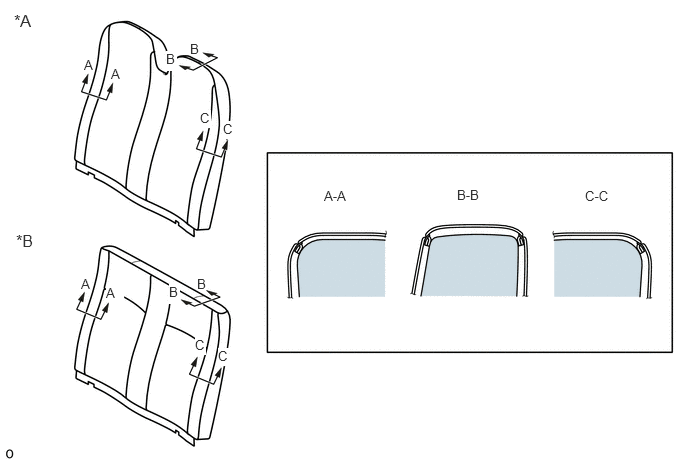 0.146,0.115 0.521,0.354 0.375,0.24 12 false *A 0.167,2.406 0.542,2.646 0.375,0.24 12 false *B 0.875,0.594 1.25,0.833 0.375,0.24 10 false A 1.156,0.688 1.531,0.927 0.375,0.24 10 false A 1.979,0.427 2.354,0.667 0.375,0.24 10 false B 1.729,0.531 1.844,0.74 0.115,0.208 10 true B 2.083,1.146 2.198,1.333 0.115,0.188 10 true C 2.323,1.26 2.438,1.448 0.115,0.188 10 true C 0.844,2.875 1.219,3.115 0.375,0.24 10 false A 1.104,2.969 1.292,3.125 0.188,0.156 10 true A 1.76,2.958 1.875,3.167 0.115,0.208 10 true B 2.052,2.875 2.427,3.115 0.375,0.24 10 false B 2.031,3.51 2.146,3.698 0.115,0.188 10 true C 2.271,3.625 2.385,3.813 0.115,0.188 10 true C 3.375,1.958 3.75,2.198 0.375,0.24 10 false A-A 4.76,1.948 5.135,2.188 0.375,0.24 10 false B-B 6.094,1.958 6.469,2.198 0.375,0.24 10 false C-C
Text in Illustration *A Middle-back Seat Type *B Low-back Seat Type
Set the No. 8 seatback cover sub-assembly LH to the No. 8 seatback pad sub-assembly LH.
for Middle-back Seat Type:
- NOTICE:
- ·
Do not dirty or damage the No. 8 seatback cover sub-assembly.
·Be sure to securely install the hog rings as shown in the illustration while preventing wrinkles from forming on the No. 8 seatback pad sub-assembly.
- HINT:
-
Install the hog rings at the cutouts if they are there.
Using hog ring pliers, install the upper side of the No. 8 seatback cover sub-assembly LH with 6 new hog rings in the order shown in the illustration.
Using hog ring pliers, install the lower side of the No. 8 seatback cover sub-assembly LH with 6 new hog rings in the order shown in the illustration.
for Low-back Seat Type:
Using hog ring pliers, install the No. 8 seatback cover sub-assembly LH with 6 new hog rings in the order shown in the illustration.
- NOTICE:
- ·
Do not dirty or damage the No. 8 seatback cover sub-assembly.
·Be sure to securely install the hog rings as shown in the illustration while preventing wrinkles from forming on the No. 8 seatback pad sub-assembly.
- HINT:
-
Install the hog rings at the cutouts if they are there.
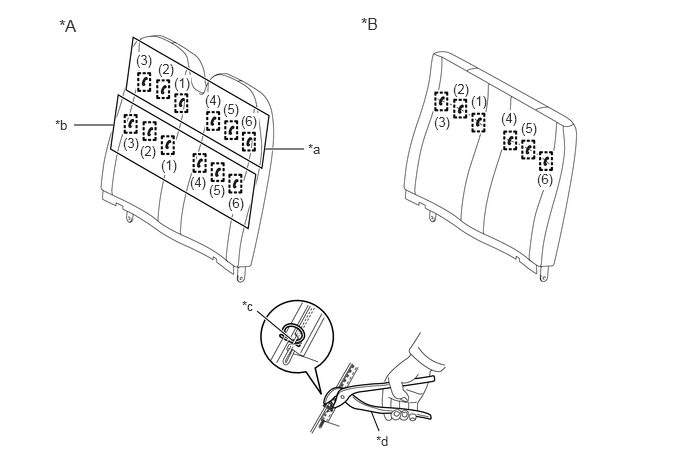
| *A | Middle-back Seat Type | *B | Low-back Seat Type |
| *a | Upper Side Hog Ring | *b | Lower Side Hog Ring |
| *c | Cutout | *d | Hog Ring Pliers |
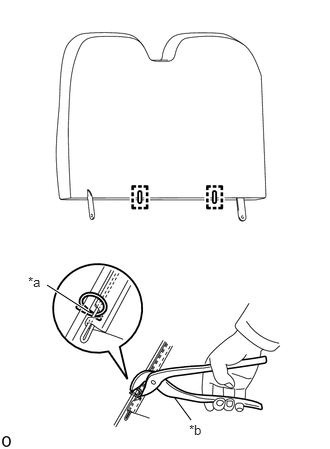
Using hog ring pliers, close the No. 8 seatback cover sub-assembly with 2 new hog rings as shown in the illustration.
| *a | Cutout |
| *b | Hog Ring Pliers |
- NOTICE:
- ·
Do not dirty or damage the No. 8 seatback cover sub-assembly.
·Be sure to securely install the hog rings as shown in the illustration while preventing wrinkles from forming on the No. 8 seatback cover sub-assembly.
- HINT:
-
Install the hog rings at the cutouts if they are there.
79083
12.INSTALL NO. 8 SEATBACK COVER SUB-ASSEMBLY RH
- HINT:
-
Use the same procedure described for the LH side.
79984
13.INSTALL SEATBACK ASSIST BRACKET LH
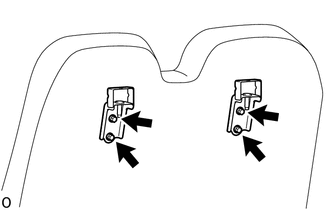
Install the 2 seatback assist bracket LH with the 4 bolts.
- Torque:
42 N*m (428 kgf*cm, 31 ft.*lbf)
79974
14.INSTALL SEATBACK ASSIST BRACKET RH
- HINT:
-
Use the same procedure described for the LH side.