N04C-WA EMISSION CONTROL EXHAUST GAS TEMPERATURE SENSOR INSTALLATION
PROCEDURE

 1.INSTALL NO. 5 EXHAUST GAS TEMPERATURE SENSOR
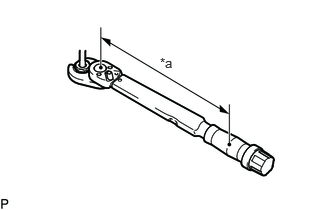
| *a | Torque Wrench Fulcrum Length |
Using a 14 mm union nut wrench, install the No. 5 exhaust gas temperature sensor.
- Torque:
- Specified tightening torque : 30 N*m (306 kgf*cm, 22 ft.*lbf)
- NOTICE:
- ·
If the No. 5 exhaust gas temperature sensor is dropped, replace it with a new one.
·If water or oil is attached to the inside of the connector, do not use the connector.
·Make sure that the sensor installation threads are free of deformation and foreign matter.
·Check that the connector and clamp are securely connected.
·When reusing the No. 5 exhaust gas temperature sensor, clean the threads and apply anti-seize compound before installing it.
- HINT:
- ·
Calculate the torque wrench reading when changing the fulcrum length of the torque wrench.
Click hereGeneral>INTRODUCTION>REPAIR INSTRUCTION>PRECAUTION
·When using a union nut wrench (fulcrum length of 25 mm (0.984 in.)) + torque wrench (fulcrum length of 180 mm (7.09 in.)): 26.3 N*m (268 kgf*cm, 19 ft.*lbf)
Connect the No. 5 exhaust gas temperature sensor connector and attach the clamp.
2.INSTALL NO. 4 EXHAUST GAS TEMPERATURE SENSOR
| *a | Torque Wrench Fulcrum Length |
Using a 14 mm union nut wrench, install the No. 4 exhaust gas temperature sensor.
- Torque:
- Specified tightening torque : 30 N*m (306 kgf*cm, 22 ft.*lbf)
- NOTICE:
- ·
If the No. 4 exhaust gas temperature sensor is dropped, replace it with a new one.
·If water or oil is attached to the inside of the connector, do not use the connector.
·Make sure that the sensor installation threads are free of deformation and foreign matter.
·Check that the connector and clamp are securely connected.
·When reusing the No. 4 exhaust gas temperature sensor, clean the threads and apply anti-seize compound before installing it.
- HINT:
- ·
Calculate the torque wrench reading when changing the fulcrum length of the torque wrench.
Click hereGeneral>INTRODUCTION>REPAIR INSTRUCTION>PRECAUTION
·When using a union nut wrench (fulcrum length of 25 mm (0.984 in.)) + torque wrench (fulcrum length of 180 mm (7.09 in.)): 26.3 N*m (268 kgf*cm, 19 ft.*lbf)
Connect the No. 4 exhaust gas temperature sensor connector and attach the clamp.
3.INSTALL NO. 3 EXHAUST GAS TEMPERATURE SENSOR
| *a | Torque Wrench Fulcrum Length |
Using a 14 mm union nut wrench, install the No. 3 exhaust gas temperature sensor.
- Torque:
- Specified tightening torque : 30 N*m (306 kgf*cm, 22 ft.*lbf)
- NOTICE:
- ·
If the No. 3 exhaust gas temperature sensor is dropped, replace it with a new one.
·If water or oil is attached to the inside of the connector, do not use the connector.
·Make sure that the sensor installation threads are free of deformation and foreign matter.
·Check that the connector and clamp are securely connected.
·When reusing the No. 3 exhaust gas temperature sensor, clean the threads and apply anti-seize compound before installing it.
- HINT:
- ·
Calculate the torque wrench reading when changing the fulcrum length of the torque wrench.
Click hereGeneral>INTRODUCTION>REPAIR INSTRUCTION>PRECAUTION
·When using a union nut wrench (fulcrum length of 25 mm (0.984 in.)) + torque wrench (fulcrum length of 180 mm (7.09 in.)): 26.3 N*m (268 kgf*cm, 19 ft.*lbf)
Connect the No. 3 exhaust gas temperature sensor connector and attach the clamp.
4.INSTALL NO. 2 EXHAUST GAS TEMPERATURE SENSOR
| *a | Torque Wrench Fulcrum Length |
Using a 17 mm union nut wrench, install the No. 2 exhaust gas temperature sensor.
- Torque:
- Specified tightening torque : 30 N*m (306 kgf*cm, 22 ft.*lbf)
- NOTICE:
- ·
If the No. 2 exhaust gas temperature sensor is dropped, replace it with a new one.
·If water or oil is attached to the inside of the connector, do not use the connector.
·Make sure that the sensor installation threads are free of deformation and foreign matter.
·Check that the connector and clamp are securely connected.
·When reusing the No. 2 exhaust gas temperature sensor, clean the threads and apply anti-seize compound before installing it.
- HINT:
- ·
Calculate the torque wrench reading when changing the fulcrum length of the torque wrench.
Click hereGeneral>INTRODUCTION>REPAIR INSTRUCTION>PRECAUTION
·When using a union nut wrench (fulcrum length of 30 mm (1.181 in.)) + torque wrench (fulcrum length of 180 mm (7.09 in.)): 25.7 N*m (262 kgf*cm, 19 ft.*lbf)
Connect the No. 2 exhaust gas temperature sensor connector and attach the clamp.
5.INSTALL EXHAUST GAS TEMPERATURE SENSOR
| *a | Torque Wrench Fulcrum Length |
Using a 14 mm union nut wrench, install the exhaust gas temperature sensor.
- Torque:
- Specified tightening torque : 30 N*m (306 kgf*cm, 22 ft.*lbf)
- NOTICE:
- ·
If the exhaust gas temperature sensor is dropped, replace it with a new one.
·If water or oil is attached to the inside of the connector, do not use the connector.
·Make sure that the sensor installation threads are free of deformation and foreign matter.
·Check that the connector and clamp are securely connected.
·When reusing the exhaust gas temperature sensor, clean the threads and apply anti-seize compound before installing it.
- HINT:
- ·
Calculate the torque wrench reading when changing the fulcrum length of the torque wrench.
Click hereGeneral>INTRODUCTION>REPAIR INSTRUCTION>PRECAUTION
·When using a union nut wrench (fulcrum length of 25 mm (0.984 in.)) + torque wrench (fulcrum length of 180 mm (7.09 in.)): 26.3 N*m (268 kgf*cm, 19 ft.*lbf)
Connect the exhaust gas temperature sensor connector and attach the 4 clamps.
6.INSTALL EXHAUST GAS TEMPERATURE SENSOR (for EGR Cooler Side)
| *a | Torque Wrench Fulcrum Length |
Using a 14 mm union nut wrench, install the exhaust gas temperature sensor (for EGR Cooler Side).
- Torque:
- Specified tightening torque : 30 N*m (306 kgf*cm, 22 ft.*lbf)
- NOTICE:
- ·
If the exhaust gas temperature sensor (for EGR Cooler Side) is dropped, replace it with a new one.
·If water or oil is attached to the inside of the connector, do not use the connector.
·Make sure that the sensor installation threads are free of deformation and foreign matter.
·Check that the connector and clamp are securely connected.
·When reusing the exhaust gas temperature sensor (for EGR cooler side), clean the threads and apply anti-seize compound before installing it.
- HINT:
- ·
Calculate the torque wrench reading when changing the fulcrum length of the torque wrench.
Click hereGeneral>INTRODUCTION>REPAIR INSTRUCTION>PRECAUTION
·When using a union nut wrench (fulcrum length of 25 mm (0.984 in.)) + torque wrench (fulcrum length of 180 mm (7.09 in.)): 26.3 N*m (268 kgf*cm, 19 ft.*lbf)
Connect the exhaust gas temperature sensor connector (for EGR Cooler Side) and attach the clamp.
58420
7.INSTALL NO. 2 ENGINE SERVICE HOLE COVER ASSEMBLY
58734B
8.INSTALL REAR ENGINE SERVICE COVER WEATHERSTRIP
58410
9.INSTALL ENGINE SERVICE HOLE COVER
58521D
10.INSTALL ENGINE SERVICE HOLE COVER MAT