AIR CONDITIONING CONDENSER(except 1BZ-FPE) INSTALLATION
PROCEDURE

 88450
1.INSTALL CONDENSER ASSEMBLY WITH RECEIVER
Install the condenser assembly with receiver with the 6 bolts.
- NOTICE:
-
Installing the condenser assembly with receiver to the vehicle must be performed by multiple people.
for Front Side:
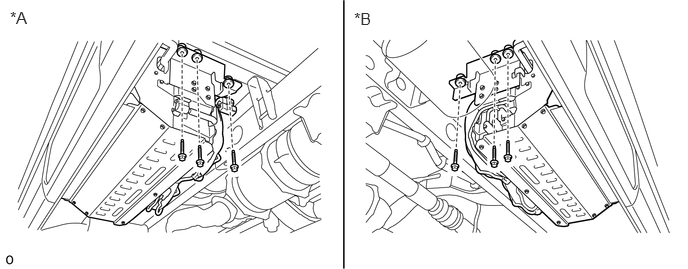
| *A | for RHD | *B | for LHD |
for Rear Side:
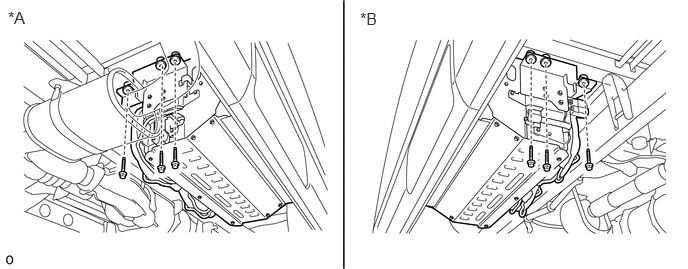
| *A | for RHD | *B | for LHD |
Connect the 2 connectors.
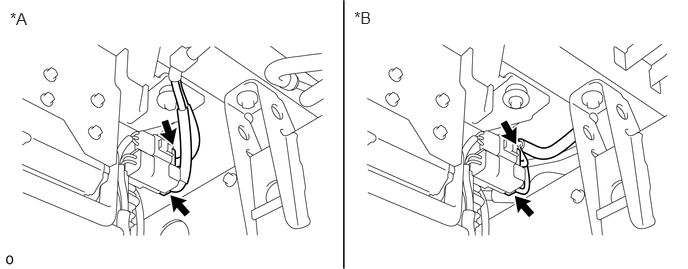
| *A | for RHD | *B | for LHD |
88415L
2.INSTALL NO. 8 DUST COVER
for Front Side:
Install the No. 8 dust cover with the 3 clips in the order shown in the illustration.
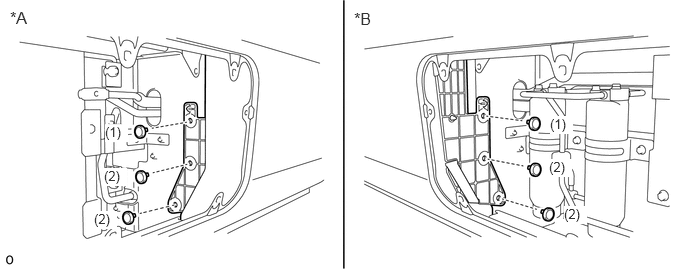
| *A | for RHD | *B | for LHD |
for Rear Side:
Install the No. 8 dust cover with the 3 clips in the order shown in the illustration.
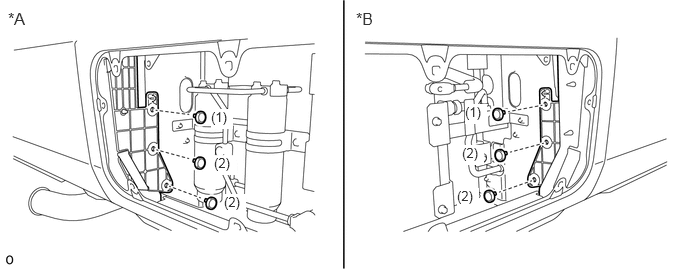
| *A | for RHD | *B | for LHD |
59401
3.INSTALL COOLER CONDENSER COVER SUB-ASSEMBLY
Install the cooler condenser cover sub-assembly with the 8 screws.
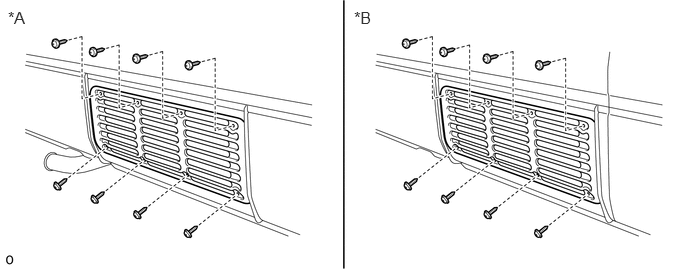
| *A | for RHD | *B | for LHD |
88711
4.CONNECT NO. 1 COOLER REFRIGERANT DISCHARGE HOSE (for RHD, N04C Series Engine)
Remove the vinyl tape wrapped around the connection of the discharge tube K and No. 1 cooler refrigerant discharge hose.
Sufficiently apply compressor oil to a new O-ring and the fitting surface of the discharge tube K and No. 1 cooler refrigerant discharge hose.
- Compressor Oil:
ND-OIL 8 or equivalent
- NOTICE:
-
Do not use any compressor oil other than ND-OIL 8 or equivalent. If any compressor oil other than ND-OIL 8 or equivalent is used, compressor motor insulation performance may decrease, resulting in leakage of electric power.
Install the O-ring to the No. 1 cooler refrigerant discharge hose.
- NOTICE:
-
Keep the O-rings and O-ring fitting surfaces free from foreign matter.
Using SST, tighten the nut and connect the No. 1 cooler refrigerant discharge hose.
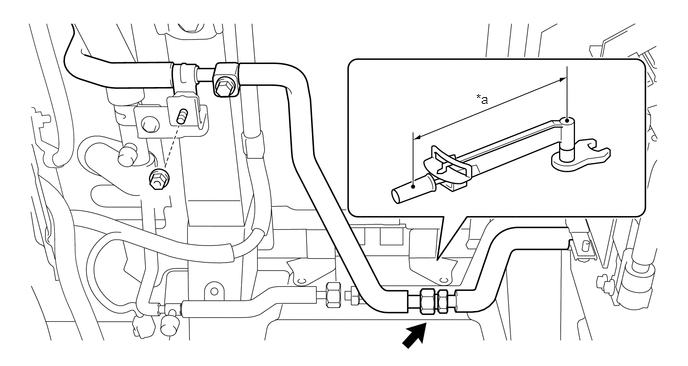
| *a | Torque Wrench Fulcrum Length | - | - |
- SST
- 09617-22010 (09617-24011)
- NOTICE:
- ·
Do not apply excessive force to the No. 1 cooler refrigerant discharge hose.
·Make sure not to cut the O-ring while installing it. (Cut O-rings cannot be installed)
- Torque:
- Specified tightening torque : 22.5 N*m (229 kgf*cm, 17 ft.*lbf)
- HINT:
- ·
Calculate the torque wrench reading when changing the fulcrum length of the torque wrench.
Click hereGeneral>INTRODUCTION>REPAIR INSTRUCTION>PRECAUTION
·When using SST (fulcrum length of 52.5 mm (2.07 in.)) + torque wrench (fulcrum length of 180 mm (7.09 in.)): 17.4 N*m (177 kgf*cm, 13 ft.*lbf)
Install the nut.
88715G
5.CONNECT DISCHARGE TUBE G
Remove the vinyl tape wrapped around the connection of the discharge tube K and discharge tube G.
Sufficiently apply compressor oil to a new O-ring and the fitting surface of the discharge tube K and discharge tube G.
- Compressor Oil:
ND-OIL 8 or equivalent
- NOTICE:
-
Do not use any compressor oil other than ND-OIL 8 or equivalent. If any compressor oil other than ND-OIL 8 or equivalent is used, compressor motor insulation performance may decrease, resulting in leakage of electric power.
Install the O-ring to the discharge tube G.
- NOTICE:
-
Keep the O-rings and O-ring fitting surfaces free from foreign matter.
for RHD, 1HZ:
Using SST, tighten the nut and connect the discharge tube G.
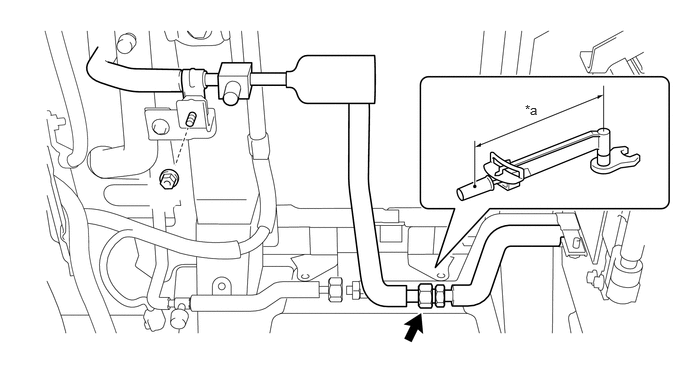
| *a | Torque Wrench Fulcrum Length | - | - |
- SST
- 09617-22010 (09617-24011)
- NOTICE:
- ·
Do not apply excessive force to the discharge tube G.
·Make sure not to cut the O-ring while installing it. (Cut O-rings cannot be installed)
- Torque:
- Specified tightening torque : 22.5 N*m (229 kgf*cm, 17 ft.*lbf)
- HINT:
- ·
Calculate the torque wrench reading when changing the fulcrum length of the torque wrench.
Click hereGeneral>INTRODUCTION>REPAIR INSTRUCTION>PRECAUTION
·When using SST (fulcrum length of 52.5 mm (2.07 in.)) + torque wrench (fulcrum length of 180 mm (7.09 in.)): 17.4 N*m (177 kgf*cm, 13 ft.*lbf)
Install the nut.
for LHD, N04C Series Engine:
Using SST, tighten the nut and connect the discharge tube G.
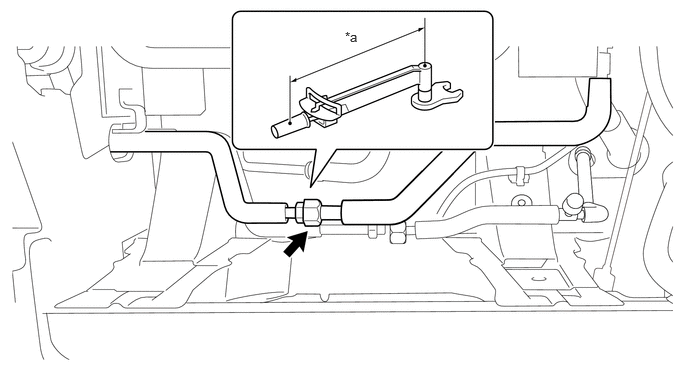
| *a | Torque Wrench Fulcrum Length | - | - |
- SST
- 09617-22010 (09617-24011)
- NOTICE:
- ·
Do not apply excessive force to the discharge tube G.
·Make sure not to cut the O-ring while installing it. (Cut O-rings cannot be installed)
- Torque:
- Specified tightening torque : 22.5 N*m (229 kgf*cm, 17 ft.*lbf)
- HINT:
- ·
Calculate the torque wrench reading when changing the fulcrum length of the torque wrench.
Click hereGeneral>INTRODUCTION>REPAIR INSTRUCTION>PRECAUTION
·When using SST (fulcrum length of 52.5 mm (2.07 in.)) + torque wrench (fulcrum length of 180 mm (7.09 in.)): 17.4 N*m (177 kgf*cm, 13 ft.*lbf)
88715J
6.CONNECT DISCHARGE TUBE J (for LHD, 1HZ, 2TR-FE)
Remove the vinyl tape wrapped around the connection of the discharge tube K and discharge tube J.
Sufficiently apply compressor oil to a new O-ring and the fitting surface of the discharge tube K and discharge tube J.
- Compressor Oil:
ND-OIL 8 or equivalent
- NOTICE:
-
Do not use any compressor oil other than ND-OIL 8 or equivalent. If any compressor oil other than ND-OIL 8 or equivalent is used, compressor motor insulation performance may decrease, resulting in leakage of electric power.
Install the O-ring to the discharge tube J.
- NOTICE:
-
Keep the O-rings and O-ring fitting surfaces free from foreign matter.
Using SST, tighten the nut and connect the discharge tube J.
| *a | Torque Wrench Fulcrum Length | - | - |
- SST
- 09617-22010 (09617-24011)
- NOTICE:
- ·
Do not apply excessive force to the discharge tube J.
·Make sure not to cut the O-ring while installing it. (Cut O-rings cannot be installed)
- Torque:
- Specified tightening torque : 22.5 N*m (229 kgf*cm, 17 ft.*lbf)
- HINT:
- ·
Calculate the torque wrench reading when changing the fulcrum length of the torque wrench.
Click hereGeneral>INTRODUCTION>REPAIR INSTRUCTION>PRECAUTION
·When using SST (fulcrum length of 52.5 mm (2.07 in.)) + torque wrench (fulcrum length of 180 mm (7.09 in.)): 17.4 N*m (177 kgf*cm, 13 ft.*lbf)
88716E
7.CONNECT COOLER REFRIGERANT LIQUID PIPE E
Remove the vinyl tape wrapped around the connection of the liquid pipe sub-assembly and cooler refrigerant liquid pipe E.
Sufficiently apply compressor oil to a new O-ring and the fitting surface of the liquid pipe sub-assembly and discharge tube E.
Install the O-ring to the cooler refrigerant liquid pipe E.
- NOTICE:
-
Keep the O-rings and O-ring fitting surfaces free from foreign matter.
Using a union nut wrench 19 mm, tighten the nut and connect the cooler refrigerant liquid pipe E.
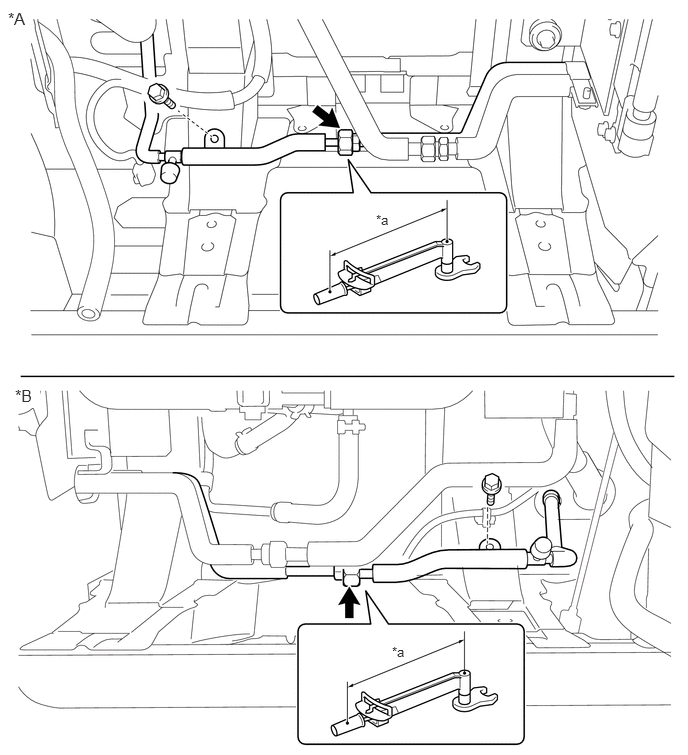
| *A | for RHD | *B | for LHD |
| *a | Torque Wrench Fulcrum Length | - | - |
- NOTICE:
- ·
Do not apply excessive force to the cooler refrigerant liquid pipe E.
·Make sure not to cut the O-ring while installing it. (Cut O-rings cannot be installed)
- Torque:
- Specified tightening torque : 13.5 N*m (138 kgf*cm, 10 ft.*lbf)
- HINT:
- ·
Calculate the torque wrench reading when changing the fulcrum length of the torque wrench.
Click hereGeneral>INTRODUCTION>REPAIR INSTRUCTION>PRECAUTION
·When using a union nut wrench (fulcrum length of 30 mm (1.18 in.)) + torque wrench (fulcrum length of 162 mm (6.38 in.)): 11.4 N*m (116 kgf*cm, 8 ft.*lbf)
Install the bolt.
8. CHARGE REFRIGERANT
9. WARM UP ENGINE
10.INSPECT FOR REFRIGERANT LEAK