N04C-VL COOLING RADIATOR INSTALLATION
PROCEDURE

 16400B
1.INSTALL RADIATOR DRAIN COCK PLUG
Install the radiator drain cock plug to the radiator assembly.
- Torque:
2.0 N*m (20 kgf*cm, 18 in.*lbf)
- NOTICE:
-
Replace the O-ring if it is damaged.
16520
2.INSTALL WATER FILLER ASSEMBLY
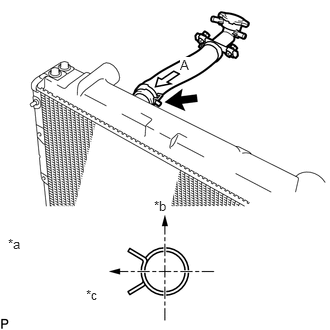
Install the water filler assembly with the hose clamp.
| *a | View A |
| *b | Upper Side |
| *c | LH Side |
- HINT:
-
Perform the installation with the hose clamp at the correct angle.
16571
3.INSTALL INLET RADIATOR HOSE
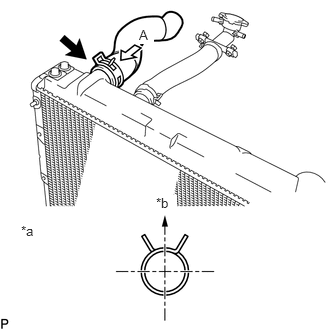
Install the inlet radiator hose with the hose clamp.
| *a | View A |
| *b | Upper Side |
- HINT:
-
Perform the installation with the hose clamp at the correct angle.
17940D
4.INSTALL INTERCOOLER ASSEMBLY
16400
5.INSTALL RADIATOR ASSEMBLY
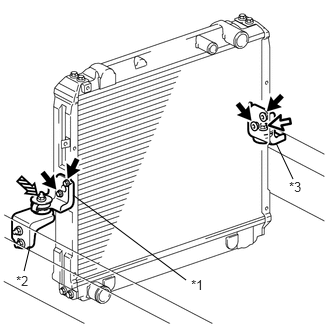
Install the radiator assembly with intercooler assembly to the vehicle.
| *1 | No. 1 Radiator Bracket |
| *2 | No. 2 Radiator Bracket |
| *3 | No. 3 Radiator Bracket |

|
Bolt A |

|
Bolt B |

|
Nut |
Install the No. 2 radiator bracket with the 2 bolts.
- Torque:
20 N*m (204 kgf*cm, 15 ft.*lbf)
Install the No. 1 radiator bracket with the 2 bolts and nut.
- Torque:
- Bolt A:
18 N*m (184 kgf*cm, 13 ft.*lbf)
- Nut:
20 N*m (204 kgf*cm, 15 ft.*lbf)
Install the No. 3 radiator bracket with the 3 bolts.
- Torque:
- Bolt A:
18 N*m (184 kgf*cm, 13 ft.*lbf)
- Bolt B:
12 N*m (122 kgf*cm, 9 ft.*lbf)
Engage the 3 hose clamps.
Connect the vacuum transmitting hose.
53167
6.INSTALL RADIATOR BRACE ROD RH
Install the radiator brace rod RH with the bolt and nut.
- Torque:
- Bolt:
18 N*m (184 kgf*cm, 13 ft.*lbf)
- Nut:
20 N*m (204 kgf*cm, 15 ft.*lbf)
53168
7.INSTALL RADIATOR BRACE ROD LH
Install the radiator brace rod LH with the bolt and nut.
- Torque:
- Bolt:
18 N*m (184 kgf*cm, 13 ft.*lbf)
- Nut:
20 N*m (204 kgf*cm, 15 ft.*lbf)
16520
8.INSTALL WATER FILLER ASSEMBLY
Install the water filler assembly with the 2 bolts.
- Torque:
7.5 N*m (76 kgf*cm, 66 in.*lbf)
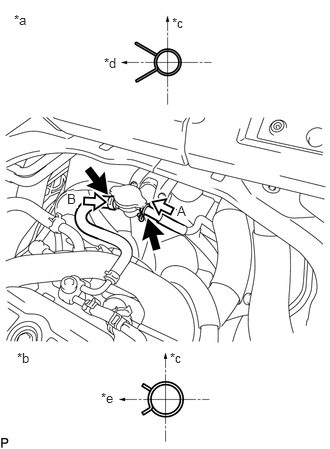
Connect the radiator reserve tank hose and water by-pass hose with the clamp and clip.
| *a | View A |
| *b | View B |
| *c | Upper Side |
| *d | Rear Side |
| *e | Front Side |
- HINT:
-
Perform the installation with the hose clamp at the correct angle.
16571
9.CONNECT INLET RADIATOR HOSE
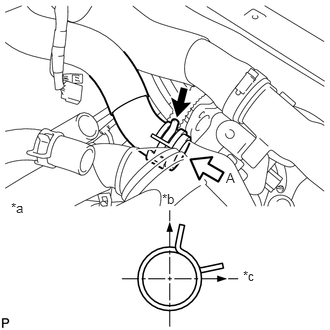
Connect the inlet radiator hose with the hose clamp.
| *a | View A |
| *b | Upper Side |
| *c | RH Side |
- HINT:
-
Perform the installation with the hose clamp at the correct angle.
17342F
10.CONNECT NO. 2 INTERCOOLER AIR HOSE
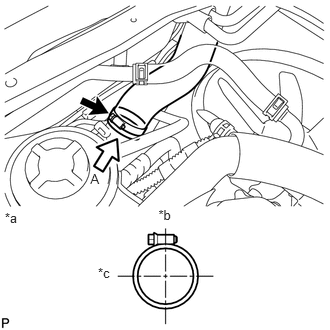
Connect the No. 2 intercooler air hose with the hose clamp.
| *a | View A |
| *b | Upper Side |
| *c | LH Side |
- HINT:
-
Perform the installation with the hose clamp at the correct angle.
- Torque:
6.5 N*m (66 kgf*cm, 58 in.*lbf)
17341K
11.CONNECT INTERCOOLER AIR HOSE
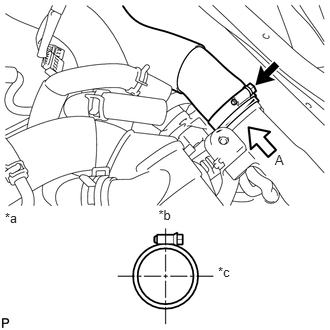
Connect the intercooler air hose with the hose clamp.
| *a | View A |
| *b | Upper Side |
| *c | RH Side |
- HINT:
-
Perform the installation with the hose clamp at the correct angle.
- Torque:
6.5 N*m (66 kgf*cm, 58 in.*lbf)
16701
12.INSTALL FAN SHROUD SUB-ASSEMBLY