N04C-VL COOLING FAN INSTALLATION
PROCEDURE

 16371
1.INSTALL FAN PULLEY
Install the fan pulley to the water pump assembly.
16210
2.INSTALL FLUID COUPLING ASSEMBLY
Install the fan onto the fluid coupling with the 4 nuts.
- Torque:
11 N*m (112 kgf*cm, 8 ft.*lbf)
16701
3.INSTALL FAN SHROUD SUB-ASSEMBLY
Temporarily install the fan shroud sub-assembly together with the fluid coupling assembly.
- NOTICE:
-
Be careful not to damage the radiator core.
Install the fan shroud sub-assembly with the 4 bolts.
- Torque:
5.0 N*m (51 kgf*cm, 44 in.*lbf)
Install the fan fluid coupling assembly with the 4 nuts.
- Torque:
29 N*m (291 kgf*cm, 21 ft.*lbf)
Install the fan and generator V belt.
(Click hereEngine / Hybrid System>N04C-VL (ENGINE MECHANICAL)>DRIVE BELT>INSTALLATION)
Engage the 3 hose clamps and install the radiator reserve tank hose.
Engage the hose clamp and install the intercooler air hose.
16361A
4.INSPECT FAN AND GENERATOR V BELT
16572
5.CONNECT OUTLET RADIATOR HOSE
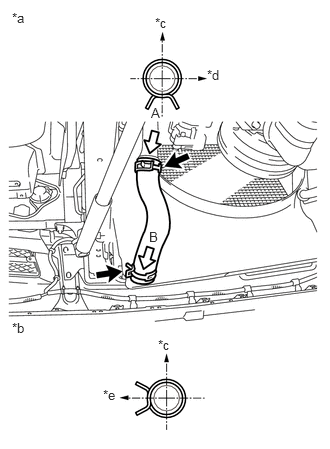
Connect the outlet radiator hose to the radiator assembly and outlet pipe with the 2 hose clamps.
| *a | View A |
| *b | View B |
| *c | Upper Side |
| *d | RH Side |
| *e | LH Side |
- HINT:
-
Perform the installation with the clip at the correct angle.
88320
6.INSTALL COOLER COMPRESSOR ASSEMBLY (w/ Air Conditioning System)
88310A
7.INSTALL V (COOLER COMPRESSOR TO CRANKSHAFT PULLEY) BELT NO.1 (w/ Air Conditioning System)
88310A
8.INSPECT V (COOLER COMPRESSOR TO CRANKSHAFT PULLEY) BELT NO.1 (w/ Air Conditioning System)
58701A
9.INSTALL FRONT ENGINE SERVICE COVER PANEL SUB-ASSEMBLY
Install the front engine service cover panel sub-assembly with the 3 bolts.
- Torque:
8.0 N*m (82 kgf*cm, 71 in.*lbf)
33503F
10.INSTALL FLOOR SHIFT SHIFT LEVER SUB-ASSEMBLY
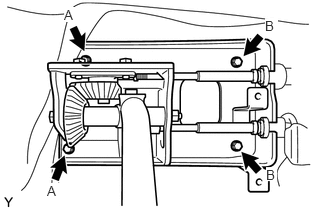
Install the floor shift shift lever sub-assembly with the 4 bolts.
- Torque:
- for Bolt A:
7.5 N*m (76 kgf*cm, 66 in.*lbf)
- for Bolt B:
12 N*m (122 kgf*cm, 9 ft.*lbf)
33820B
11.CONNECT TRANSMISSION CONTROL CABLE ASSEMBLY
Connect the transmission control select cable and transmission control shift cable with the nut, 2 new clips and the clip.
- Torque:
15 N*m (153 kgf*cm, 11 ft.*lbf)
Connect the shift wire clamp to the front engine service cover panel sub-assembly with the nut.
- Torque:
12 N*m (122 kgf*cm, 9 ft.*lbf)
58286
12.INSTALL NO. 1 SHIFT AND SELECT LEVER BOOT
Install the No. 1 shift and select lever boot with the 4 bolts.
- Torque:
8.0 N*m (82 kgf*cm, 71 in.*lbf)
Install the shift knob.
58534A
13.INSTALL TRANSMISSION COVER MAT
Install the transmission cover mat.
58420
14.INSTALL NO. 2 ENGINE SERVICE HOLE COVER ASSEMBLY
Install the No. 2 engine service hole cover assembly.
58521D
15.INSTALL ENGINE SERVICE HOLE COVER MAT
Install the engine service hole cover mat.
58734B
16.INSTALL REAR ENGINE SERVICE COVER WEATHERSTRIP
Install the rear engine service cover weatherstrip.
58410
17.INSTALL ENGINE SERVICE HOLE COVER
Attach the 2 guides and 2 catch hooks and install the engine service hole cover.
18.ADD ENGINE COOLANT
19.INSPECT FOR COOLANT LEAK
51441D
20.INSTALL NO. 1 ENGINE UNDER COVER
21.CONNECT CABLE TO NEGATIVE BATTERY TERMINAL
- Torque:
3.9 N*m (40 kgf*cm, 35 in.*lbf)