N04C-UH ENGINE CONTROL DIESEL THROTTLE BODY INSTALLATION
PROCEDURE

 26100
1.INSTALL VENTURI ASSEMBLY
Remove any seal packing material from the contact surface.
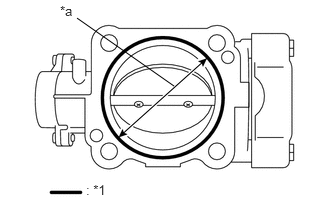
Apply a continuous bead of seal packing (width: 1.5 to 2.5 mm (0.059 to 0.098 in.)) as shown in the illustration.
| *1 | Seal Packing |
| *a | 70 mm (2.75 in.) |
- Seal packing:
Toyota Genuine Seal Packing Black, Three Bond 1207B or equivalent
- NOTICE:
- ·
Remove any oil from contact surface.
·Apply seal packing to the inner side of the bolt holes.
·Install the venturi assembly within 3 minutes of applying the seal packing.
·Do not run the engine for at least 2 hours after installing.
Install the venturi assembly with the 4 nuts onto the intake pipe.
- Torque:
29 N*m (291 kgf*cm, 21 ft.*lbf)
17113
2.INSTALL INTAKE PIPE WITH VENTURI ASSEMBLY
Remove any seal packing material from the contact surface.
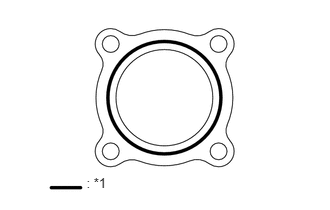
Apply a continuous bead of seal packing (width: 1.5 to 2.5 mm(0.059 to 0.098 in. )) as shown in the illustration.
| *1 | Seal Packing |
- Seal packing:
Toyota Genuine Seal Packing Black, Three Bond 1207B or equivalent
- NOTICE:
- ·
Remove any oil from contact surface.
·Apply seal packing to the inner side of the bolt holes.
·Install the venturi assembly within 3 minutes of applying the seal packing.
·Do not run the engine for at least 2 hours after installing.
Install the intake pipe with venturi assembly with the 2 nuts and 2 bolts.
- Torque:
29 N*m (291 kgf*cm, 21 ft.*lbf)
Install the oil level dipstick guide with the bolt.
- Torque:
29 N*m (291 kgf*cm, 21 ft.*lbf)
Connect the vacuum hose to the intake pipe.
Connect the diesel throttle position sensor connector and the throttle control motor connector.
17342P
3.INSTALL NO. 2 AIR HOSE
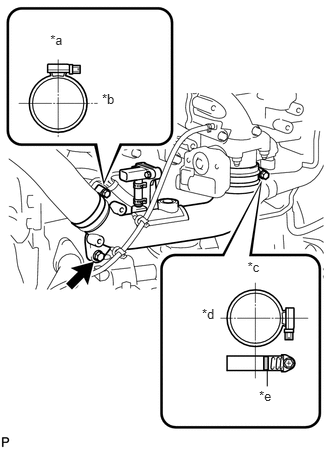
Connect the No. 2 air hose and install the bolt.
| *a | Upper Side |
| *b | Outside |
| *c | Inside |
| *d | Front Side |
| *e | Paint Mark |
- Torque:
18 N*m (184 kgf*cm, 13 ft.*lbf)
Tighten the hose clamp (intercooler air hose side), as shown in the illustration.
Tighten the hose clamp (venturi side) until its end portion is overlapped to the paint mark.
Connect the connector and the 2 hose clamps.
53712C
4.INSTALL FRONT FENDER APRON LH
Install the front fender apron LH with the 6 bolts.
- Torque:
7.0 N*m (71 kgf*cm, 62 in.*lbf)
51441D
5.INSTALL NO. 1 ENGINE UNDER COVER (for Plastic Type)
51441D
6.INSTALL NO. 1 ENGINE UNDER COVER (for Metal Type)
51459
7.INSTALL ENGINE SIDE COVER STAY (for TCAP Made)
58701A
8.INSTALL FRONT ENGINE SERVICE COVER PANEL SUB-ASSEMBLY
33504F
9.INSTALL SHIFT LEVER SUB-ASSEMBLY
33820B
10.CONNECT TRANSMISSION CONTROL CABLE ASSEMBLY
33531B
11.INSTALL SHIFT AND SELECT LEVER SHAFT DUST BOOT
58534A
12.INSTALL TRANSMISSION COVER MAT
58420
13.INSTALL NO. 2 ENGINE SERVICE HOLE COVER ASSEMBLY
58521D
14.INSTALL ENGINE SERVICE HOLE COVER MAT
58734B
15.INSTALL ENGINE SERVICE COVER REAR WEATHERSTRIP
58410
16.INSTALL ENGINE SERVICE HOLE COVER