U660E AUTOMATIC TRANSMISSION / TRANSAXLE AUTOMATIC TRANSAXLE FLUID ADJUSTMENT
CAUTION / NOTICE / HINT
- NOTICE:
- ·
The U660E transaxle requires Toyota Genuine ATF WS.
·Keep the vehicle level when it is lifted up. Allowable inclination angle is +/- 1°.
·Turn all electrical systems off before performing the following operations.
·If the engine has been operated recently and it is hot, wait until the engine coolant temperature becomes the same as the ambient temperature before proceeding to the next procedure.
PROCEDURE

 1. FILL TRANSAXLE WITH FLUID
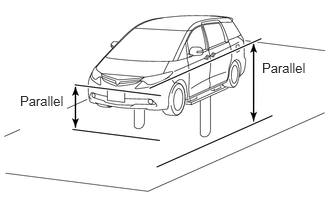
Lift the vehicle.
- NOTICE:
-
Make sure that the vehicle inclination angle is +/- 1° with the vehicle lifted up.
Remove the No. 2 engine under cover.
Remove the No. 3 engine under cover.
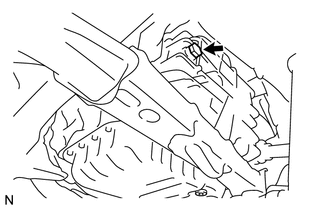
Remove the refill plug and gasket from the automatic transaxle.
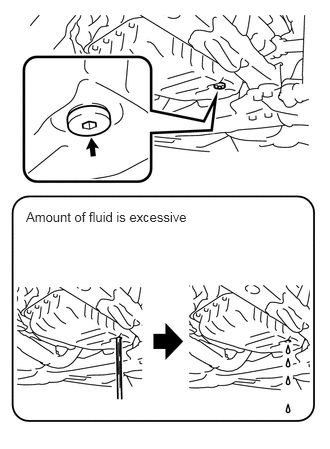
Using a 6 mm socket hexagon wrench, remove the overflow plug and gasket from the automatic transaxle.
- NOTICE:
-
If ATF comes out after removing the overflow plug, wait until the fluid flow slows and only drips come out.
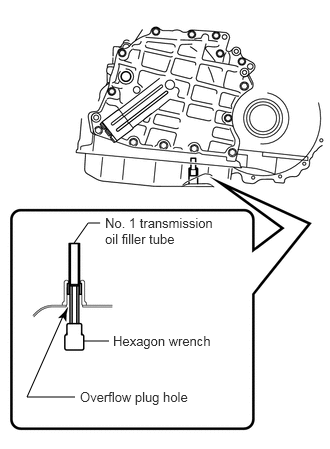
Using a 6 mm socket hexagon wrench, check that the No. 1 transmission oil filler tube is tightened to the specified torque.
- Torque:
- 1.7 N*m (17 kgf*cm, 15 in.*lbf)
- NOTICE:
-
If the No. 1 transmission oil filler tube is not tightened to the specified torque, the amount of fluid cannot be adjusted precisely.
- HINT:
-
To check the torque of the No. 1 transmission oil filler tube, insert the hexagon socket into the overflow hole.
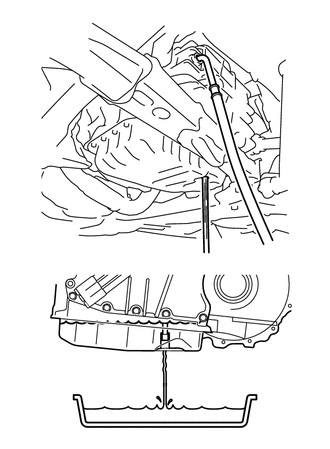
Fill the transaxle with fluid through the refill hole if no fluid comes out of the overflow hole after the overflow plug is removed.
- NOTICE:
- ·
Do not perform this step if fluid comes out after removing the overflow plug.
·Use Toyota Genuine ATF WS.
·Add transaxle fluid until fluid comes out of the overflow hole.
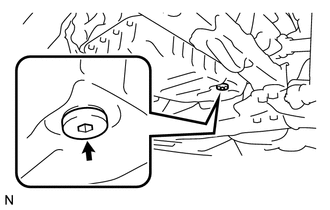
Using a 6 mm socket hexagon wrench, temporarily install the gasket and overflow plug to the automatic transaxle.
- HINT:
-
Reuse the old gasket. The plug will be removed again to adjust the fluid level.
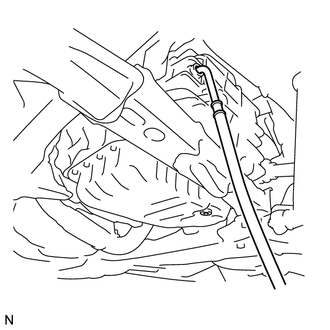
Fill the transaxle with the correct amount of fluid through the refill hole as specified in the table below.
| Operation that was performed | Amount of fluid to be added |
|---|---|
| Removal and installation of oil cooler and cooler hoses | 2.8 liters (3.0 US qts, 2.5 lmp. qts) |
| Repair of fluid leaks | 2.8 liters (3.0 US qts, 2.5 lmp. qts) |
| Removal and installation of oil pan or drive shaft assembly, or replacement of an oil seal | 2.8 liters (3.0 US qts, 2.5 lmp. qts) |
| Replacement of automatic transaxle assembly (in the event the torque converter assembly was reused) | 2.9 liters (3.1 US qts, 2.6 lmp. qts) |
| Removal and installation of transmission valve body assembly | 3.2 liters (3.4 US qts, 2.8 lmp. qts) |
| Removal and installation of torque converter assembly | 4.8 liters (5.1 US qts, 4.2 lmp. qts) |
| Replacement of automatic transaxle assembly (in the event a new torque converter assembly was used) | 4.8 liters (5.1 US qts, 4.2 lmp. qts) |
Temporarily install the gasket and refill plug to the automatic transaxle.
- HINT:
-
Reuse the old gasket. The plug will be removed again to adjust the fluid level.
Lower the vehicle.
2. ADJUST FLUID LEVEL
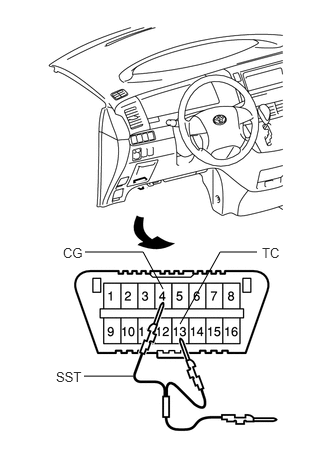
Using SST, connect terminals 13 (TC) and 4 (CG) of the DLC3 with the engine switch off.
- SST
- 09843-18040
- HINT:
-
The intelligent tester can also be used to connect the terminals instead of performing the above procedure. If using the intelligent tester, select the following menu items: Powertrain / ECT / Active Test / TC and E1.
Start the engine.
- NOTICE:
-
Check that electrical systems such as the air conditioning system and audio system are off.
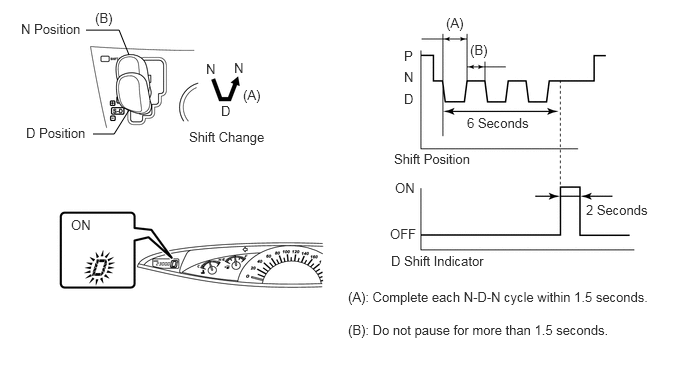
Depress the brake pedal and slowly move the shift lever from P to D, then back to P.
Move the shift lever from P to N.
Move the shift lever in cycles of N-D-N, completing each cycle within 1.5 seconds and repeating for 6 seconds or more.
- NOTICE:
-
Do not pause for more than 1.5 seconds.
- HINT:
- ·
Performing the operation will automatically cause the vehicle to enter fluid temperature detection mode.
·When the fluid temperature detection mode is activated, the D shift indicator on the combination meter comes on for 2 seconds.
·In the fluid temperature detection mode, the ATF temperature range is indicated by the D shift indicator.
·The actual ATF temperature can be checked on the data list using the intelligent tester.
Move the shift lever from N to P.
Remove SST from terminals 13 (TC) and 4 (CG).
- SST
- 09843-18040
- NOTICE:
-
Failure to disconnect SST from terminals TC and CG will prevent the fluid amount from being accurately adjusted.
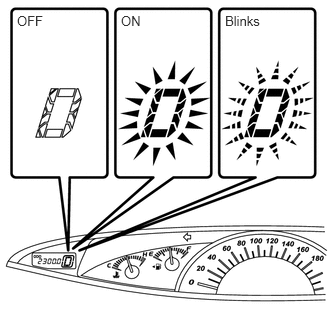
Allow the engine to idle until the D shift indicator comes on again.
| Below Normal Operating Temperature
(40°C or less) (104°F or less) |
Normal Operating Temperature
(40 to 45°C) (104 to 113°F) |
Above Normal Operating Temperature
(45°C or more) (113°F or more) |
|---|---|---|
| OFF | ON | Blinks |
- NOTICE:
- ·
If the indicator blinks, stop the engine and wait until the engine coolant temperature becomes the same as the ambient temperature. Then perform the "ADJUST FLUID LEVEL" procedure again from the beginning.
·Keep the engine idling to increase the fluid temperature.
- HINT:
-
When the D shift indicator comes on, the electric fan(s) will start operating to slow the rate of fluid temperature increase.
Lift the vehicle.
- NOTICE:
-
Make sure that the vehicle inclination angle is +/- 1° with the vehicle lifted up.
Using a 6 mm socket hexagon wrench, remove the overflow plug and gasket.
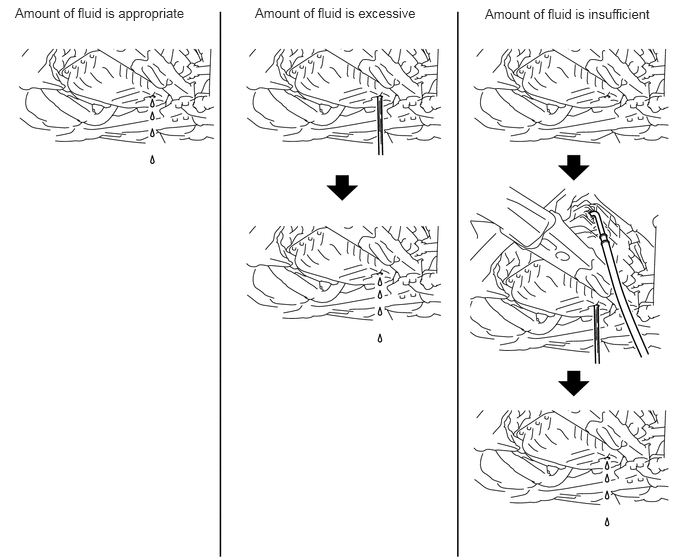
When the D shift indicator is on, adjust the amount of fluid so that the fluid drips out of the overflow hole.
- NOTICE:
- ·
The electric fan(s) will operate. Keep away from the fan(s) during fluid level adjustment to prevent injury.
·If the D shift indicator starts blinking during adjustment, stop the engine and wait until the engine coolant temperature becomes the same as the ambient temperature. Then perform the "ADJUST FLUID LEVEL" procedure again from the beginning.
- HINT:
- ·
If the amount of fluid that comes out of the overflow hole is large, wait until the fluid flow slows and only drips come out.
·If no fluid comes out of the overflow hole, remove the refill plug and gasket. Then add transaxle fluid through the refill hole until fluid comes out of the overflow hole. Wait until the fluid flow slows and only drips come out.
Install a new gasket and the overflow plug to the automatic transaxle.
- Torque:
- 40 N*m (408 kgf*cm, 30 ft.*lbf)
Remove the refill plug and gasket.
Install a new gasket and the refill plug to the automatic transaxle.
- Torque:
- 49 N*m (500 kgf*cm, 36 ft.*lbf)
Install the No. 3 engine under cover.
Install the No. 2 engine under cover.
Lower the vehicle.