AIR CONDITIONING AIR CONDITIONING SYSTEM B1423/23 Pressure Sensor Circuit
DESCRIPTION
This DTC is output when the refrigerant pressure is either extremely low (0.19 MPa [2.0 kgf/cm2, 28 psi] or less) or extremely high (3.14 MPa [32.0 kgf/cm2, 455 psi] or more). The air conditioning pressure sensor, which is installed on the pipe of the high pressure side, detects the refrigerant pressure and sends refrigerant pressure signals to the air conditioning amplifier. The air conditioning amplifier determines the pressure from the signals in accordance with the sensor characteristics, and controls the compressor accordingly.
| DTC No. | DTC Detection Condition | Trouble Area |
|---|---|---|
| B1423/23 | Open or short in air conditioning pressure sensor circuit | ·
Air conditioning pressure sensor ·
Wire harness between air conditioning pressure sensor and air conditioning amplifier ·
Air conditioning amplifier |
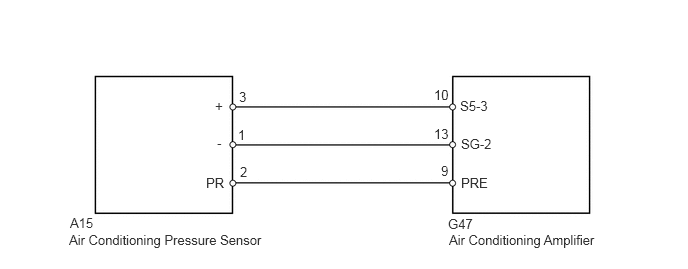
WIRING DIAGRAM
PROCEDURE
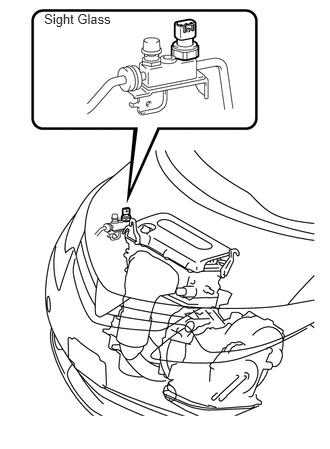
Check the sight glass of the cooler unit refrigerant liquid pipe.
Prepare the vehicle in accordance with the chart below.
| Item | Condition |
|---|---|
| Engine Speed | 1,500 rpm |
| Vehicle Doors | Fully open |
| Temperature Setting | MAX COLD |
| Blower Speed | HI |
| A/C Switch | ON |
Compare the sight glass to the following chart.
| Item | Symptom | Amount of Refrigerant | Corrective Procedures |
|---|---|---|---|
| 1 | Bubbles visible | Insufficient* | 1.
Check for gas leakage and repair if necessary 2.
Add refrigerant until bubbles disappear |
| 2 | No bubbles visible | Empty, insufficient or too much | Refer to items 3 and 4 |
| 3 | No temperature difference between compressor inlet and outlet | Empty or nearly empty | 1.
Check for gas leakage with gas leak detector and repair if necessary 2.
Add refrigerant until bubbles disappear |
| 4 | Considerable temperature difference between compressor inlet and outlet | Correct or too much | Refer to items 5 and 6 |
| 5 | Refrigerant becomes clear immediately after A/C turned OFF | Too much | 1.
Drain or discharge refrigerant 2.
Bleed air and supply proper amount of purified refrigerant |
| 6 | Refrigerant foams and then becomes clear immediately after A/C turned OFF | Correct | - |
- HINT:
-
*: If the ambient temperature is higher than usual but cooling is sufficient, bubbles in the sight glass are permissible.
OK
NG
Connect the intelligent tester to the DLC3.
Turn the ignition switch on (IG) and turn the intelligent tester main switch ON.
Select the item below in the Data List, and read the value displayed on the intelligent tester.
- Air conditioning amplifier:
Item Measurement Item / Display (Range) Normal Condition Diagnostic Note Reg Press Sens Regulator pressure sensor /
Min.: 0 MPaG
Max.: 3.187 MPaGActual regulator pressure is displayed -
- OK:
The display is as specified in the normal condition column.
| Result | Proceed to |
|---|---|
| NG | A |
| OK (Checking from PROBLEM SYMPTOMS TABLE) | B |
| OK (Checking from DTC) | C |
A
B
C
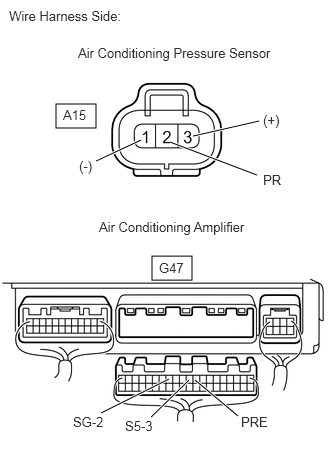
Disconnect the A15 pressure sensor connector.
Disconnect the G47 amplifier connector.
Measure the resistance of the wire harness side connectors.
- Standard resistance:
Tester Connection Specified Condition A15-3 (+) - G47-10 (S5-3) Below 1 Ω A15-2 (PR) - G47-9 (PRE) Below 1 Ω A15-1 (-) - G47-13 (SG-2) Below 1 Ω A15-3 (+) - Body ground 1 MΩ or higher A15-2 (PR) - Body ground 1 MΩ or higher A15-1 (-) - Body ground 1 MΩ or higher
OK
NG
Turn the A/C switch ON.
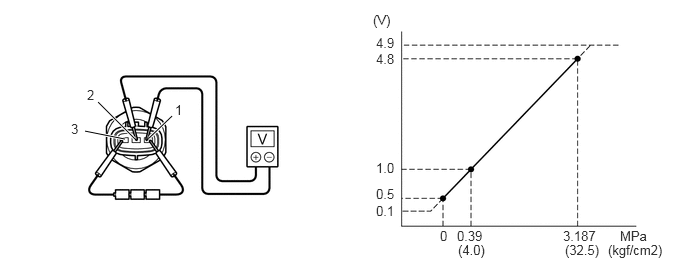
Disconnect the A15 sensor connector.
Connect the three 1.5 V dry cell batteries' positive (+) lead to terminal 3 and the negative (-) lead to terminal 1. Then connect the voltmeter's positive (+) lead to terminal 2 and the negative (-) lead to terminal 1. Measure the voltage.
- OK:
The voltage changes in accordance with the refrigerant pressure as shown in the graph.
OK
NG
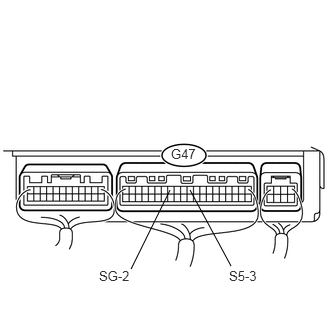
Remove the air conditioning amplifier with its connectors still connected.
Measure the resistance of the wire harness side connector.
- Standard resistance:
Tester Connection Specified Condition G47-13 (SG-2) - Body ground Below 1 Ω
Turn the ignition switch on (IG).
Measure the voltage of the wire harness side connector.
- Standard voltage:
Tester Connection Specified Condition G47-10 (S5-3) - G47-13 (SG-2) 4.5 to 5.5 V
OK
NG