INSTALLATION
Removal / installation · Vehicles built Jul 2007 – Jul 2009
Versions by build date: Jul 2007 – Jul 2009 from Aug 2009
| 1.
INSTALL FUEL SENDER GAUGE ASSEMBLY |
 |
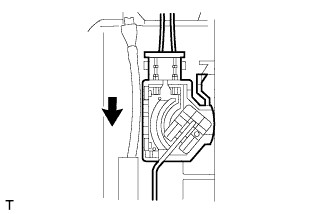
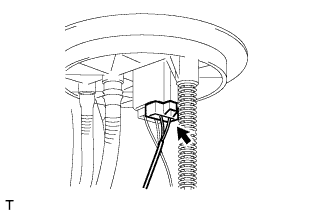
Install the fuel sender gauge onto the fuel suction with pump and gauge tube.
- Connect the fuel sender gauge connector.
| 2.
INSTALL FUEL SUCTION WITH PUMP AND GAUGE TUBE ASSEMBLY
|
|
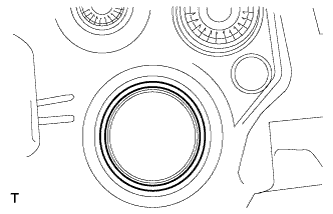
- Install a new gasket onto the fuel tank.
- Set the fuel suction tube assembly to the fuel tank.
- NOTICE:
- Do not bend the arm of the fuel sender gauge.
Fit the spline of the fuel suction tube assembly into the keyway of the fuel tank.
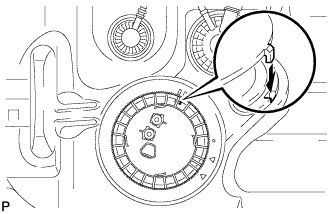
Install a new retainer.
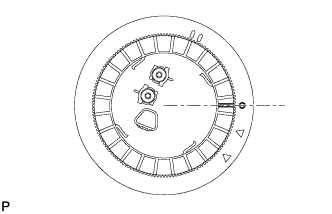
- Align the mark on a new retainer with the rib on the fuel tank as shown in the illustration.
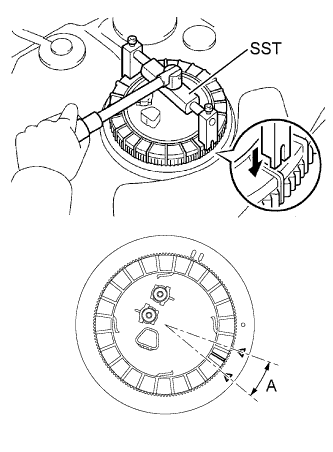
- Using SST, turn the retainer 740° to 760° clockwise (more than 2 turns), and position the mark on the retainer within range A to install it.
- SST
- 09808-14020
(09808-01410, 09808-01420, 09808-01430)
- HINT:
- Align the tips of the SST with the ribs on the retainer.
| 3.
INSTALL FUEL TANK MAIN TUBE AND FUEL TANK RETURN TUBE
|
|
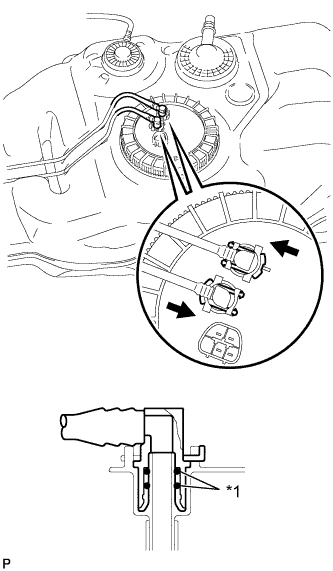
- Install the fuel tank main tube and return tube with the 2 joint clips.
Text in Illustration
*1
|
O-Ring
|
 
|
Push
|
- NOTICE:
- Check that there are no scratches or foreign matter around the disconnected part of the fuel tube joint and plug before performing this work.
- Check that the fuel tube joint is securely inserted into the end.
- Check that the tube joint clips are on the collar of the fuel tube joint.
- After installing the tube joint clip, check that the fuel tank main tube and return tube can be pulled out.
| 4.
INSTALL FUEL TANK ASSEMBLY
|
|
Set a mission jack onto the fuel tank.
Install the fuel tank and 2 fuel tank bands with the 2 clips, 2 pins and the 2 bolts.
-
Torque:
- 40 N*m{
408 kgf*cm
, 30 ft.*lbf
}
| 5.
CONNECT FUEL TANK MAIN TUBE AND FUEL TANK RETURN TUBE
|
|
- Install the fuel tank main tube and return tube with the 2 joint clips.
Text in Illustration
*1
|
O-Ring
|
|
Push
|
- NOTICE:
- Check that there are no scratches or foreign matter around the disconnected part of the fuel tube joint and plug before performing this work.
- Check that the fuel tube joint is securely inserted into the end.
- Check that the tube joint clips are on the collar of the fuel tube joint.
- After installing the tube joint clip, check that the fuel tank main tube and return tube can be pulled out.
| 6.
CONNECT FUEL TANK BREATHER TUBE
|
|
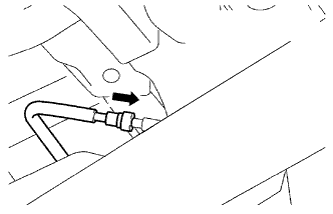
- Push the tube connector into the pipe until the connector makes a click sound.
Text in Illustration
|
Push
|
- NOTICE:
- Check that there is no damage or foreign objects on the connected part of the pipe.
- After connecting, check that the pipe and the connector are securely connected by pulling them.
| 7.
CONNECT FUEL CUT-OFF TUBE
|
|
- Push the tube connector into the pipe until the connector makes a click sound.
Text in Illustration
|
Push
|
- NOTICE:
- Check that there is no damage or foreign objects on the connected part of the pipe.
- After connecting, check that the pipe and the connector are securely connected by pulling them.
| 8.
CONNECT FUEL TANK TO FILLER PIPE HOSE
|
|
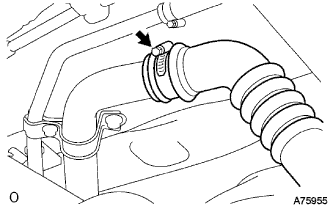
- Connect the fuel tank to filler pipe hose, as shown in the illustration, with the clamp.
| 9.
INSTALL NO.1 FUEL TANK PROTECTOR SUB-ASSEMBLY (for Manual Transmission)
|
|
Install the fuel tank protector with the 4 nuts.
-
Torque:
- 20 N*m{
204 kgf*cm
, 15 ft.*lbf
}
Install the fuel tank protector bracket with the nut.
-
Torque:
- 5.5 N*m{
56 kgf*cm
, 49 in.*lbf
}
| 10.
INSTALL NO.1 FUEL TANK PROTECTOR SUB-ASSEMBLY (for Automatic Transmission)
|
|
Install the fuel tank protector with the 4 nuts.
-
Torque:
- 20 N*m{
204 kgf*cm
, 15 ft.*lbf
}
Install the fuel tank protector bracket with the 2 nuts.
-
Torque:
- 5.5 N*m{
56 kgf*cm
, 49 in.*lbf
}
| 11.
INSTALL REAR FLOOR SERVICE HOLE COVER
|
|
Connect the connector.
Install the 3 screws to the center floor.
Install the center floor silencer pad LH.
Install the floor carpet.
| 12.
INSTALL REAR SEAT CUSHION ASSEMBLY LH
|
|
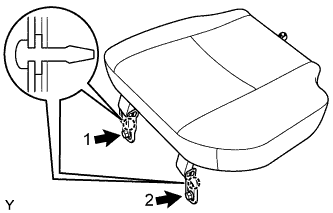
- Insert the 2 locating pins into the body hole.
Temporarily install the rear seat cushion with the 2 bolts.
Tighten the 2 bolts in the sequence shown in the illustration.
-
Torque:
- 37 N*m{
375 kgf*cm
, 27 ft.*lbf
}
| 13.
INSTALL REAR DOOR SCUFF PLATE LH
|
|
- HINT:
- Use the same procedure as for the RH side.
| 14.
INSTALL FRONT DOOR SCUFF PLATE LH
|
|
- HINT:
- Use the same procedure as for the RH side.
| 15.
CONNECT CABLE TO NEGATIVE BATTERY TERMINAL |
|
-
Torque:
- 3.9 N*m{
40 kgf*cm
, 35 in.*lbf
}
| 16.
CHECK FOR FUEL LEAK
|
|
Connect the Techstream to the DLC3.
Turn the ignition switch ON.
- NOTICE:
- Do not start the engine.
Turn the Techstream ON.
Select the following menu items: Powertrain / Engine and ECT / Active Test / Activate the Fuel Pump Speed Control / ON.
Check that there is no leakage from the fuel system.