Home › ENGINE › 1GR-FE ENGINE CONTROL SYSTEM › SFI SYSTEMECM Power Source Circuit
Circuit diagnosis · Vehicles built Aug 2009 – Oct 2010
Versions by build date: Jul 2007 – Nov 2007 Dec 2007 – Jul 2009 Aug 2009 – Oct 2010 from Nov 2010
DESCRIPTION
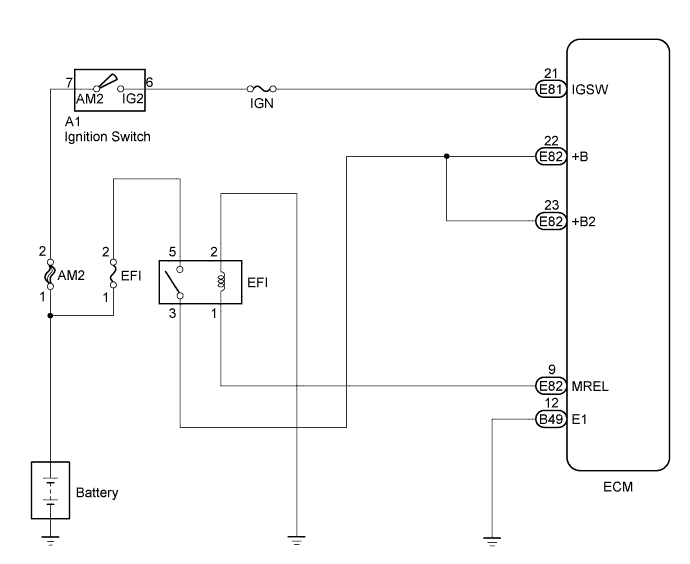
When the ignition switch is turned to ON, the battery voltage is applied to terminal IGSW of the ECM. The ECM MREL output signal causes a current to flow to the coil, closing the contacts of the EFI relay and supplying power to terminal +B of the ECM. If the ignition switch is turned off, the ECM holds the EFI relay ON for a maximum of 2 seconds to allow for the initial setting of the throttle valve. WIRING DIAGRAM
INSPECTION PROCEDURE
NOTICE:
Inspect the fuses for circuits related to this system before performing the following inspection procedure.
1. INSPECT ECM (+B VOLTAGE)
Turn the ignition switch to ON.
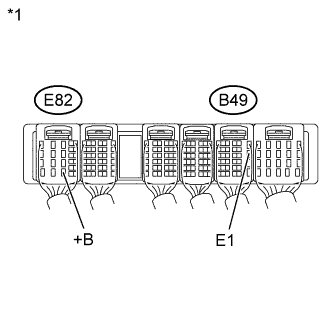
Measure the voltage according to the value(s) in the table below.
Standard Voltage:
Tester Connection
Switch Condition
Specified Condition
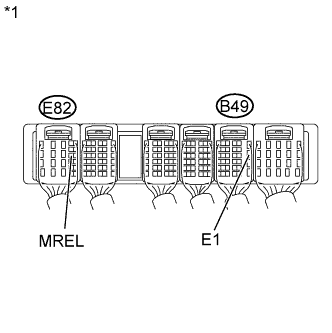
E82-22 (+B) - B49-12 (E1)
Ignition switch ON
11 to 14 V
Text in Illustration
*1
Rear view of wire harness connector
NG
OK
PROCEED TO NEXT SUSPECTED AREA SHOWN IN PROBLEM SYMPTOMS TABLE (Click here )
2. CHECK HARNESS AND CONNECTOR (ECM - BODY GROUND)
Disconnect the ECM connector.
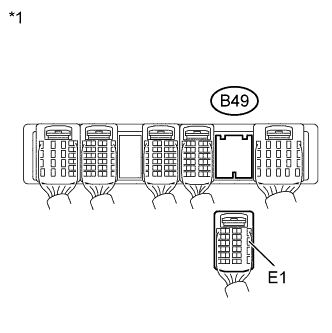
Measure the resistance according to the value(s) in the table below.
Standard Resistance (Check for Open):
Tester Connection
Condition
Specified Condition
B49-12 (E1) - Body ground
Always
Below 1 Ω
Text in Illustration
*1
Rear view of wire harness connector
NG
REPAIR OR REPLACE HARNESS OR CONNECTOR
OK
3. INSPECT ECM (IGSW VOLTAGE)
Turn the ignition switch to ON.
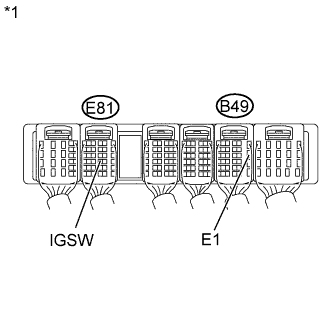
Measure the voltage according to the value(s) in the table below.
Standard Voltage:
Tester Connection
Switch Condition
Specified Condition
E81-21 (IGSW) - B49-12 (E1)
Ignition switch ON
11 to 14 V
Text in Illustration
*1
Rear view of wire harness connector
NG
OK
4. INSPECT ECM (MREL VOLTAGE)
Turn the ignition switch to ON.
Measure the voltage according to the value(s) in the table below.
Standard Voltage:
Tester Connection
Switch Condition
Specified Condition
E82-9 (MREL) - B49-12 (E1)
Ignition switch ON
11 to 14 V
Text in Illustration
*1
Rear view of wire harness connector
NG
OK
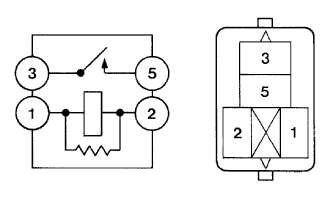
5. INSPECT EFI RELAY
Remove the EFI relay from the engine room relay block.
Measure the resistance according to the value(s) in the table below.
Standard Resistance:
Tester Connection
Condition
Specified Condition
3 - 5
Battery voltage not applied
10 kΩ or higher
Battery voltage applied to terminals 1 and 2
Below 1 Ω
NG
OK
6. CHECK HARNESS AND CONNECTOR (EFI RELAY- ECM, EFI RELAY - BODY GROUND)
Check the harness and connector between the EFI relay and ECM.
Remove the EFI relay from the engine room relay block.
Disconnect the ECM connector.
Measure the resistance according to the value(s) in the table below.
Standard Resistance (Check for Open):
Tester Connection
Condition
Specified Condition
EFI relay terminal 1 - E82-9 (MREL)
Always
Below 1 Ω
Standard Resistance (Check for Short):
Tester Connection
Condition
Specified Condition
EFI relay terminal 1 or E82-9 (MREL) - Body ground
Always
10 kΩ or higher
Check the harness and connector between the EFI relay and body ground.
Remove the EFI relay from the engine room relay block.
Measure the resistance according to the value(s) in the table below.
Standard Resistance (Check for Open):
Tester Connection
Condition
Specified Condition
EFI relay terminal 2 - Body ground
Always
Below 1 Ω
NG
REPAIR OR REPLACE HARNESS OR CONNECTOR
OK
CHECK AND REPAIR HARNESS OR CONNECTOR (TERMINAL +B OF ECM - BATTERY POSITIVE TERMINAL)
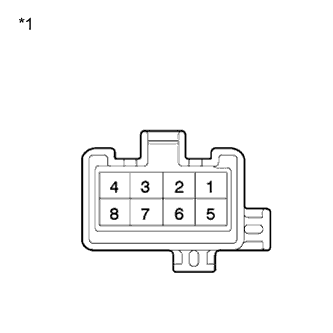
7. INSPECT IGNITION SWITCH ASSEMBLY
Disconnect the ignition switch connector.
Measure the resistance according to the value(s) in the table below.
Standard Resistance:
Tester Connection
Switch Condition
Specified Condition
All Terminals
LOCK
10 kΩ or higher
2-4
ACC
Below 1 Ω
1-2, 1-4, 5-6
ON
Below 1 Ω
1-3-4, 5-6-7
START
Below 1 Ω
Text in Illustration
*1
Component without harness connected
NG
OK
CHECK AND REPLACE HARNESS OR CONNECTOR (BATTERY - IGNITION SWITCH, IGNITION SWITCH - ECM)