ON-VEHICLE INSPECTION
Inspection · Vehicles built from Aug 2014
Versions by build date: Jul 2007 – Jul 2009 Aug 2009 – Oct 2012 Nov 2012 – Jul 2014 from Aug 2014
| CHECK FOR FUEL PUMP OPERATION AND FUEL LEAK |

Connect the intelligent tester to the DLC3.
Turn the ignition switch to ON.
- NOTICE:
- Do not start the engine.
Turn the intelligent tester ON.
Enter the following menus: Powertrain / Engine and ECT / Active Test / Control the Fuel Pump Speed / ON.
Check fuel pump operation.
Check for pressure in the fuel inlet tube from the fuel line. Check that the sound of fuel flowing in the fuel tank can be heard.
If there is no sound, check the integration relay, fuel pump, ECM and wiring connector.
| CHECK FUEL PRESSURE |
Discharge the fuel system pressure (Click here).
Check the battery voltage.
Measure the voltage according to the value(s) in the table below.
- Standard Voltage:
Tester Connection
Switch Condition
Specified Condition
Positive (+) terminal - Negative (-) terminal
Ignition switch off
11 to 14 V
Disconnect the cable from the negative (-) battery terminal.
Disengage the clamp and disconnect the No. 1 fuel pipe sub-assembly (Click here).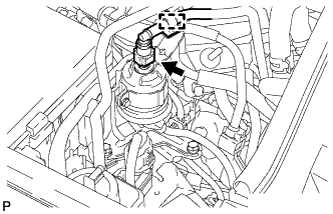

- NOTICE:
- Check for dirt or other foreign matter on the parts to be disconnected and clean them if necessary.
- The fuel tube connector seals with an O-ring. Ensure that there is no damage or foreign matter on the contact surface.
- If the connector and the pipe are stuck, push and pull on the connector to release them while pinching the retainer. Pull the connector out of the pipe carefully.
- Do not use any tools.
- Do not bend or twist the tubes.
- Protect the contact surface by covering it with a plastic bag.
- Do not damage any of the clips. If a clip is damaged, replace it.
- Check for dirt or other foreign matter on the parts to be disconnected and clean them if necessary.
Install SST (pressure gauge) using other SST as shown in the illustration.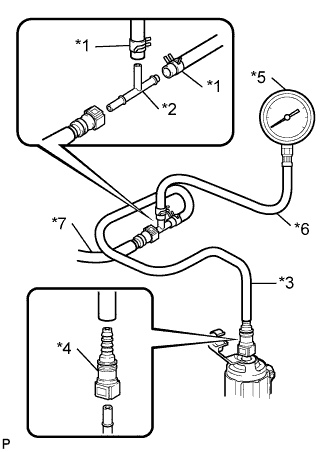
Text in Illustration *1
SST (Clip)
*2
SST (T-joint)
*3
SST (Hose)
*4
SST (Fuel Tube Connector)
*5
SST (Pressure Gauge)
*6
SST (Pressure Gauge Hose)
*7
Fuel Tube
- SST
- 09268-31013
(09268-41120, 09268-41500, 90467-13001, 95336-08070)
09268-45014 (09268-41200, 09268-41220)
Clean up any spilled gasoline.
Connect the cable to the negative (-) battery terminal.
- Torque:
- 5.4 N*m{ 55 kgf*cm , 48 in.*lbf }
Operate the fuel pump.
Connect the intelligent tester to the DLC3.
Turn the ignition switch to ON.
- NOTICE:
- Do not start the engine.
Turn the intelligent tester ON.
Enter the following menus: Powertrain / Engine and ECT / Active Test / Control the Fuel Pump Speed / ON.
Measure the fuel pressure.
- Standard fuel pressure:
- 281 to 287 kPa (2.87 to 2.93 kgf/cm2, 41 to 42 psi)
If the pressure is below the specification, check the fuel hoses and connections, fuel pump, fuel filter and fuel pressure regulator.
Start the engine.
Measure the fuel pressure at idle.
- Standard fuel pressure:
- 281 to 287 kPa (2.87 to 2.93 kgf/cm2, 41 to 42 psi)
Stop the engine.
Check that the fuel pressure remains as specified for 5 minutes after the engine has stopped.
- Standard fuel pressure:
- 147 kPa (1.5 kgf/cm2, 21 psi) or more
Disconnect the cable from the negative (-) battery terminal and carefully remove SST and the fuel tube connector to prevent gasoline from spraying.
Connect the No. 1 fuel pipe sub-assembly and engage the clamp (Click here).
- NOTICE:
- Check that there are no scratches or foreign objects on the connecting part.
- If the pipe is difficult to push into the connector, apply a small amount of clean engine oil to the tip of the pipe and reinsert it.
- After connecting, check that the pipe and connector are securely connected by pulling on them.
- Check that there are no scratches or foreign objects on the connecting part.
Inspect for fuel leak (Step 1).