INSTALLATION
Removal / installation · Vehicles built from Jul 2007
| 1. INSTALL TRANSFER ASSEMBLY |

Install the transfer onto the transmission.
Install the 2 clamps and 8 bolts.
- Torque:
- 24 N*m{ 244 kgf*cm , 17 ft.*lbf }
| 2. INSTALL AUTOMATIC TRANSMISSION ASSEMBLY |
Install the automatic transmission (Click here).
| 3. INSTALL LOWER TRANSFER CASE PROTECTOR |
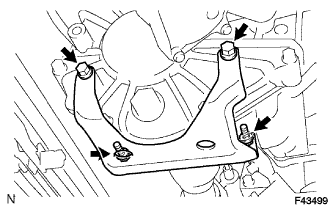  |
Install the protector with the 4 bolts.
- Torque:
- 18 N*m{ 183 kgf*cm , 13 ft.*lbf }
| 4. ADD TRANSFER OIL |
Remove the case plug (for filler) and gasket.
Pour oil so that the oil level is between 0 to 5.0 mm (0 to 0.197 in.) from the bottom lip of the case plug (for filler) hole.
- NOTICE:
- When adding oil, pour it slowly.
- Add oil a little at a time, waiting several minutes between each addition of oil.
- When adding oil, pour it slowly.
Wait approximately 5 minutes and check that the oil level has not changed.
Install a new gasket and the case plug (for filler).
- Torque:
- 37 N*m{ 377 kgf*cm , 27 ft.*lbf }
| 5. CONNECT CABLE TO NEGATIVE BATTERY TERMINAL |
- Torque:
- 3.9 N*m{ 40 kgf*cm , 35 in.*lbf }
| 6. PERFORM INITIALIZATION |
Perform initialization (Click here).
- NOTICE:
- Certain systems need to be initialized after disconnecting and reconnecting the cable from the negative (-) battery terminal.
| 7. CHECK FOR TRANSFER OIL LEAKAGE |