INSTALLATION
Removal / installation · Vehicles built from Nov 2010
Versions by build date: Jul 2007 – Oct 2010 from Nov 2010
| 1. INSTALL FRONT DIFFERENTIAL CARRIER ASSEMBLY |

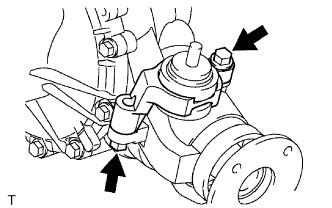  |
Install the front No. 3 differential support with the 2 bolts.
- Torque:
- 108 N*m{ 1,100 kgf*cm , 80 ft.*lbf }
Install the front No. 2 differential support with the 2 bolts.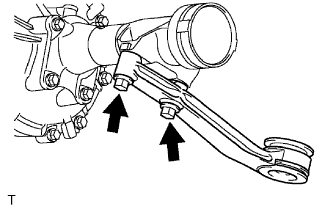
- Torque:
- 160 N*m{ 1,630 kgf*cm , 11 ft.*lbf }
Install the front No. 1 differential support with the 3 bolts.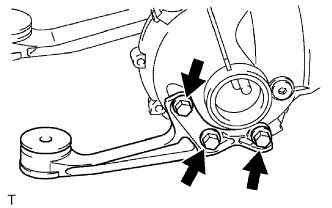
- Torque:
- 186 N*m{ 1,900 kgf*cm , 137 ft.*lbf }
Support the front differential with a jack.
Install the 2 front mounting bolts and 2 nuts.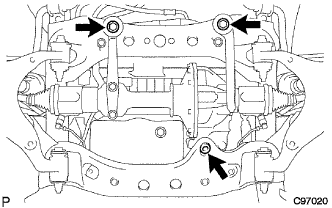
- Torque:
- 137 N*m{ 1,400 kgf*cm , 101 ft.*lbf }
Install front differential mounting nut No. 1.
- Torque:
- 87 N*m{ 887 kgf*cm , 64 ft.*lbf }
Install the front differential breather tube bracket with the bolt.
- Torque:
- 13 N*m{ 133 kgf*cm , 10 ft.*lbf }
Lower the jack.
| 2. INSTALL FRONT DRIVE SHAFT ASSEMBLY LH |
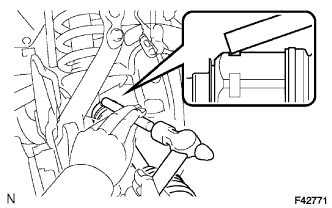 |
Coat the spline of the inboard joint shaft with ATF.
Align the shaft splines and install the drive shaft with a brass bar and hammer.
- NOTICE:
- Set the snap ring with the opening side facing downward.
- Do not damage the oil seal.
- Set the snap ring with the opening side facing downward.
- HINT:
- Whether the inboard joint shaft is in contact with the pinion shaft or not can be confirmed from the sound or feeling when driving it.
| 3. INSTALL FRONT DRIVE SHAFT ASSEMBLY RH |
- HINT:
- Use the same procedure as for the LH side.
| 4. INSTALL FRONT LOWER BALL JOINT ATTACHMENT |
Install the front lower ball joint attachment with the 2 bolts.
- Torque:
- 160 N*m{ 1631 kgf*cm , 118 ft.*lbf }
| 5. INSTALL TIE ROD END SUB-ASSEMBLY LH |
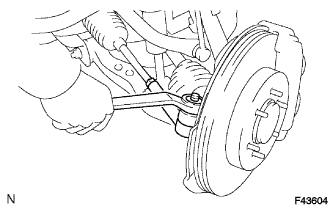 |
Install the tie rod end onto the steering knuckle.
Install the nut.
- Torque:
- 91 N*m{ 928 kgf*cm , 67 ft.*lbf }
Install a new cotter pin.
- NOTICE:
- If the holes in the cotter pin are not aligned, tighten the nut an additional 60°.
| 6. INSTALL TIE ROD END SUB-ASSEMBLY RH |
- HINT:
- Use the same procedure as for the LH side.
| 7. INSTALL FRONT AXLE HUB NUT LH |
Install the hub nut.
- Torque:
- 235 N*m{ 2396 kgf*cm , 174 ft.*lbf }
Install the adjusting lock cap and a new cotter pin.
| 8. INSTALL FRONT AXLE HUB NUT RH |
- HINT:
- Use the same procedure as for the LH side.
| 9. INSTALL FRONT AXLE HUB GREASE CAP |
| 10. INSTALL FRONT SPEED SENSOR LH |
Type A:
Install the skid control sensor wire onto the steering knuckle with the bolt.
- Torque:
- 13 N*m{ 127 kgf*cm , 9 ft.*lbf }
Engage the 3 clamps.
Using a 5 mm hexagon wrench, install the speed sensor with the bolt.
- Torque:
- 8.5 N*m{ 87 kgf*cm , 75 in.*lbf }
Type B:
Install the skid control sensor wire onto the steering knuckle with the 2 bolts.
- Torque:
- 13 N*m{ 127 kgf*cm , 9 ft.*lbf }
Engage the clamp.
Install the speed sensor with the bolt.
- Torque:
- 8.5 N*m{ 87 kgf*cm , 75 in.*lbf }
| 11. INSTALL FRONT SPEED SENSOR RH |
- HINT:
- Use the same procedure as for the LH side.
| 12. INSTALL FRONT WHEEL |
- Torque:
- 112 N*m{ 1,137 kgf*cm , 82 ft.*lbf }
| 13. INSPECT DIFFERENTIAL OIL |
 |
Stop the vehicle on a level surface.
Remove the differential filler plug and gasket.
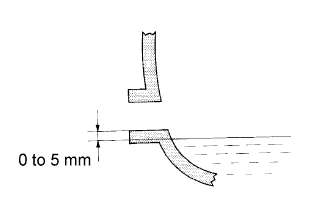
Check that the oil level is between 0 to 5 mm (0 to 0.20 in.) from the bottom lip of the differential filler plug hole.
- NOTICE:
- After changing the oil seal, drive the vehicle and then check the oil level again.
- After changing the oil seal, drive the vehicle and then check the oil level again.
- Too much or too little oil will lead to differential problems.
- Too much or too little oil will lead to differential problems.
- HINT:
- If necessary, fill the differential carrier assembly with hypoid gear oil.
- Differential oil type and viscosity:
- Toyota Genuine Differential gear oil LT 75W-85 API GL-5 SAE 75W-85 or equivalent
- Differential Oil Capacity:
Item
Capacity
Front Differential
w/o A.D.D.
1.35 to 1.45 Liters
(1.43 to 1.53 US qts, 1.19 to 1.28 Imp qts.)
w/ A.D.D.
1.50 to 1.60 Liters
(1.59 to 1.69 US qts, 1.32 to 1.41 Imp qts.)
Rear Differential
w/o Differential Lock
2.45 to 2.55 Liters
(2.59 to 2.69 US qts, 2.16 to 2.24 Imp qts.)
w/ Differential Lock
2.40 to 2.50 Liters
(2.54 to 2.64 US qts, 2.11 to 2.20 Imp qts.)
Check for oil leakage when the oil level is low.
Install the differential filler plug with a new gasket.
- Torque:
- Front differential:
- 39 N*m{ 400 kgf*cm , 29 ft.*lbf }
- Rear differential:
- 49 N*m{ 500 kgf*cm , 36 ft.*lbf }
| 14. CHECK FOR DIFFERENTIAL OIL LEAKAGE |
| 15. INSTALL REAR ENGINE UNDER COVER ASSEMBLY |
| 16. INSTALL NO. 1 ENGINE UNDER COVER |
| 17. CONNECT CABLE TO NEGATIVE BATTERY TERMINAL |
- Torque:
- 3.9 N*m{ 40 kgf*cm , 35 in.*lbf }
| 18. CHECK VSC SENSOR SIGNAL |
| 19. INSPECT AND ADJUST FRONT WHEEL ALIGNMENT |