P0351 Ignition Coil "A" Primary / Secondary Circuit
Diagnostic trouble codes · Vehicles built Aug 2009 – Jul 2014
Also covers:
- P0352 Ignition Coil "B" Primary / Secondary Circuit
- P0353 Ignition Coil "C" Primary / Secondary Circuit
- P0354 Ignition Coil "D" Primary / Secondary Circuit
- P0355 Ignition Coil "E" Primary / Secondary Circuit
- P0356 Ignition Coil "F" Primary / Secondary Circuit
Versions by build date: Jul 2007 – Jul 2009 Aug 2009 – Jul 2014 from Aug 2014
CAUTION / NOTICE / HINT
- HINT:
- These DTCs indicate malfunctions relating to the primary circuit.
- If DTC P0351 is set, check No. 1 ignition coil with igniter circuit.
- If DTC P0352 is set, check No. 2 ignition coil with igniter circuit.
- If DTC P0353 is set, check No. 3 ignition coil with igniter circuit.
- If DTC P0354 is set, check No. 4 ignition coil with igniter circuit.
- If DTC P0355 is set, check No. 5 ignition coil with igniter circuit.
- If DTC P0356 is set, check No. 6 ignition coil with igniter circuit.
- These DTCs indicate malfunctions relating to the primary circuit.
DESCRIPTION
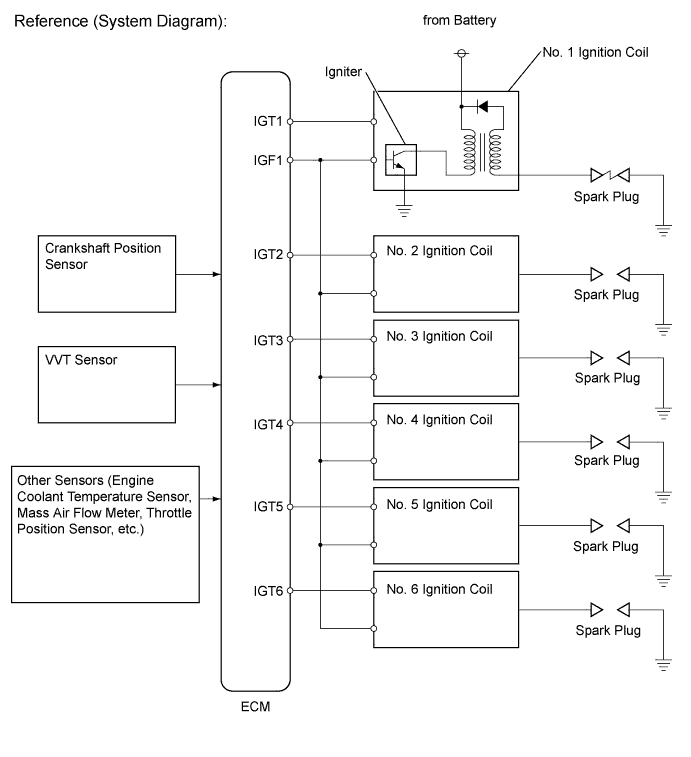
A Direct Ignition System (DIS) is used on this vehicle.The DIS is a 1-cylinder ignition system in which each cylinder is ignited by one ignition coil and one spark plug is connected to the end of each secondary wiring. A powerful voltage, generated in the secondary wiring, is applied directly to each spark plug. The sparks of the spark plugs pass from the center electrodes to the ground electrodes.
The ECM determines the ignition timing and transmits the ignition (IGT) signals to each cylinder. Using the IGT signal, the ECM turns the power transistor inside the igniter on and off. The power transistor, in turn, switches on and off the current to the primary coil. When the current to the primary coil is cut off, a powerful voltage is generated in the secondary coil. This voltage is applied to the spark plugs, causing them to spark inside the cylinders. As the ECM cuts the current to the primary coil, the igniter sends back an ignition confirmation (IGF) signal to the ECM, for each cylinder ignition.

| DTC No. |
DTC Detection Condition |
Trouble Area |
| P0351 P0352 P0353 P0354 P0355 P0356 |
No IGF signal to ECM while engine running (1-trip detection logic) |
|
-
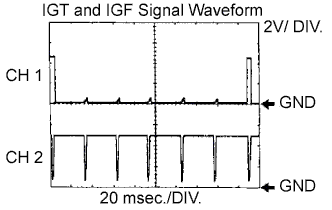
- Inspection using an oscilloscope
While cranking or idling, check the waveform between terminals IGT(1 to 6) and E1, and IGF1 and E1 of the ECM connector.Item
Content
Terminal
CH1: IGT1, IGT2, IGT3, IGT4, IGT5, IGT6 - E1
CH2: IGF1 - E1
Equipment Setting
2 V/DIV, 20 ms/DIV.
Condition
Cranking or idling
MONITOR DESCRIPTION
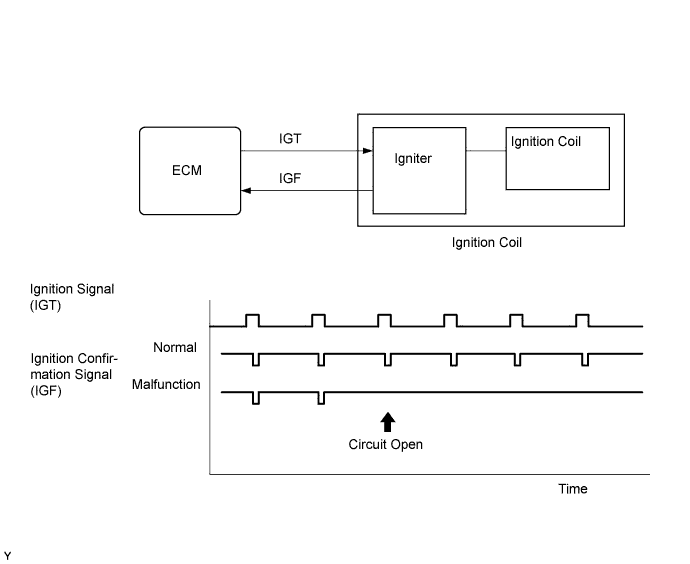
If the ECM does not receive any IGF signals despite transmitting the IGT signal, it interprets this as a fault in the igniter and sets a DTC.
If the malfunction is not repaired successfully, a DTC is set 1 second after the engine is next started.
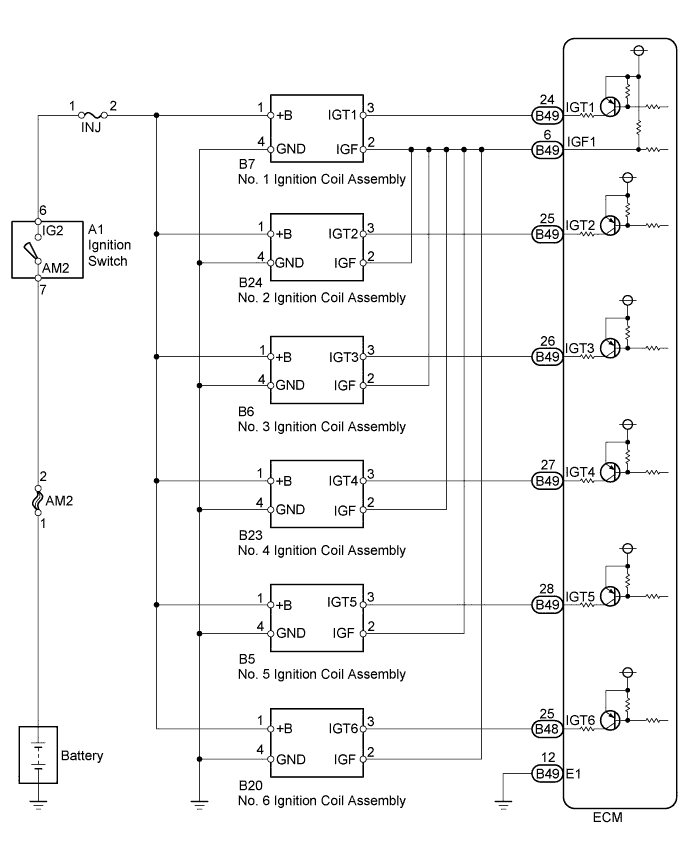
WIRING DIAGRAM
INSPECTION PROCEDURE
- NOTICE:
- Inspect the fuses for circuits related to this system before performing the following inspection procedure.
- HINT:
- Read freeze frame data using the intelligent tester. Freeze frame data record the engine condition when malfunctions are detected. When troubleshooting, freeze frame data can help determine if the vehicle was moving or stationary, if the engine was warmed up or not, if the air-fuel ratio was lean or rich, and other data, from the time the malfunction occurred.
| 1. CHECK SPARK PLUG AND SPARK OF MISFIRING CYLINDER |

Check the spark plug and sparks of the misfiring cylinder (Click here).
|
|
||||

| OK | |
 |
| 2. CHECK HARNESS AND CONNECTOR (IGNITION COIL ASSEMBLY - ECM (IGF1 SIGNAL TERMINAL)) |
Disconnect the ignition coil assembly connector.
Disconnect the ECM connector.
Measure the resistance according to the value(s) in the table below.
- Standard Resistance (Check for Open):
Tester Connection
Condition
Specified Condition
B7-2 (IGF) - B49-6 (IGF1)
Always
Below 1 Ω
B24-2 (IGF) - B49-6 (IGF1)
Always
Below 1 Ω
B6-2 (IGF) - B49-6 (IGF1)
Always
Below 1 Ω
B23-2 (IGF) - B49-6 (IGF1)
Always
Below 1 Ω
B5-2 (IGF) - B49-6 (IGF1)
Always
Below 1 Ω
B20-2 (IGF) - B49-6 (IGF1)
Always
Below 1 Ω
- Standard Resistance (Check for Short):
Tester Connection
Always
Specified Condition
B7-2 (IGF) or B49-6 (IGF1) - Body ground
Always
10 kΩ or higher
B24-2 (IGF) or B49-6 (IGF1) - Body ground
Always
10 kΩ or higher
B6-2 (IGF) or B49-6 (IGF1) - Body ground
Always
10 kΩ or higher
B23-2 (IGF) or B49-6 (IGF1) - Body ground
Always
10 kΩ or higher
B5-2 (IGF) or B49-6 (IGF1) - Body ground
Always
10 kΩ or higher
B20-2 (IGF) or B49-6 (IGF1) - Body ground
Always
10 kΩ or higher
|
|
||||

| OK | |
|
| 3. INSPECT ECM (IGF1 VOLTAGE) |
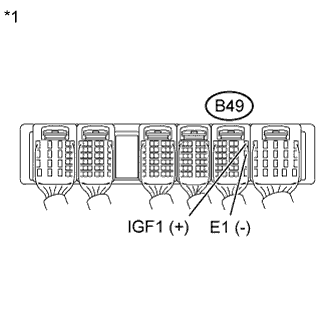 |
Disconnect the ignition coil assembly connector.
Turn the ignition switch to ON.
Measure the voltage according to the value(s) in the table below.
- Standard Voltage:
Tester Connection
Switch Condition
Specified Condition
B49-6 (IGF1) - B49-12 (E1)
Ignition switch ON
4.5 to 5.5 V
Text in Illustration *1
Rear view of wire harness connector
(to ECM)
|
|
||||
| OK | ||
 |
||
| ||
| 4. CHECK HARNESS AND CONNECTOR (IGNITION COIL ASSEMBLY - ECM (IGT SIGNAL TERMINAL)) |
Disconnect the ignition coil assembly connector.
Disconnect the ECM connector.
Measure the resistance according to the value(s) in the table below.
- Standard Resistance (Check for Open):
Tester Connection
Condition
Specified Condition
B7-3 (IGT1) - B49-24 (IGT1)
Always
Below 1 Ω
B24-3 (IGT2) - B49-25 (IGT2)
Always
Below 1 Ω
B6-3 (IGT3) - B49-26 (IGT3)
Always
Below 1 Ω
B23-3 (IGT4) - B49-27 (IGT4)
Always
Below 1 Ω
B5-3 (IGT5) - B49-28 (IGT5)
Always
Below 1 Ω
B20-3 (IGT6) - B48-25 (IGT6)
Always
Below 1 Ω
- Standard Resistance (Check for Short):
Tester Connection
Condition
Specified Condition
B7-3 (IGT1) or B49-24 (IGT1) - Body ground
Always
10 kΩ or higher
B24-3 (IGT2) or B49-25 (IGT2) - Body ground
Always
10 kΩ or higher
B6-3 (IGT3) or B49-26 (IGT3) - Body ground
Always
10 kΩ or higher
B23-3 (IGT4) or B49-27 (IGT4) - Body ground
Always
10 kΩ or higher
B5-3 (IGT5) or B49-28 (IGT5) - Body ground
Always
10 kΩ or higher
B20-3 (IGT6) or B48-25 (IGT6) - Body ground
Always
10 kΩ or higher
|
|
||||
| OK | |
|
| 5. INSPECT ECM (IGT1, IGT2, IGT3, IGT4, IGT5, OR IGT6 VOLTAGE) |
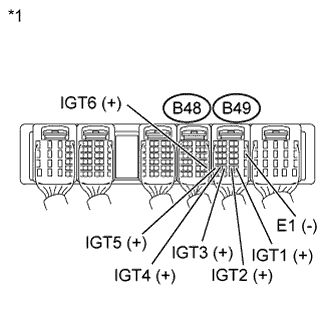 |
Measure the voltage according to the value(s) in the table below, when the engine is cranked.
- Standard Voltage:
Tester Connection
Condition
Specified Condition
B49-24 (IGT1) - B49-12 (E1)
Cranking
0.1 to 4.5 V
B49-25 (IGT2) - B49-12 (E1)
Cranking
0.1 to 4.5 V
B49-26 (IGT3) - B49-12 (E1)
Cranking
0.1 to 4.5 V
B49-27 (IGT4) - B49-12 (E1)
Cranking
0.1 to 4.5 V
B49-28 (IGT5) - B49-12 (E1)
Cranking
0.1 to 4.5 V
B48-25 (IGT6) - B49-12 (E1)
Cranking
0.1 to 4.5 V
Text in Illustration *1
Rear view of wire harness connector
(to ECM)
|
|
||||
| OK | |
|
| 6. INSPECT ECM (IGT1, IGT2, IGT3, IGT4, IGT5, OR IGT6 VOLTAGE) |
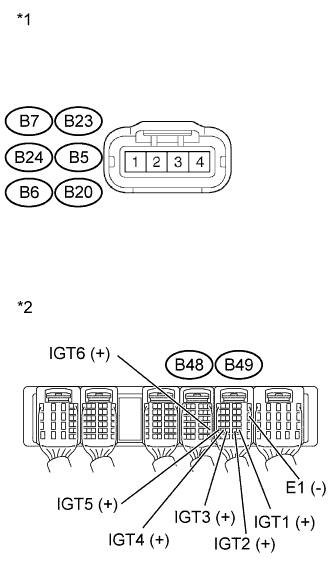 |
Disconnect the ignition coil assembly connector.
Measure the voltage according to the value(s) in the table below, when the engine is cranked.
- Standard Voltage:
Tester Connections
Condition
Specified Conditions
B49-24 (IGT1) - B49-12 (E1)
Cranking
4.5 V or more
B49-25 (IGT2) - B49-12 (E1)
Cranking
4.5 V or more
B49-26 (IGT3) - B49-12 (E1)
Cranking
4.5 V or more
B49-27 (IGT4) - B49-12 (E1)
Cranking
4.5 V or more
B49-28 (IGT5) - B49-12 (E1)
Cranking
4.5 V or more
B48-25 (IGT6) - B49-12 (E1)
Cranking
4.5 V or more
Text in Illustration *1
Front view of wire harness connector
(to Ignition Coil Assembly)
*2
Rear view of wire harness connector
(to ECM)
|
|
||||
| OK | |
|
| 7. INSPECT IGNITION COIL ASSEMBLY (POWER SOURCE AND GROUND) |
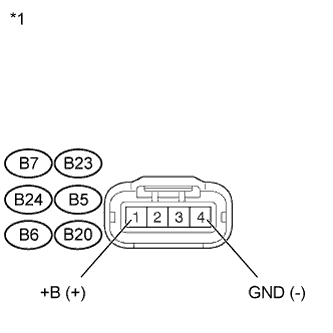 |
Disconnect the ignition coil assembly connector.
Measure the resistance according to the value(s) in the table below.
- Standard Resistance (Check for Open):
Tester Connection
Condition
Specified Condition
B7-4 (GND) - Body ground
Always
Below 1 Ω
B24-4 (GND) - Body ground
Always
Below 1 Ω
B6-4 (GND) - Body ground
Always
Below 1 Ω
B23-4 (GND) - Body ground
Always
Below 1 Ω
B5-4 (GND) - Body ground
Always
Below 1 Ω
B20-4 (GND) - Body ground
Always
Below 1 Ω
Turn the ignition switch to ON.
Measure the voltage according to the value(s) in the table below.
- Standard Voltage:
Tester Connection
Switch Condition
Specified Condition
B7-1 (+B) - B7-4 (GND)
Ignition switch ON
11 to 14 V
B24-1 (+B) - B24-4 (GND)
Ignition switch ON
11 to 14 V
B6-1 (+B) - B6-4 (GND)
Ignition switch ON
11 to 14 V
B23-1 (+B) - B23-4 (GND)
Ignition switch ON
11 to 14 V
B5-1 (+B) - B5-4 (GND)
Ignition switch ON
11 to 14 V
B20-1 (+B) - B20-4 (GND)
Ignition switch ON
11 to 14 V
Text in Illustration *1
Front view of wire harness connector
(to Ignition Coil Assembly)
Reconnect the ignition coil assembly connector.
|
|
||||
| OK | ||
|
||
| ||
| 8. CHECK HARNESS AND CONNECTOR (IGNITION COIL ASSEMBLY - IGNITION SWITCH) |
Disconnect the ignition coil assembly connector.
Disconnect the ignition switch connector.
Measure the resistance according to the value(s) in the table below.
- Standard Resistance (Check for Open):
Tester Connection
Condition
Specified Condition
B7-1 (+B) - A1-6 (IG2)
Always
Below 1 Ω
B24-1 (+B) - A1-6 (IG2)
Always
Below 1 Ω
B6-1 (+B) - A1-6 (IG2)
Always
Below 1 Ω
B23-1 (+B) - A1-6 (IG2)
Always
Below 1 Ω
B5-1 (+B) - A1-6 (IG2)
Always
Below 1 Ω
B20-1 (+B) - A1-6 (IG2)
Always
Below 1 Ω
- Standard Resistance (Check for Short):
Tester Connection
Condition
Specified Condition
B7-1 (+B) or A1-6 (IG2) - Body ground
Always
10 kΩ or higher
B24-1 (+B) or A1-6 (IG2) - Body ground
Always
10 kΩ or higher
B6-1 (+B) or A1-6 (IG2) - Body ground
Always
10 kΩ or higher
B23-1 (+B) or A1-6 (IG2) - Body ground
Always
10 kΩ or higher
B5-1 (+B) or A1-6 (IG2) - Body ground
Always
10 kΩ or higher
B20-1 (+B) or A1-6 (IG2) - Body ground
Always
10 kΩ or higher
|
|
||||
| OK | ||
|
||
| ||