INSTALLATION
Removal / installation · Vehicles built Aug 2012 – Jul 2014
Versions by build date: Jul 2007 – Oct 2010 Nov 2010 – Jul 2012 Aug 2012 – Jul 2014 from Aug 2014
| 1. INSTALL STEERING COLUMN ASSEMBLY |

Install the steering column assembly to the instrument panel reinforcement assembly with the 4 nuts.
- Torque:
- 26 N*m{ 265 kgf*cm , 19 ft.*lbf }
Connect all connectors and engage the 2 wire harness clamps to the steering column assembly.
| 2. INSTALL NO. 2 STEERING INTERMEDIATE SHAFT SUB-ASSEMBLY |
Align the matchmarks on the No. 2 steering intermediate shaft sub-assembly and the power steering link.
Install the No. 2 steering intermediate shaft sub-assembly onto the power steering link with the bolt.
- Torque:
- 36 N*m{ 367 kgf*cm , 27 ft.*lbf }
| 3. INSTALL NO. 1 STEERING COLUMN HOLE COVER SUB-ASSEMBLY |
Install the No. 1 steering column hole cover sub-assembly with the 4 bolts.
- Torque:
- 5.0 N*m{ 51 kgf*cm , 44 in.*lbf }
- NOTICE:
- Do not fold back the boot part of the steering hole cover or extend it excessively. If it is extended excessively, return it to its original position.
| 4. INSTALL STEERING SLIDING YOKE |
Align the matchmarks on the steering sliding yoke and the steering intermediate shaft assembly.
Install the steering sliding yoke onto the steering intermediate shaft assembly and slide it upward.
Align the matchmarks on the steering sliding yoke and the No. 2 steering intermediate shaft sub-assembly.
Install the steering sliding yoke onto the No. 2 steering intermediate shaft sub-assembly with the 2 bolts.
- Torque:
- 36 N*m{ 367 kgf*cm , 27 ft.*lbf }
| 5. INSTALL FRONT FENDER SPLASH SHIELD REAR LH |
Install the frame seal with the 5 clips.
| 6. INSTALL FRONT WHEEL LH |
| 7. INSTALL COMBINATION SWITCH ASSEMBLY |
Install the combination switch assembly with the 3 screws.
Connect all connectors to the combination switch assembly.
| 8. INSTALL UPPER STEERING COLUMN COVER |
Engage the claw and install the upper steering column cover.
| 9. INSTALL LOWER STEERING COLUMN COVER |
Engage the 2 claws and install the lower steering column cover.
Install the 3 screws.
| 10. PLACE FRONT WHEELS FACING STRAIGHT AHEAD |
| 11. ADJUST SPIRAL CABLE |
Check that the ignition switch is turned to OFF.
Check that the negative (-) battery terminal is disconnected.
- CAUTION:
- After removing the terminal, wait for at least 90 seconds before starting the operation.
Rotate the spiral cable counterclockwise slowly by hand until it feels firm.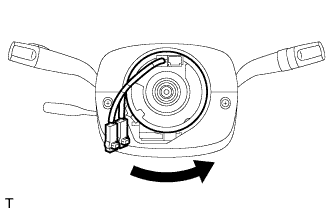

- NOTICE:
- Do not turn the spiral cable with the airbag wire harness or connector.
Rotate the spiral cable clockwise approximately 2.5 turns to align the marks.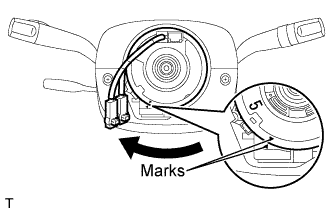
- NOTICE:
- Do not turn the spiral cable with the airbag wire harness or connector.
- HINT:
- The spiral cable will rotate approximately 2.5 turns both ways from the center.
| 12. INSTALL STEERING WHEEL ASSEMBLY |
Align the matchmarks on the steering wheel assembly and the main shaft assembly.
Install the steering wheel assembly set nut.
- Torque:
- 50 N*m{ 510 kgf*cm , 37 ft.*lbf }
| 13. INSTALL STEERING PAD |
Support the steering pad with one hand as shown in the illustration.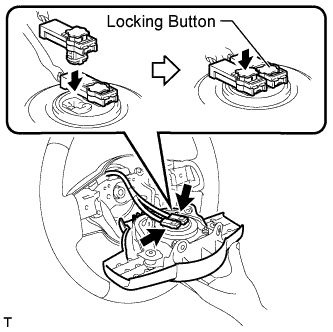
Connect the 2 connectors to the steering pad.
- NOTICE:
- When handling the airbag connector, take care not to damage the airbag wire harness.
Connect the horn connector.
Confirm that the circumferencial groove of the "Torx" screw fits in the screw case, and place the steering pad onto the steering wheel assembly.
Using "Torx" socket wrench (T30), tighten the 2 "Torx" screws.
- Torque:
- 8.8 N*m{ 90 kgf*cm , 78 in.*lbf }
- NOTICE:
- Tighten the 2 bolts while holding the steering pad to prevent it from moving upward.
| 14. INSTALL LOWER NO. 3 STEERING WHEEL COVER |
Install steering wheel cover lower No.3.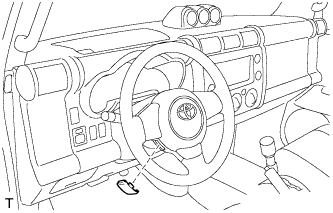
| 15. INSTALL LOWER NO. 2 STEERING WHEEL COVER |
Install steering wheel cover lower No.2.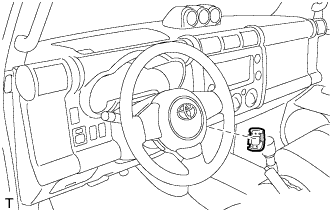
| 16. INSTALL STEERING COLUMN HOLE COVER |
Install the steering column hole cover with the 4 clips.
| 17. INSTALL NO. 1 AIR DUCT (for LHD) |
Engage the 3 claws and install the air duct.
| 18. INSTALL NO. 1 AIR DUCT (for RHD) |
Engage the 2 claws and install the air duct.
Tighten the screw.
| 19. INSTALL FRONT FLOOR FOOTREST (for LHD) |
Engage the 2 studs and install the front floor footrest.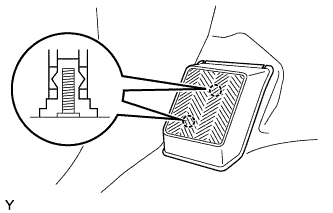
| 20. INSTALL LOWER INSTRUMENT PANEL LH (for LHD) |
Install the lower instrument panel with the 4 <E> bolts.
| 21. INSTALL LOWER INSTRUMENT PANEL FINISH PANEL (for LHD) |
Engage the 5 clips and claw and install the lower instrument panel finish panel.
Install the 2 <E> bolts.
| 22. INSTALL LOWER INSTRUMENT PANEL FINISH PANEL (for RHD) |
Connect the connectors.
Engage the 8 clips and 4 guides and install the lower instrument panel finish panel.
Install the 2 <E> bolts.
| 23. INSTALL INSTRUMENT PANEL FINISH PLATE |
Install the instrument panel finish plate.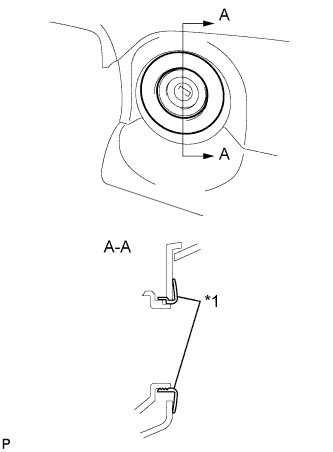
Text in Illustration *1
Instrument Panel Finish Plate
| 24. INSTALL FUEL LID LOCK OPEN LEVER SUB-ASSEMBLY (for RHD) |
Engage the 3 claws and install the fuel lid lock open lever.
| 25. INSTALL HOOD LOCK CONTROL LEVER SUB-ASSEMBLY |
Engage the 3 claws and install the hood lock control lever.
| 26. INSTALL NO. 1 INSTRUMENT PANEL REGISTER ASSEMBLY |
Engage the 4 clips and 2 claws and install the instrument panel register.
| 27. INSTALL FRONT DOOR OPENING TRIM WEATHERSTRIP LH |
Install the front door opening trim weatherstrip.
| 28. INSTALL COWL SIDE TRIM BOARD LH |
- HINT:
- Use the same procedure as for the RH side.
| 29. INSTALL FRONT DOOR SCUFF PLATE LH |
- HINT:
- Use the same procedure as for the RH side.
| 30. CONNECT CABLE TO NEGATIVE BATTERY TERMINAL |
- Torque:
- 3.9 N*m{ 40 kgf*cm , 35 in.*lbf }
| 31. INSPECT STEERING WHEEL CENTER POINT |
| 32. INSPECT SRS WARNING LIGHT |