REASSEMBLY
Removal / installation · Vehicles built from Jul 2007
| 1. INSTALL 1ST AND REVERSE SHIFT ARM |

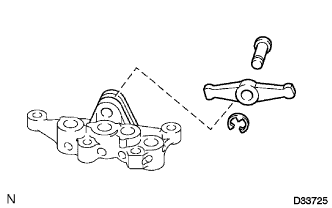  |
Install the shift arm and shift arm pivot onto the interlock bracket.
Install a new E-ring onto the shift arm pivot.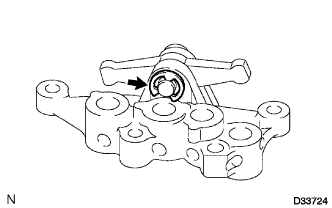
| 2. INSTALL NO. 4 GEAR SHIFT FORK SHAFT |
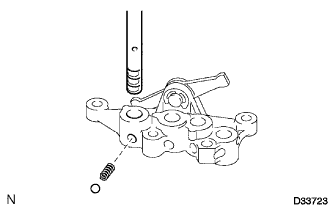 |
Install the spring and ball onto the interlock bracket.
Install the No. 4 shift fork shaft.
| 3. INSTALL NO. 4 GEAR SHIFT FORK |
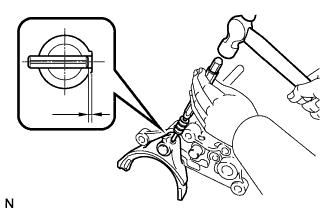 |
Install the No. 4 shift fork onto the No. 4 shift fork shaft .
Using a pin punch (5 mm (0.20 in.)) and hammer, tap a new slotted pin into the No. 4 shaft fork and No. 4 shift fork shaft.
- Drive in depth:
- 0 to 0.5 mm (0 to 0.050 in.)
| 4. INSTALL NO. 1 GEAR SHIFT FORK |
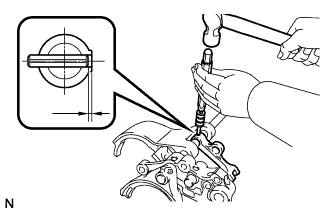 |
Install the No. 1 shift fork and No. 2 shift head onto the No. 4 shift fork shaft.
Using a pin punch (5 mm (0.20 in.)) and hammer, tap a new slotted pin into the No. 2 shaft head and No. 4 shift fork shaft.
- Drive in depth:
- 0 to 0.5 mm (0 to 0.050 in.)
| 5. INSTALL NO. 1 GEAR SHIFT FORK SHAFT |
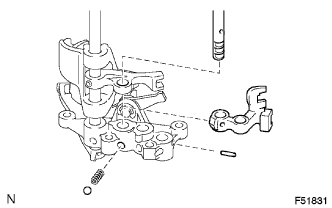 |
Apply MP grease to the No. 1 interlock pin and install it into the interlock bracket.
Install the spring and ball into the interlock bracket.
Install the No. 1 shift fork shaft onto the interlock bracket.
- HINT:
- Place the No. 4 shift fork shaft in the neutral position.
| 6. INSTALL NO. 1 GEAR SHIFT HEAD |
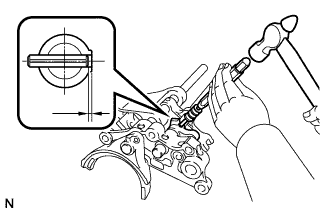 |
Install the No. 1 shift head into the No. 1 shift fork shaft.
Using a pin punch (5 mm (0.20 in.)) and hammer, tap a new slotted pin into the No. 1 shaft head and No. 1 shift fork shaft.
- Drive in depth:
- 0 to 0.5 mm (0 to 0.050 in.)
| 7. INSTALL NO. 2 GEAR SHIFT FORK SHAFT |
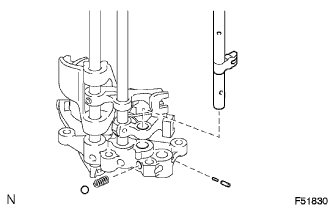 |
Apply MP grease to the No. 2 and No. 3 interlock pins, then install them onto the interlock bracket.
Install the spring and ball into the interlock bracket.
Install the No. 2 shift fork shaft onto the interlock bracket.
- HINT:
- Place the No. 3 and No. 4 shift fork shafts in the neutral position.
| 8. INSTALL NO. 2 GEAR SHIFT FORK |
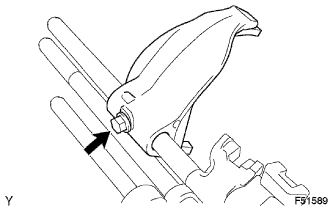 |
Install the No. 2 shift fork with the bolt.
- Torque:
- 20 N*m{ 199 kgf*cm , 14 ft.*lbf }
| 9. INSTALL NO. 3 GEAR SHIFT FORK SHAFT |
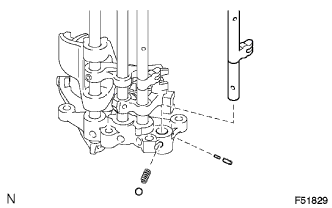 |
Apply MP grease to the No. 2 and No. 3 interlock pins, then install them onto the interlock bracket.
Install the spring and ball into the interlock bracket.
Install the No. 3 shift fork shaft onto the interlock bracket.
- HINT:
- Place the No. 2, No. 1 and No. 4 shift fork shafts in the neutral position.
| 10. INSTALL NO. 3 GEAR SHIFT FORK |
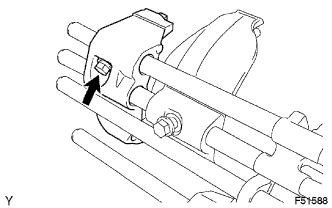 |
Install the No. 3 shift fork with the bolt.
- Torque:
- 20 N*m{ 199 kgf*cm , 14 ft.*lbf }
| 11. INSTALL TRANSMISSION CASE OIL SEAL |
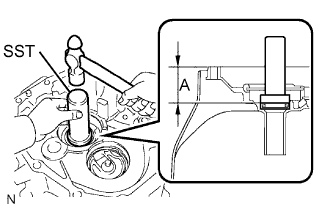 |
Using SST and a hammer, tap a new oil seal into the front case in accordance with the dimension specified in the illustration.
- SST
- 09950-70010
(09951-07100)
09950-60010 (09951-00470)
- Dimension A:
- 60.0 to 60.8 mm (2.362 to 2.394 in.)
Apply gear oil to the lip of the oil seal.
| 12. INSTALL FRONT BEARING SHAFT SNAP RING |
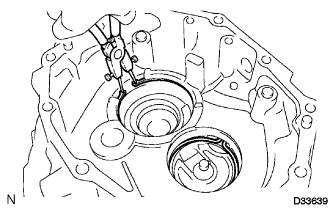 |
Using snap ring pliers, install the 2 snap rings.
| 13. INSTALL NO. 1 OIL RECEIVER PIPE |
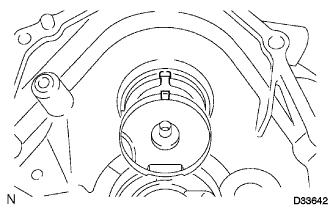 |
Install the No. 1 oil receiver pipe onto the transmission front case.
- HINT:
- Align the convex portion of the oil receiver pipe with the cutout of the front case and install the oil receiver pipe onto the clutch housing.
| 14. INSTALL TRANSMISSION FRONT CASE |
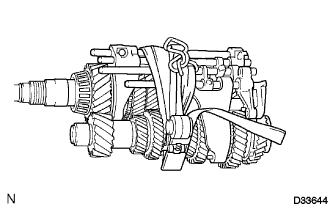 |
Apply gear oil to all sliding and rotating parts.
Provisionally install the output shaft, input shaft, counter gear shaft and control assembly, and tie them with a piece of rope or string.
Using a snap ring expander, extend the 2 snap rings and install the output shaft, input shaft, counter gear shaft and control assembly.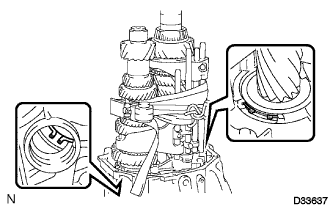
- HINT:
- Make sure that the snap ring is fitted into the grooves of the input shaft and front bearing of the counter gear shaft.
Untie the output shaft, input shaft, counter gear shaft and control assembly.
Using a hexagonal wrench (27 mm), install the plug onto the front case.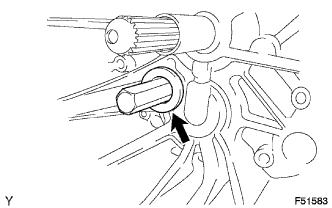
- Torque:
- 39 N*m{ 400 kgf*cm , 29 ft.*lbf }
Install the interlock bracket with the 4 bolts.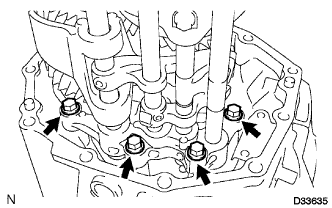
- Torque:
- 21 N*m{ 214 kgf*cm , 15 ft.*lbf }
| 15. INSTALL REVERSE IDLER GEAR |
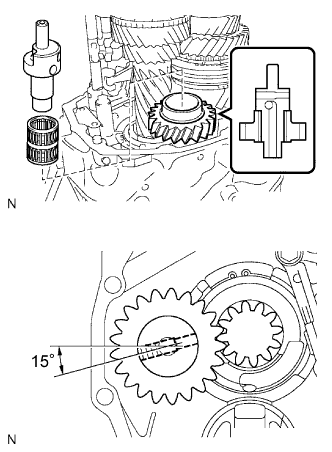 |
Install the reverse idler gear, reverse idler gear bearing and reverse idler gear shaft.
- HINT:
- Make sure that the reverse idler gear faces the correct direction as shown in the illustration.
- NOTICE:
- Make sure that the hole in the reverse idler shaft is in the position shown in the illustration.
| 16. INSTALL BACK-UP LIGHT SWITCH ASSEMBLY |
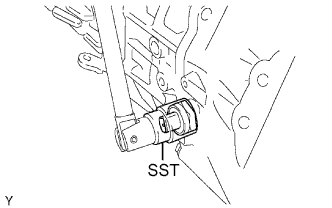 |
Using SST, install the back-up light switch with a new gasket onto the transmission front case.
- SST
- 09817-16011
- Torque:
- 44 N*m{ 449 kgf*cm , 33 ft.*lbf }
| 17. INSTALL SHIFT AND SELECT LEVER CAM |
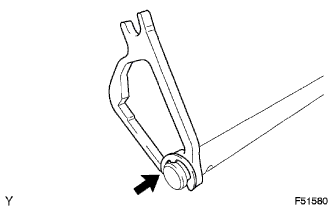 |
Install the shift and select lever cam onto the shaft and install a new E-ring.
| 18. INSTALL SHIFT AND SELECT LEVER |
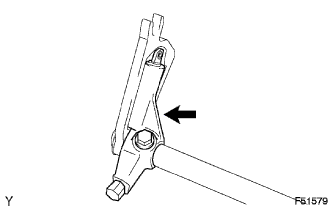 |
Install the lock ball pin and spring onto the shift and select lever.
Install the shift and select lever onto the shift and select lever cam and shaft.
Install the bolt onto the shift and select lever.
- Torque:
- 33 N*m{ 340 kgf*cm , 25 ft.*lbf }
| 19. INSTALL SHIFT AND SELECT LEVER SHAFT |
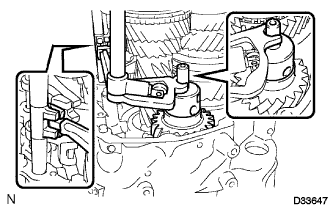 |
Align the groove of the shift and select cam with the reverse idler shaft, and the claw with the groove of the control assembly, and install them.
| 20. INSTALL NO. 2 OIL RECEIVER PIPE |
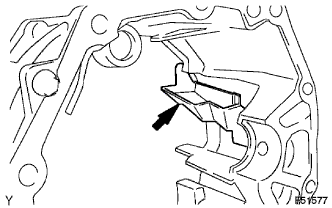 |
Install the No. 2 oil receiver pipe into the transmission middle case.
| 21. INSTALL DRAIN PLUG SUB-ASSEMBLY |
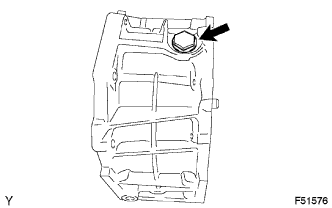 |
Install the drain plug with a new gasket onto the transmission middle case.
- Torque:
- 37 N*m{ 377 kgf*cm , 27 ft.*lbf }
| 22. INSTALL TRANSMISSION MIDDLE CASE |
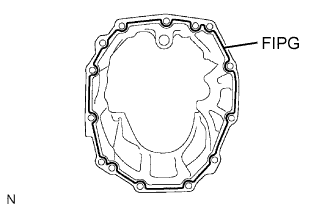 |
Apply FIPG to the transmission middle case, as shown in the illustration.
- FIPG:
- Toyota Genuine Seal Packing 1281, Three Bond 1281 or Equivalent
- NOTICE:
- Parts must be assembled within 10 minutes of the application. Otherwise, the packing (FIPG) material must be removed and reapplied.
Install the transmission middle case with the 11 bolts onto the transmission front case.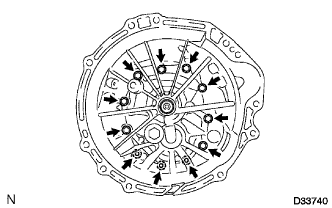
- Torque:
- 40 N*m{ 408 kgf*cm , 30 ft.*lbf }
- Bolt length:
- Bolt A: 40 mm (1.57 in.)
- Bolt B: 80 mm (3.15 in.)
| 23. INSTALL REVERSE IDLER GEAR SHAFT BOLT |
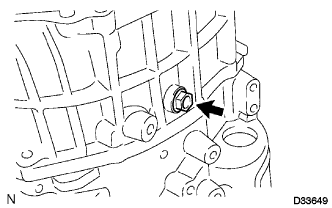 |
Install a new gasket and the reverse idler gear shaft bolt onto the reverse idler gear shaft.
- Torque:
- 28 N*m{ 286 kgf*cm , 21 ft.*lbf }
| 24. INSTALL TRANSMISSION OIL SEPARATOR |
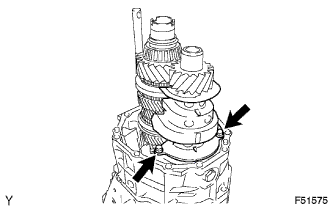 |
Install the transmission oil separator with the 2 bolts.
- Torque:
- 8.5 N*m{ 87 kgf*cm , 75 in.*lbf }
| 25. INSTALL COUNTER GEAR REAR RADIAL BALL BEARING |
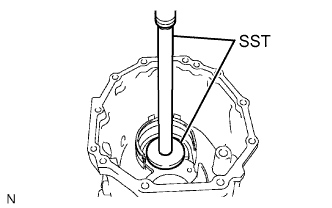 |
Coat a new counter gear rear radial ball bearing with gear oil, and using SST and a press, install it into the transmission rear case.
- SST
- 09950-70010
(09951-07360)
09950-60010 (09951-00650)
Install the bearing lock plate with the bolt.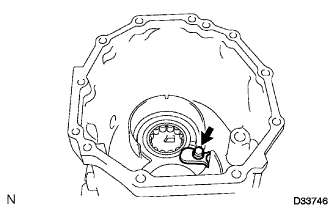
- Torque:
- 11 N*m{ 115 kgf*cm , 8.3 ft.*lbf }
| 26. INSTALL OUTPUT SHAFT REAR BEARING OUTER RACE |
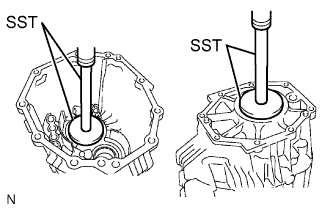 |
Using SST and a press, press in 2 new bearing outer races.
- SST
- 09950-70010
(09951-07100, 09951-07360)
09950-60020 (09951-00790)
| 27. INSTALL OIL SEPARATOR PACKING SEAL |
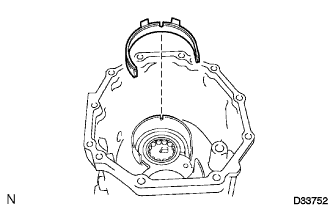 |
Install the oil separator packing seal onto the transmission rear case.
- HINT:
- Insert the protruding part of the oil separator packing seal into the groove on the transmission rear case.
| 28. INSTALL EXTENSION HOUSING OIL RECEIVER PIPE |
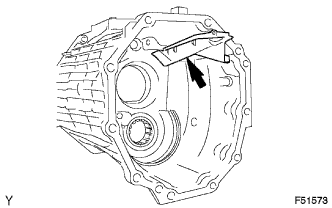 |
Install the extension housing oil receiver pipe onto the transmission rear case.
| 29. INSTALL MANUAL TRANSMISSION FILLER PLUG |
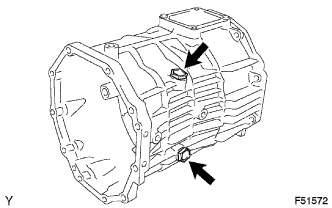 |
Install the 2 transmission filler plugs with 2 new gaskets onto the transmission rear case.
- Torque:
- 37 N*m{ 377 kgf*cm , 27 ft.*lbf }
| 30. INSTALL TRANSMISSION REAR CASE |
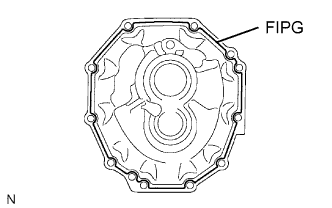 |
Apply FIPG to the transmission rear case, as shown in the illustration.
- FIPG:
- Toyota Genuine Seal Packing 1281, Three Bond 1281 or Equivalent
- NOTICE:
- Parts must be assembled within 10 minutes of the application. Otherwise, the packing (FIPG) material must be removed and reapplied.
Install the transmission rear case with the 10 bolts and 3 brackets onto the transmission middle case.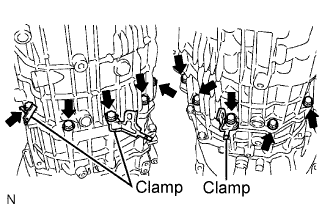
- Torque:
- 40 N*m{ 408 kgf*cm , 30 ft.*lbf }
| 31. INSTALL SHIFT DETENT BALL PLUG |
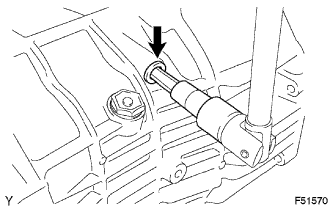 |
Install the ball and compression spring onto the transmission rear case.
Install a new shift detent ball plug, and install it onto the transmission rear case.
- Torque:
- 25 N*m{ 250 kgf*cm , 18 ft.*lbf }
| 32. INSTALL OUTPUT SHAFT ADJUST NUT |
Using a belt and wooden block, securely fasten the transmission to the workbench.
Install a new spacer and a new No. 2 taper roller bearing.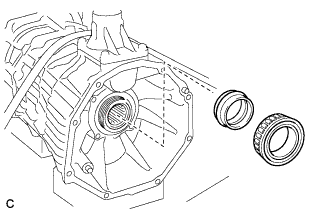
Temporarily tighten a new nut by hand.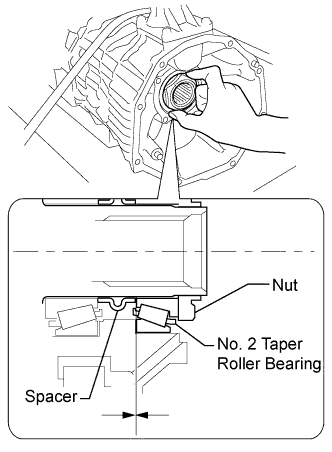
- HINT:
- Fit the spacer and No. 2 taper roller bearing securely.
Move the shift and select lever shaft to N.
Fit the bearing into the output shaft by turning the output shaft 15 times.
Using SST and a torque wrench, inspect preload (at starting)*1.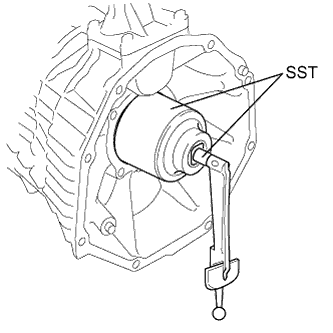
- SST
- 09326-35010
(09326-03010, 09326-03020)
Engage 5th gear, and then secure the input shaft using SST.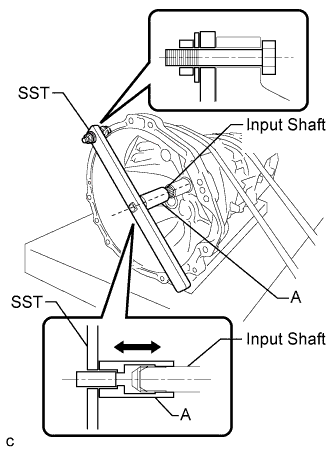
- SST
- 09322-35010
(09322-03010, 09322-03020, 09322-03030, 90105-12087, 90170-12030, 94622-51200)
- HINT:
- Install SST securely so that (A) is in-line with the input shaft.
- Make sure that (A) moves back and forth by hand after installing SST.
- Install SST securely so that (A) is in-line with the input shaft.
Using SST, tighten the nut.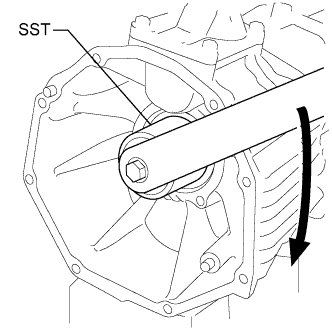
- SST
- 09326-35010
(09326-03010)
- Torque:
- Reference:
- 410 to 750 N*m{ 4180 to 7648 kgf*cm , 303 to 554 ft.*lbf }
Move the shift and select lever shaft to N.
Fit the bearing into the output shaft by turning the output shaft 15 times.
Using SST and a torque wrench, inspect preload (at starting)*2.
- SST
- 09326-35010
(09326-03010, 09326-03020)
Adjust the preload so that the difference between *1 and *2 is within the specified range.
- Preload (at starting):
- *2 - *1 = 0.45 to 1.35 N*m (4.59 to 13.77 kgf*cm, 3.98 to 11.95 in.*lbf)
- NOTICE:
- If the result is not as specified, tighten and adjust the output shaft adjusting nut.
- If the output shaft adjusting nut is loose or removed due to a large preload, always replace the spacer and nut with new ones.
- If the result is not as specified, tighten and adjust the output shaft adjusting nut.
Using a chisel and hammer, caulk the output shaft adjust nut.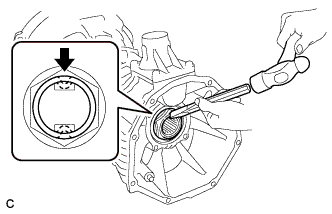
| 33. INSTALL MANUAL TRANSMISSION CASE COVER SUB-ASSEMBLY |
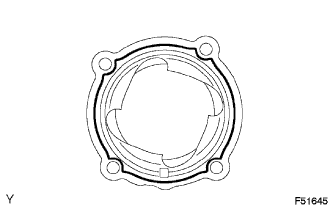 |
Apply FIPG to the transmission case cover, as shown in the illustration.
- FIPG:
- Toyota Genuine Seal Packing 1281, Three Bond 1281 or Equivalent
- NOTICE:
- Parts must be assembled within 10 minutes of the application. Otherwise, the packing (FIPG) material must be removed and reapplied.
Install the transmission case cover with the 4 bolts.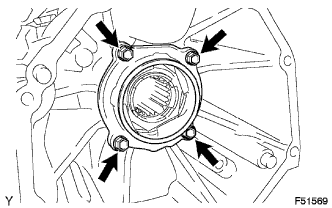
- Torque:
- 18 N*m{ 184 kgf*cm , 13 ft.*lbf }
| 34. INSTALL SHIFT LEVER HOUSING |
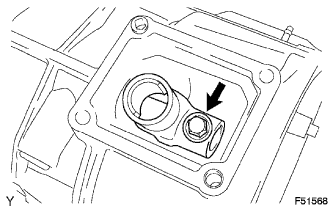 |
Install the shift lever housing with the bolt.
- Torque:
- 33 N*m{ 340 kgf*cm , 25 ft.*lbf }
| 35. INSTALL FLOOR SHIFT CONTROL SHIFT LEVER RETAINER SUB-ASSEMBLY |
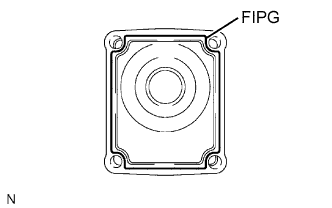 |
Apply FIPG to the floor shift control shift lever retainer, as shown in the illustration.
- FIPG:
- Toyota Genuine Seal Packing 1281, Three Bond 1281 or Equivalent
- NOTICE:
- Parts must be assembled within 10 minutes of the application. Otherwise, the packing (FIPG) material must be removed and reapplied.
Install the floor shift control shift lever retainer with the 4 bolts.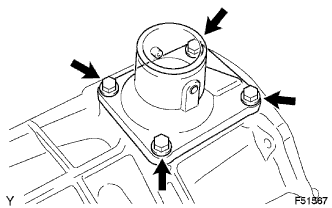
- Torque:
- 20 N*m{ 204 kgf*cm , 15 ft.*lbf }