CALIBRATION
Troubleshooting · Vehicles built from Aug 2012
Versions by build date: Jul 2007 – Jul 2008 Aug 2008 – Oct 2010 Nov 2010 – Jul 2012 from Aug 2012
| DESCRIPTION |
After replacing the VSC relevant components or performing "Front wheel alignment adjustment", clearing and reading the sensor calibration data are necessary.
Follow the chart to perform calibration.
Replacing Parts
Necessary Operations
Skid Control ECU
Yaw rate and deceleration sensor zero point calibration.
Yaw Rate Sensor
- Clearing zero point calibration data.
- Yaw rate and deceleration sensor zero point calibration.
Front Wheel Alignment
- Clearing zero point calibration data.
- Yaw rate and deceleration sensor zero point calibration.
- Clearing zero point calibration data.
| CLEAR ZERO POINT CALIBRATION (for Using an Intelligent Tester) |
- HINT:
- After replacing the yaw rate and deceleration sensor or adjusting the front wheel alignment, be sure to clear the zero point calibration data in the skid control ECU and perform zero point calibration.
Turn the ignition switch off.
Check that the steering wheel is in the straight-ahead position.
for Automatic Transmission:
Check that the shift lever is in P and apply the parking brake.
for Manual Transmission:
Check that the shift lever is in N and apply the parking brake.Connect the intelligent tester to the DLC3.
Turn the ignition switch to ON.
Enter the following menus: Chassis / ABS/VSC/TRC / Utility / Reset Memory
| PERFORM ZERO POINT CALIBRATION OF YAW RATE AND DECELERATION SENSOR (for Using an Intelligent Tester) |
- HINT:
- After replacing the skid control ECU and/or yaw rate and deceleration sensor, or adjusting the front wheel alignment, be sure to perform yaw rate and deceleration sensor zero point calibration.
- NOTICE:
- While obtaining the zero point, do not vibrate the vehicle by tilting, moving or shaking it and keep it stationary. (Do not start the engine.)
- Be sure to do this on a level surface (with an inclination of less than 1 degree).
- While obtaining the zero point, do not vibrate the vehicle by tilting, moving or shaking it and keep it stationary. (Do not start the engine.)
Procedures for test mode.
Turn the ignition switch off.
Check that the steering wheel is in the straight-ahead position.
for Automatic Transmission:
Check that the shift lever is in P and apply the parking brake.
for Manual Transmission:
Check that the shift lever is in N and apply the parking brake.- NOTICE:
- DTC C1210 and C1336 will be recorded if the shift lever is not in P (for automatic transmission) or the parking brake is not applied (for manual transmission).
Connect the intelligent tester to the DLC3.
Turn the ignition switch to ON.
Switch the ECU to test mode using the intelligent tester.
Enter the following menus: Chassis / ABS/VSC/TRC / Utility / Test ModeKeep the vehicle stationary on a level surface for 5 seconds or more.
Check that the SLIP indicator light blinks as shown in the illustration.
- NOTICE:
- The SLIP indicator light stays ON when obtaining the zero point.
- HINT:
- If the SLIP indicator light does not blink, perform the zero point calibration again.
- The zero point calibration is performed only once after the system enters test mode.
- Calibration cannot be performed again until the stored data is cleared once.
- If the SLIP indicator light does not blink, perform the zero point calibration again.
| CLEAR ZERO POINT CALIBRATION (for Using SST Check Wire) |
- HINT:
- After replacing the yaw rate and deceleration sensor or adjusting the front wheel alignment, be sure to clear the zero point calibration data in the skid control ECU and perform zero point calibration.
Turn the ignition switch to ON.
Using SST, connect and disconnect terminals 12 (TS) and 4 (CG) of the DLC3 4 times or more within 8 seconds.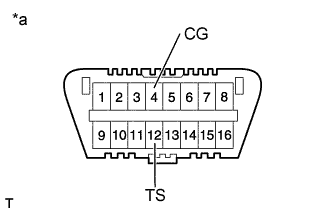

- SST
- 09843-18040
Text in Illustration *a
Front view of DLC3
Check that the warning light blinks in a normal system indication pattern.
| PERFORM ZERO POINT CALIBRATION OF YAW RATE AND DECELERATION SENSOR (for Using SST Check Wire) |
- HINT:
- After replacing the skid control ECU and/or yaw rate and deceleration sensor, or adjusting the front wheel alignment, be sure to perform yaw rate and deceleration sensor zero point calibration.
- NOTICE:
- While obtaining the zero point, do not vibrate the vehicle by tilting, moving or shaking it and keep it stationary. (Do not start the engine.)
- Be sure to do this on a level surface (with an inclination of less than 1 degree).
- While obtaining the zero point, do not vibrate the vehicle by tilting, moving or shaking it and keep it stationary. (Do not start the engine.)
Procedures for test mode:
Turn the ignition switch off.
Check that the steering wheel is in the straight-ahead position.
for Automatic Transmission:
Check that the shift lever is in P and apply the parking brake.
for Manual Transmission:
Check that the shift lever is in N and apply the parking brake.- NOTICE:
- DTC C1210 and C1336 will be recorded if the shift lever is not in P (for automatic transmission) or the parking brake is not applied (for manual transmission).
Using SST, connect terminals 12 (TS) and 4 (CG) of the DLC3.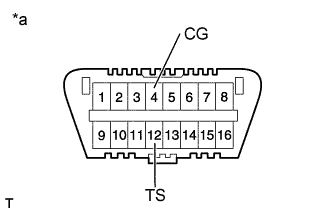
- SST
- 09843-18040
Text in Illustration *a
Front view of DLC3
Turn the ignition switch to ON.
Keep the vehicle stationary on a level surface for 5 seconds or more.
Check that the SLIP indicator light blinks as shown in the illustration.
- NOTICE:
- The SLIP indicator light stays ON when obtaining the zero point.
- HINT:
- If the SLIP indicator light does not blink, perform the zero point calibration again.
- The zero point calibration is performed only once after the system enters test mode.
- Calibration cannot be performed again until the stored data is cleared once.
- If the SLIP indicator light does not blink, perform the zero point calibration again.