Hazard Warning Switch Circuit
Circuit diagnosis · Vehicles built Jul 2007 – Oct 2010
Versions by build date: Jul 2007 – Oct 2010 from Nov 2010
DESCRIPTION
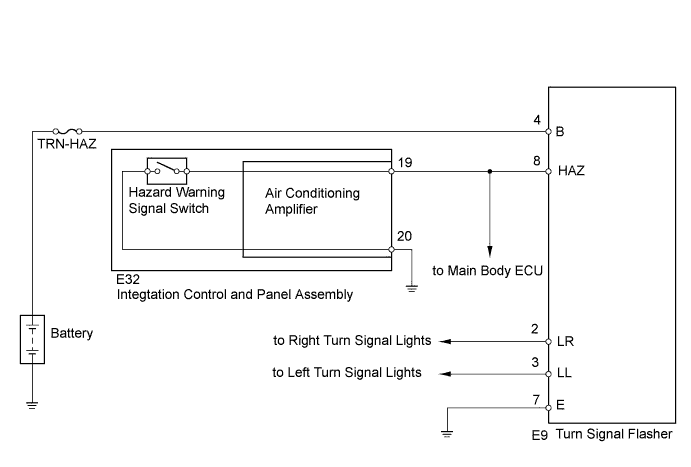
When the hazard warning switch is turned on, the turn signal flasher relay turns on to flash the hazard warning signal lights.WIRING DIAGRAM

INSPECTION PROCEDURE
| 1. PERFORM ACTIVE TEST USING INTELLIGENT TESTER (HAZARD) |
 |
Connect the intelligent tester to the DLC3.
Turn the ignition switch to ON.
Turn the tester on.
Enter the following menus: Body Electrical / Body / Active Test / Hazard
Check the hazard warning signal light while operating the hazard using the tester.
- Body (Main Body ECU):
Tester Display
|
Test Part
|
Control Range
|
Normal Condition
|
Hazard
|
Turn signal flasher
|
ON/OFF
|
-
|
- OK:
- The hazard warning signal light flash when operating it through the intelligent tester.
|
OK |
 |
|
|
|
| NG |
|
 |
|
| 2. INSPECT FUSE (TRN-HAZ) |
|
Remove the TRN-HAZ fuse from the No. 2 engine room relay block.
Measure the resistance according value(s) in the table below.
- Standard resistance:
Tester Connection
|
Condition
|
Specified Condition
|
TRN-HAZ fuse
|
Always
|
Below 1 Ω
|
Reinstall the TRN-HAZ fuse.
|
NG |
 |
|
|
|
| OK |
|
|
|
| 3. CHECK HARNESS AND CONNECTOR (FUSE - TURN SIGNAL FLASHER RELAY - BODY GROUND) |
|
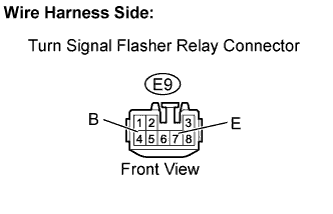
- Disconnect the E9 turn signal flasher relay connector.
Measure the voltage according value(s) in the table below.
- Standard voltage:
Tester Connection
|
Condition
|
Specified Condition
|
E9-4 (B) - Body ground
|
Always
|
11 to 14 V
|
Measure the resistance according value(s) in the table below.
- Standard resistance:
Tester Connection
|
Condition
|
Specified Condition
|
E9-7 (E) - Body ground
|
Always
|
Below 1 Ω
|
Reconnect the turn signal flasher relay connector.
|
NG |
|
|
| REPAIR OR REPLACE HARNESS OR CONNECTOR |
|
|
| OK |
|
 |
|
| REPLACE TURN SIGNAL FLASHER RELAY |
|
| 4. INSPECT INTEGRATION CONTROL AND PANEL ASSEMBLY (HAZARD WARNING SWITCH) |
|
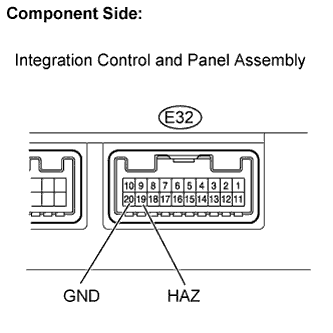
Disconnect the E32 integration control and panel assembly connector.
Measure the resistance according value(s) in the table below.
- Standard resistance:
Tester Connection
|
Condition
|
Specified Condition
|
19 (HAZ) - 20 (GND)
|
Hazard warning switch OFF
|
10 kΩ or higher
|
19 (HAZ) - 20 (GND)
|
Hazard warning switch ON
|
Below 3 Ω
|
Reconnect the integration control and panel assembly connector.
|
NG |
|
|
| REPLACE INTEGRATION CONTROL AND PANEL ASSEMBLY (Click here)
|
|
|
| OK |
|
|
|
| 5. CHECK HARNESS AND CONNECTOR (INTEGRATION CONTROL AND PANEL - MAIN BODY ECU, BODY GROUND) |
|
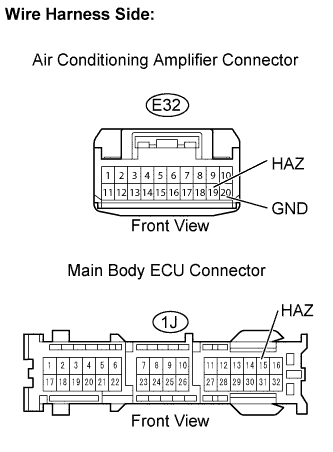
- Disconnect the E32 integration control and panel assembly connector.
Disconnect the 1J main body ECU connector.
Measure the resistance according value(s) in the table below.
- Standard resistance:
Tester Connection
|
Condition
|
Specified Condition
|
E32-19 (HAZ) - 1J-15 (HAZ)
|
Always
|
Below 1 Ω
|
E32-19 (HAZ) or 1J-15 (HAZ) - Body ground
|
Always
|
10 kΩ or higher
|
E32-20 (GND) - Body ground
|
Always
|
Below 1 Ω
|
Reconnect the integration control and panel assembly connector.
Reconnect the main body ECU connector.
|
NG |
|
|
| REPAIR OR REPLACE HARNESS OR CONNECTOR |
|
|
| OK |
|
|
|
| PROCEED TO NEXT CIRCUIT INSPECTION SHOWN IN PROBLEM SYMPTOMS TABLE (Click here)
|
|