INSTALLATION
Removal / installation · Vehicles built Aug 2009 – Oct 2010
Versions by build date: Jul 2007 – Jul 2009 Aug 2009 – Oct 2010 Nov 2010 – Jul 2014 from Aug 2014
| 1. INSTALL GENERATOR ASSEMBLY |

Install the generator bracket to the generator with the bolt.
- Torque:
- 20 N*m{ 204 kgf*cm , 15 ft.*lbf }
Install the generator with the 2 bolts.
- Torque:
- 43 N*m{ 438 kgf*cm , 32 ft.*lbf }
Install the generator bracket with the bolt.
- Torque:
- 20 N*m{ 204 kgf*cm , 15 ft.*lbf }
Attach the wire harness clamp.
Install the wire harness with the 2 bolts.
- Torque:
- 8.0 N*m{ 82 kgf*cm , 71 in.*lbf }
Connect the generator connector to the generator.
Install the generator wire with the nut.
- Torque:
- 9.8 N*m{ 100 kgf*cm , 87 in.*lbf }
Close the terminal cap.
| 2. INSTALL FRONT FENDER APRON SEAL LH |
Install the apron seal with the 5 clips.
| 3. INSTALL NO. 2 EXHAUST MANIFOLD HEAT INSULATOR |
Install the heat insulator with the 3 bolts.
- Torque:
- 13 N*m{ 133 kgf*cm , 10 ft.*lbf }
| 4. INSTALL WIRING HARNESS CLAMP BRACKET |
Install the wiring harness clamp bracket with the bolt.
- Torque:
- 8.0 N*m{ 82 kgf*cm , 71 in.*lbf }
Connect the clamp.
| 5. INSTALL FAN AND GENERATOR V BELT |
Set the V belt onto every part.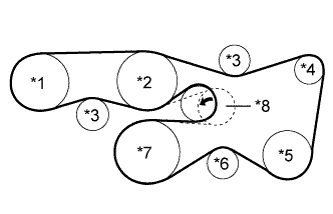

Text in Illustration *1
Vane Pump
*2
Water Pump
*3
No. 2 Idler
*4
Generator
*5
Cooler Compressor or Idler Pulley
*6
No. 1 Idler
*7
Crankshaft
*8
V-Ribbed Belt Tensioner
While turning the belt tensioner counterclockwise, remove the pin.
- NOTICE:
- Make sure that the V belt is properly installed to each pulley.
Check that the belt fits properly in the ribbed grooves.
- HINT:
- Make sure to check by hand that the belt has not slipped out of the grooves on the bottom of the pulley.
| 6. INSTALL V-BANK COVER |
Engage the 2 V-bank cover hooks to the bracket.
Align the 2 V-bank cover grommets with the 2 pins and press down on the V-bank cover to engage the pins.
| 7. INSTALL BATTERY TRAY |
| 8. INSTALL BATTERY |
| 9. INSTALL BATTERY HOLD DOWN CLAMP |
Install the battery hold down clamp and tighten the 2 nuts.
- Torque:
- 6.0 N*m{ 61 kgf*cm , 53 in.*lbf }
| 10. CONNECT CABLE TO POSITIVE BATTERY TERMINAL |
- Torque:
- 3.9 N*m{ 40 kgf*cm , 35 in.*lbf }
| 11. CONNECT CABLE TO NEGATIVE BATTERY TERMINAL |
- Torque:
- 3.9 N*m{ 40 kgf*cm , 35 in.*lbf }
- NOTICE:
- When disconnecting the cable, some systems need to be initialized after the cable is reconnected (Click here).