INSTALLATION
Removal / installation · Vehicles built from Jul 2007
- HINT:
- The procedure described below is for the LH side. Use the same procedure for both the RH and LH sides, unless otherwise specified.
| 1. INSTALL NO. 5 BLACK OUT TAPE |

Application precautions (Click here).
Clean the attachment surface (Using an infrared light) (Click here).
Clean the attachment surface (Using a tape removal disc) (Click here).
Apply new No. 5 black out tape to the positions shown in the illustration.
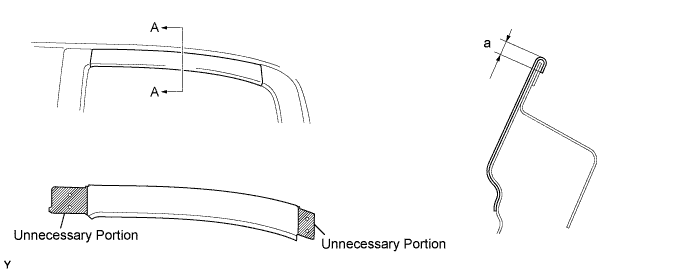

Installation position: Mark
Measurement
a
2 to 4 mm (0.079 to 0.157 in.)
| 2. INSTALL NO. 6 BLACK OUT TAPE |
Application precautions (Click here).
Clean the attachment surface (Using an infrared light) (Click here).
Clean the attachment surface (Using a tape removal disc) (Click here).
Apply new No. 6 black out tape to the positions shown in the illustration.
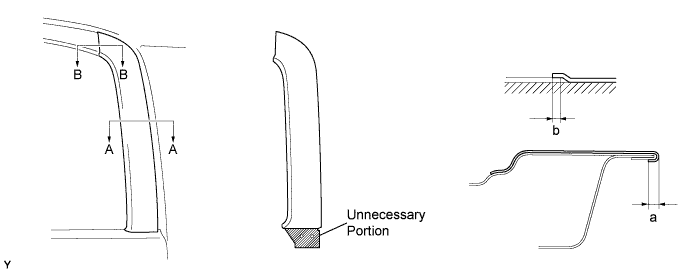
Installation position: Mark
Measurement
a
2 to 4 mm (0.079 to 0.157 in.)
b
2 mm (0.079 in.)
| 3. INSTALL NO. 4 BLACK OUT TAPE |
Application precautions (Click here).
Clean the attachment surface (Using an infrared light) (Click here).
Clean the attachment surface (Using a tape removal disc) (Click here).
Apply new No. 4 black out tape to the positions shown in the illustration.
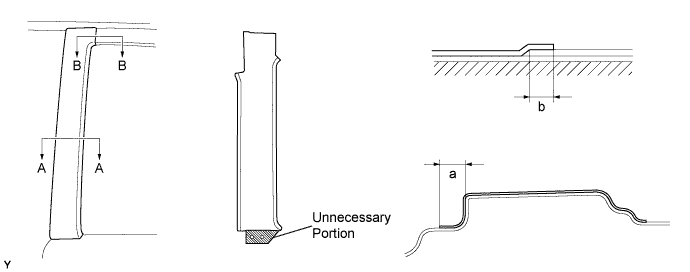
Installation position: Mark
Measurement
a
10 mm (0.394 in.)
b
2 mm (0.079 in.)
| 4. INSTALL ACCESS DOOR GLASS SUB-ASSEMBLY |
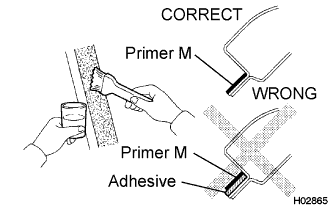 |
Using a brush, apply Primer M to the exposed part of the vehicle body.
- NOTICE:
- Allow the primer to dry for 3 minutes or more.
- Do not apply Primer M to the adhesive.
- Throw away any leftover Primer M.
- Do not apply too much Primer M.
- Allow the primer to dry for 3 minutes or more.
Using a brush or sponge, apply Primer G to the edge of the rear door glass and contact surface.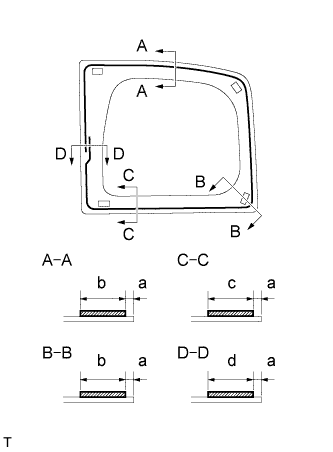
- Specification:
Area
Measurement
a
5.0 mm (0.197 in.)
b
20 mm (0.787 in.)
c
15 mm (0.591 in.)
d
26 mm (1.024 in.)
- NOTICE:
- Allow the primer to dry for 3 minutes or more.
- Throw away any leftover Primer G.
- Do not apply too much Primer G.
- Allow the primer to dry for 3 minutes or more.
- HINT:
- If Primer G is applied to any areas other than those specified, wipe off the primer with a clean shop rag or piece of cloth before it dries.
Apply adhesive.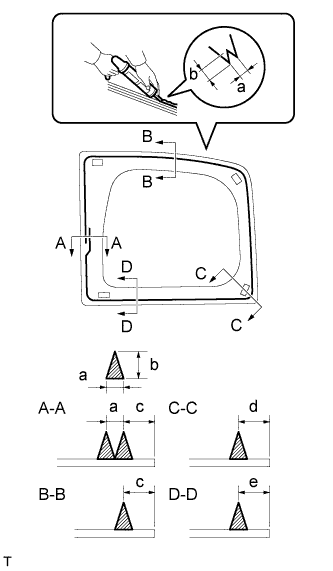
- Adhesive:
- Toyota Genuine Windshield Glass Adhesive or the equivalent
Cut the tip off the cartridge nozzle, as shown in the illustration.
- HINT:
- After cutting off the tip, use all adhesive within the time indicated in the table below.
- Usage time frame:
Temperature
Usage Time Frame
35°C (95°F)
15 minutes
20°C (68°F)
1 hour 40 minutes
5°C (41°F)
8 hours
Load the sealer gun with the cartridge.
Apply adhesive to the rear door glass as shown in the illustration.
- Specification:
Area
Measurement
a
8 mm (0.315 in.)
b
12 mm (0.472 in.)
c
13 mm (0.512 in.)
d
14.2 mm (0.559 in.)
e
11.6 mm (0.457 in.)
Install the rear door glass onto the body.
Hold the quarter window glass in place securely with protective tape or the equivalent until the adhesive hardens.
- NOTICE:
- Allow the primer coating to dry for 3 minutes or more.
- Check that the pins are attached to the body correctly.
- Check the clearance between the body and glass.
- Allow the primer coating to dry for 3 minutes or more.
Lightly press the front surface of the glass to ensure a close fit.
Using a scraper, remove any excessive or protruding adhesive.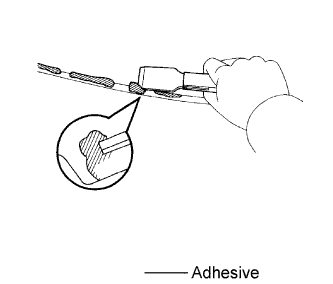
- HINT:
- Apply adhesive to the rear door glass rim.
- NOTICE:
- Do not drive the vehicle within the time indicated in the table below.
- Minimum time:
Temperature
Minimum time prior to driving vehicle
35°C (95°F)
1 hour 30 minutes
20°C (68°F)
5 hours
5°C (41°F)
24 hours
| 5. INSTALL ACCESS DOOR GLASS OUTER WEATHERSTRIP |
Engage the 3 clips and install a new access door glass outer weatherstrip.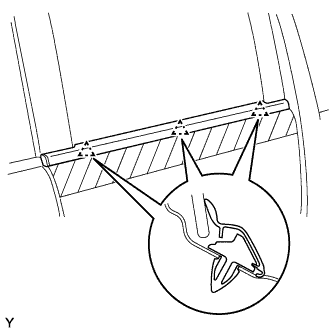
Remove the protective tape.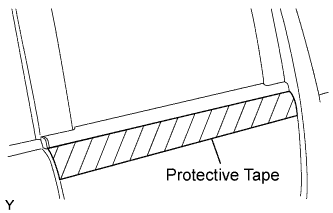
| 6. INSTALL ACCESS PANEL WEATHERSTRIP |
- HINT:
- Use the same procedure as for the RH side (Click here).
| 7. INSTALL ACCESS DOOR OPENING TRIM |
- HINT:
- Use the same procedure as for the RH side (Click here).
| 8. INSTALL CENTER PILLAR UPPER GARNISH |
- HINT:
- Use the same procedure as for the RH side (Click here).
| 9. INSTALL ACCESS DOOR TRIM BOARD SUB-ASSEMBLY |
- HINT:
- Use the same procedure as for the RH side (Click here).
| 10. INSTALL CUP HOLDER |
- HINT:
- Use the same procedure as for the RH side (Click here).
| 11. INSTALL ACCESS DOOR INSIDE HANDLE SUB-ASSEMBLY |
- HINT:
- Use the same procedure as for the RH side (Click here).
| 12. INSTALL LAP BELT OUTER ANCHOR COVER |
- HINT:
- Use the same procedure as for the RH side (Click here).
| 13. INSTALL ACCESS PANEL REAR WEATHERSTRIP |
- HINT:
- Use the same procedure as for the RH side (Click here).