INSTALLATION
Removal / installation · Vehicles built from Nov 2012
Versions by build date: Jul 2007 – Jul 2009 Aug 2009 – Oct 2012 from Nov 2012
| 1. INSTALL FUEL TANK TO FILLER PIPE HOSE |

Install the fuel tank to filler pipe hose to the fuel tank assembly with the hose clamp.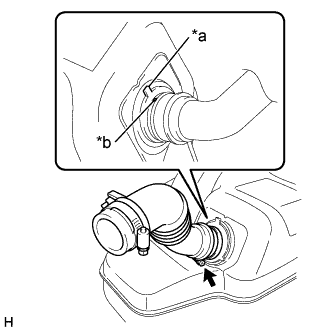

Text in Illustration *a
Fuel Tank Assembly Alignment Mark
*b
Fuel Tank to Filler Pipe Hose Alignment Mark
- HINT:
- Align the fuel tank assembly alignment mark and the fuel tank to filler pipe hose alignment mark in a straight line as shown in the illustration.
| 2. INSTALL FUEL SUCTION TUBE WITH PUMP AND GAUGE ASSEMBLY (for Single Tank Type) |
Install a new gasket onto the fuel tank.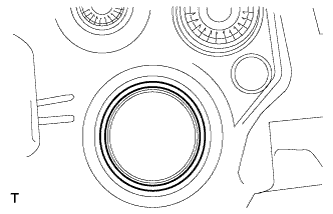
Set the fuel suction tube assembly to the fuel tank.
- NOTICE:
- Do not bend the arm of the fuel sender gauge.
Fit the spline of the fuel suction tube assembly into the keyway of the fuel tank.
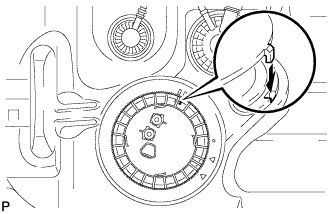
Install a new retainer.
Align the mark on a new retainer with the rib on the fuel tank as shown in the illustration.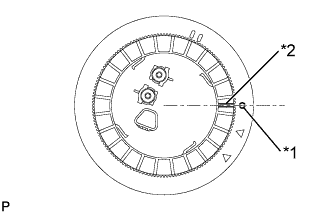
*1
Start Mark (Fuel Tank Side)
*2
Start Mark (Retainer Side)
Using SST, turn the retainer 740° to 760° clockwise (more than 2 turns), and position the mark on the retainer within range A to install it.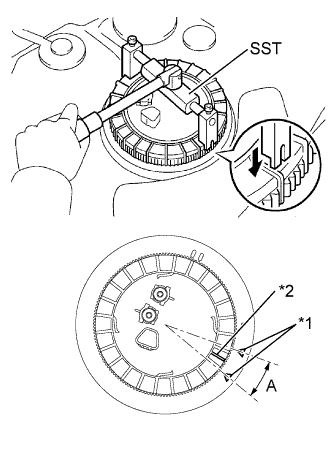
*1
Fuel Tank Side Mark
*2
Retainer Side Mark
- SST
- 09808-14020
(09808-01410, 09808-01420, 09808-01430)
- HINT:
- Align the tips of the SST with the ribs on the retainer.
| 3. INSTALL FUEL SUCTION TUBE WITH PUMP AND GAUGE ASSEMBLY (for Double Tank Type) |
Install the fuel suction tube set gasket to the fuel tank assembly.
Set the fuel suction tube with pump and gauge assembly to the fuel tank.
- NOTICE:
- Make sure that the fuel sender gauge assembly arm does not bend.
Align the protrusions of the fuel suction tube with pump and gauge assembly with the groove of the fuel tank assembly.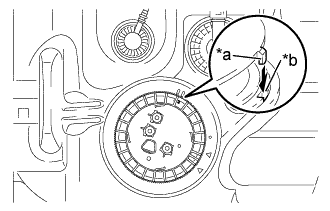
Text in Illustration *a
Protrusion
*b
Groove
While holding the fuel suction tube with pump and gauge assembly by hand to prevent it from tilting, align the mark on a new fuel pump gauge retainer with the start mark on the fuel tank assembly and tighten the fuel pump gauge retainer 180° by hand.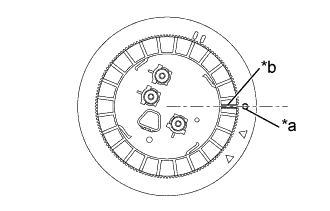
Text in Illustration *a
Start Mark (Fuel Tank Side)
*b
Mark (Retainer Side)
- HINT:
- Check that there is no damage, dents, foreign matter or other defects on the threads of the fuel tank assembly.
Temporarily install the SST plate and claws to the fuel pump gauge retainer.
- SST
- 09808-14030
(09808-01030, 09808-01040, 09808-01050)
- HINT:
- Engage the SST claws securely with the fuel pump gauge retainer ribs to secure SST.
While pressing the claws of SST to the fuel pump gauge retainer ribs securely, tighten the bolts.
- HINT:
- Install SST while pressing the SST claws toward the fuel pump gauge retainer (towards the center of SST).
Install the SST handle to the SST plate.
Tighten the fuel pump gauge retainer approximately 360° so that the mark on the fuel pump gauge retainer comes within the range shown in the illustration.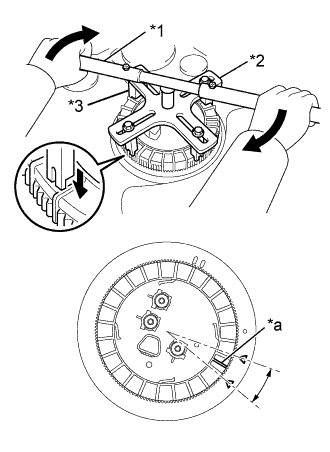
Text in Illustration *1
SST (Handle)
*2
SST (Plate)
*3
SST (Claw)
*a
Mark (Retainer Side)
- SST
- 09808-14030
(09808-01010, 09808-01020, 09808-01030, 09808-01040, 09808-01050)
- NOTICE:
- Do not use any tools other than specified in this operation. Damage to the fuel pump gauge retainer or the fuel tank assembly may result.
- Do not press down on SST excessively as this may make the retainer hard to rotate, and may damage components.
- Make sure to rotate the SST handle horizontally. If the SST handle is rotated at an angle, SST may come off.
- Do not spin SST too fast or use an impact wrench as this may result in damage to components.
- If SST comes off of the fuel pump gauge retainer, loosen the SST bolts and reinstall SST.
- Do not use any tools other than specified in this operation. Damage to the fuel pump gauge retainer or the fuel tank assembly may result.
- HINT:
- Lightly press down on SST to prevent it from separating from the fuel pump gauge retainer. While pressing SST, rotate the handle slowly to tighten the fuel pump gauge retainer.
- The ribs on the fuel pump gauge retainer can be fitted into the tips of SST.
- Lightly press down on SST to prevent it from separating from the fuel pump gauge retainer. While pressing SST, rotate the handle slowly to tighten the fuel pump gauge retainer.
| 4. INSTALL FUEL TANK EVAPORATION VENT TUBE SUB-ASSEMBLY (for Double Tank Type w/ Fuel Tank Evaporation Vent Tube Sub-assembly) |
Install the fuel tank evaporation vent tube sub-assembly to the fuel suction tube with pump and gauge assembly with the hose clip.
| 5. INSTALL NO. 2 FUEL MAIN TUBE SUB-ASSEMBLY (for Double Tank Type) |
Connect the No. 2 fuel main tube sub-assembly to the fuel suction tube with pump and gauge assembly.
Install the tube joint clip.
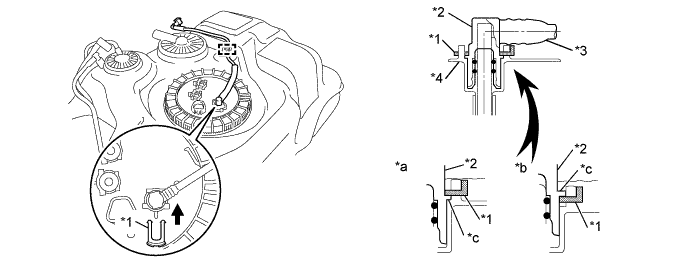
Text in Illustration *1
Tube Joint Clip
*2
Fuel Tube Joint
*3
No. 2 Fuel Main Tube Sub-Assembly
*4
Fuel Suction Plate
*a
OK
*b
NG
*c
Rib
-
-
- NOTICE:
- Make sure there is no damage to or foreign matter on the connecting surfaces.
- Check that the fuel tube joint is correctly and fully inserted.
- Check that the main joint clip is above the rib of the main tube.
- After installing the tube joint clip, make sure the fuel tube joint will not come out.
- Do not damage any of the clips. If a clip is damaged, replace it.
- Make sure there is no damage to or foreign matter on the connecting surfaces.
Engage the clamp and install the No. 2 fuel main tube sub-assembly to the fuel tank assembly.
| 6. INSTALL FUEL TANK MAIN TUBE SUB-ASSEMBLY (for Single Tank Type) |
Connect the fuel tank main tube sub-assembly to the fuel suction tube with pump and gauge assembly.
Install the tube joint clip.
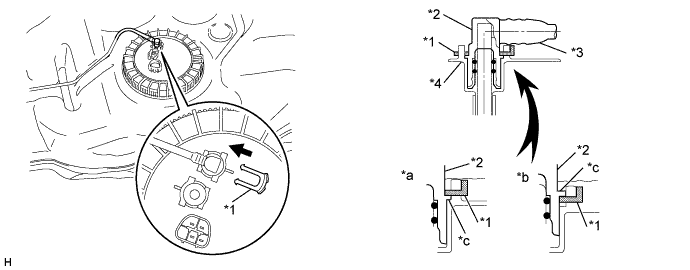
Text in Illustration *1
Tube Joint Clip
*2
Fuel Tube Joint
*3
Fuel Tank Main Tube Sub-Assembly
*4
Fuel Suction Plate
*a
OK
*b
NG
*c
Rib
-
-
- NOTICE:
- Make sure there is no damage to or foreign matter on the connecting surfaces.
- Check that the fuel tube joint is correctly and fully inserted.
- Check that the main joint clip is above the rib of the main tube.
- After installing the tube joint clip, make sure the fuel tube joint will not come out.
- Do not damage any of the clips. If a clip is damaged, replace it.
- Make sure there is no damage to or foreign matter on the connecting surfaces.
Engage the 3 clamps and install the fuel tank main tube sub-assembly to the fuel tank assembly.
| 7. INSTALL FUEL TANK MAIN TUBE SUB-ASSEMBLY (for Double Tank Type) |
Connect the fuel tank main tube sub-assembly to the fuel suction tube with pump and gauge assembly.
Install the tube joint clip.
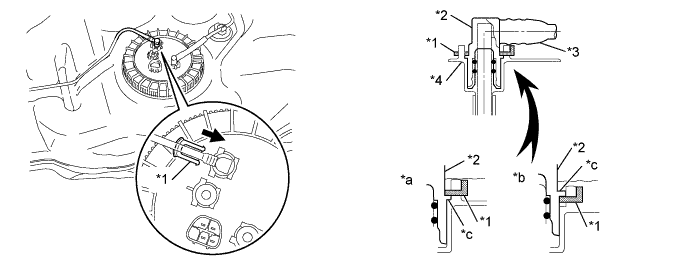
Text in Illustration *1
Tube Joint Clip
*2
Fuel Tube Joint
*3
Fuel Tank Main Tube Sub-Assembly
*4
Fuel Suction Plate
*a
OK
*b
NG
*c
Rib
-
-
- NOTICE:
- Make sure there is no damage to or foreign matter on the connecting surfaces.
- Check that the fuel tube joint is correctly and fully inserted.
- Check that the main joint clip is above the rib of the main tube.
- After installing the tube joint clip, make sure the fuel tube joint will not come out.
- Do not damage any of the clips. If a clip is damaged, replace it.
- Make sure there is no damage to or foreign matter on the connecting surfaces.
Engage the 3 clamps and install the fuel tank main tube sub-assembly to the fuel tank assembly.
| 8. INSTALL FUEL TANK RETURN TUBE |
Connect the fuel tank return tube to the fuel suction tube with pump and gauge assembly.
Install the tube joint clip.
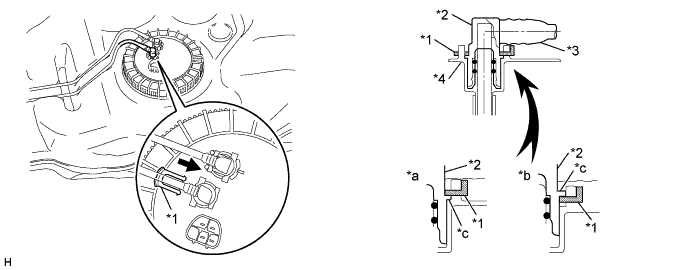
Text in Illustration *1
Tube Joint Clip
*2
Fuel Tube Joint
*3
Fuel Tank Return Tube
*4
Fuel Suction Plate
*a
OK
*b
NG
*c
Rib
-
-
- NOTICE:
- Make sure there is no damage to or foreign matter on the connecting surfaces.
- Check that the fuel tube joint is correctly and fully inserted.
- Check that the main joint clip is above the rib of the main tube.
- After installing the tube joint clip, make sure the fuel tube joint will not come out.
- Do not damage any of the clips. If a clip is damaged, replace it.
- Make sure there is no damage to or foreign matter on the connecting surfaces.
Engage the 3 clamps and install the fuel tank return tube to the fuel tank assembly.
| 9. INSTALL FUEL TANK CUSHION |
Install the 4 new fuel tank cushions to the fuel tank assembly.
| 10. INSTALL NO. 3 FUEL TANK PROTECTOR |
Engage the 3 claws, and install the No. 3 fuel tank protector to the fuel tank assembly.
Install the 2 bolts to the No. 3 fuel tank protector.
- Torque:
- 5.0 N*m{ 51 kgf*cm , 44 in.*lbf }
| 11. INSTALL FUEL TANK ASSEMBLY |
Set a transmission jack underneath the fuel tank assembly.
Install the fuel tank assembly to the vehicle.
Install the 2 fuel tank bands to the vehicle with the 2 bolts, 2 clips and 2 pins.
- Torque:
- 40 N*m{ 408 kgf*cm , 30 ft.*lbf }
| 12. CONNECT NO. 2 FUEL MAIN TUBE SUB-ASSEMBLY (for Double Tank Type) |
Align the axis of the No. 2 fuel main tube sub-assembly connector and the axis of the pipe, and push in the No. 2 fuel main tube sub-assembly connector until the retainer makes a click sound.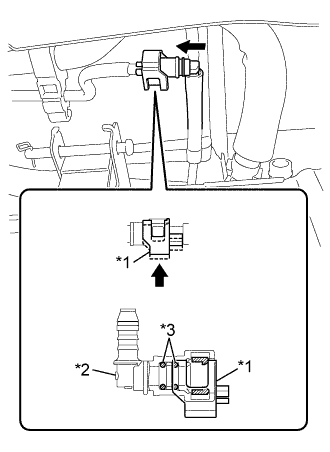
Text in Illustration *1
Connector Cover
*2
Fuel Tube Connector
*3
O-ring

Push
- NOTICE:
- Check that there are no scratches or foreign objects on the connecting part.
- Check that the fuel tank main tube is inserted securely.
- After installing the checker, check that the No. 2 fuel main tube sub-assembly is securely connected by pulling on it.
- Check that there are no scratches or foreign objects on the connecting part.
After connecting the No. 2 fuel main tube sub-assembly connector, pull on the No. 2 fuel main tube sub-assembly connector and the pipe to make sure they are firmly connected.
Push the fuel tube connector cover in to lock it.
| 13. CONNECT NO. 1 FUEL TANK BREATHER TUBE SUB-ASSEMBLY |
Align the axis of the No. 1 fuel tank breather tube sub-assembly connector and the axis of the pipe, and push in the No. 1 fuel tank breather tube sub-assembly connector until the retainer makes a click sound.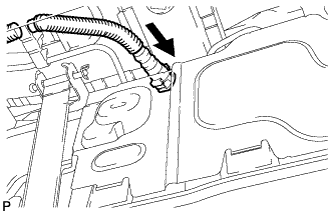
Text in Illustration
Push
- NOTICE:
- Check that there are no scratches or foreign objects on the connecting part.
- Check that the No. 1 fuel tank breather tube sub-assembly is inserted securely.
- Check that there are no scratches or foreign objects on the connecting part.
After connecting the No. 1 fuel tank breather tube sub-assembly connector, pull on the No. 1 fuel tank breather tube sub-assembly connector and the pipe to make sure they are firmly connected.
| 14. CONNECT FUEL TANK EVAPORATION VENT TUBE SUB-ASSEMBLY (for Double Tank Type w/ Fuel Tank Evaporation Vent Tube Sub-assembly) |
Align the axis of the fuel tank evaporation vent tube sub-assembly connector and the axis of the pipe, and push in the fuel tank evaporation vent tube sub-assembly connector until the retainer makes a click sound.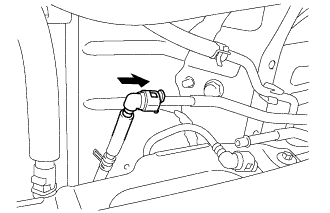
Text in Illustration
Push
- NOTICE:
- Check that there are no scratches or foreign objects on the connecting part.
- Check that the fuel tank evaporation vent tube sub-assembly is inserted securely.
- Check that there are no scratches or foreign objects on the connecting part.
After connecting the fuel tank evaporation vent tube sub-assembly connector, pull on the fuel tank evaporation vent tube sub-assembly connector and the pipe to make sure they are firmly connected.
| 15. CONNECT FUEL CUT-OFF TUBE (for Single Tank Type) |
Align the axis of the fuel cut-off tube connector and the axis of the pipe, and push in the fuel cut-off tube connector until the retainer makes a click sound.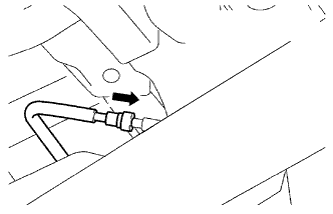
Text in Illustration
Push
- NOTICE:
- Check that there are no scratches or foreign objects on the connecting part.
- Check that the fuel cut-off tube is inserted securely.
- Check that there are no scratches or foreign objects on the connecting part.
After connecting the fuel cut-off tube connector, pull on the fuel cut-off tube connector and the pipe to make sure they are firmly connected.
| 16. CONNECT FUEL CUT-OFF TUBE (for Double Tank Type) |
Align the axis of the fuel cut-off tube connector and the axis of the pipe, and push in the fuel cut-off tube connector until the retainer makes a click sound.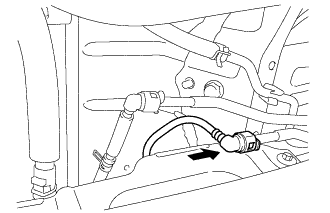
Text in Illustration
Push
- NOTICE:
- Check that there are no scratches or foreign objects on the connecting part.
- Check that the fuel cut-off tube is inserted securely.
- Check that there are no scratches or foreign objects on the connecting part.
After connecting the fuel cut-off tube connector, pull on the fuel cut-off tube connector and the pipe to make sure they are firmly connected.
| 17. CONNECT FUEL TANK MAIN TUBE SUB-ASSEMBLY |
Align the axis of the fuel tank main tube sub-assembly connector and the axis of the pipe, and push in the fuel tank main tube sub-assembly connector until the retainer makes a click sound.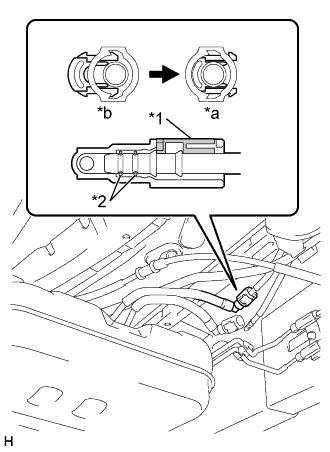
Text in Illustration *1
Retainer
*2
O-Ring
*a
Lock
*b
Unlock
- NOTICE:
- Check that the fuel tank main tube sub-assembly is inserted securely.
After connecting the fuel tank main tube sub-assembly connector, pull on the fuel tank main tube sub-assembly connector and the pipe to make sure they are firmly connected.
| 18. CONNECT FUEL TANK RETURN TUBE |
Align the axis of the fuel tank return tube connector and the axis of the pipe, and push in the fuel tank return tube connector until the retainer makes a click sound.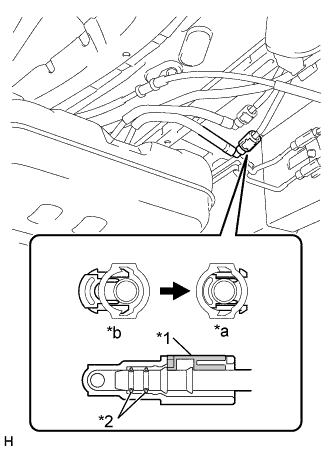
Text in Illustration *1
Retainer
*2
O-Ring
*a
Lock
*b
Unlock
- NOTICE:
- Check that the fuel tank return tube is inserted securely.
After connecting the fuel tank return tube connector, pull on the fuel tank return tube connector and the pipe to make sure they are firmly connected.
| 19. CONNECT FUEL TANK TO FILLER PIPE HOSE |
Connect the fuel tank to filler pipe hose to the fuel tank inlet pipe sub-assembly with the hose clamp.
| 20. INSTALL NO. 1 FUEL TANK PROTECTOR SUB-ASSEMBLY (for Automatic Transmission) |
Install the No. 1 fuel tank protector sub-assembly to the fuel tank assembly with the 4 nuts.
- Torque:
- 20 N*m{ 204 kgf*cm , 15 ft.*lbf }
Install the No. 1 fuel tank protector sub-assembly bracket to the vehicle with the 2 nuts.
- Torque:
- 5.5 N*m{ 56 kgf*cm , 49 in.*lbf }
| 21. INSTALL NO. 1 FUEL TANK PROTECTOR SUB-ASSEMBLY (for Manual Transmission) |
Install the No. 1 fuel tank protector sub-assembly to the fuel tank assembly with the 4 nuts.
- Torque:
- 20 N*m{ 204 kgf*cm , 15 ft.*lbf }
Install the No. 1 fuel tank protector sub-assembly bracket to the vehicle with the nut.
- Torque:
- 5.5 N*m{ 56 kgf*cm , 49 in.*lbf }
| 22. INSTALL REAR FLOOR SERVICE HOLE COVER |
Connect the fuel suction tube with pump and gauge assembly connector.
Install the 3 screws to the rear floor service hole cover.
Install the center floor silencer pad LH to the vehicle.
Return the floor carpet.
| 23. INSTALL REAR SEAT CUSHION ASSEMBLY LH |
Install rear seat cushion LH to the vehicle with the 2 bolts.
- Torque:
- 37 N*m{ 377 kgf*cm , 27 ft.*lbf }
| 24. INSTALL REAR DOOR SCUFF PLATE LH |
Engage the 6 claws and install the rear door scuff plate to the vehicle.
| 25. INSTALL FRONT DOOR SCUFF PLATE LH |
Engage the 14 claws and install the front door scuff plate to the vehicle.
| 26. INSPECT FOR FUEL LEAK |
Connect the intelligent tester to the DLC3.
Turn the ignition switch to ON.
- NOTICE:
- Do not start the engine.
Turn the intelligent tester ON.
Enter the following menus: Powertrain / Engine and ECT / Active Test / Control the Fuel Pump Speed / ON.
Check fuel pump operation.
Check for pressure in the fuel inlet tube from the fuel line. Check that the sound of fuel flowing in the fuel tank can be heard.
If there is no sound, check the integration relay, fuel pump, ECM and wiring connector.