INSTALLATION
Removal / installation · Vehicles built from Jul 2007
| 1. INSTALL TRANSFER CASE OIL SEAL |

Coat the lip of a new oil seal with MP grease.
Using SST and a hammer, tap in the oil seal until its surface is flush with the case upper surface.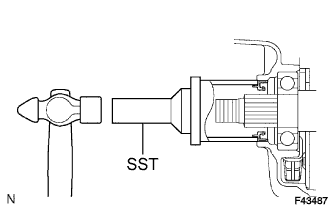

- SST
- 09316-60011
(09316-00011)
| 2. INSTALL TRANSFER OUTPUT SHAFT COMPANION FLANGE OIL SEAL (for Front) |
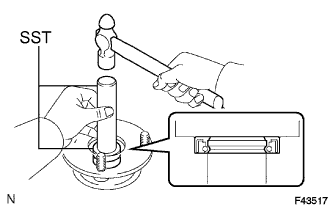 |
Using SST and a hammer, tap in a new oil seal.
- SST
- 09950-60010
(09951-00320)
09950-70010 (09951-07100)
- NOTICE:
- Be careful not to damage the companion flange.
| 3. INSTALL OUTPUT SHAFT COMPANION FLANGE SUB-ASSEMBLY |
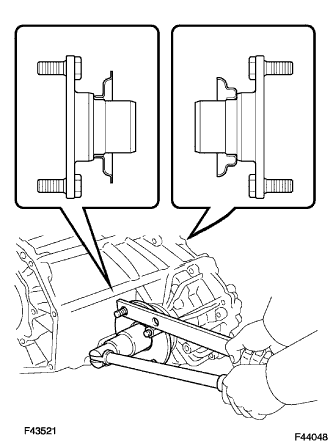 |
Apply gear oil to the connecting areas of the companion flange and driven sprocket.
Install the companion flange onto the driven sprocket.
Using SST to hold the companion flange, install a new lock nut.
- SST
- 09330-00021
09950-40011 (09951-04020, 09952-04010, 09953-04030, 09954-04010, 09955-04051, 09957-04010, 09958-04011)
- Torque:
- 118 N*m{ 1,203 kgf*cm , 87 ft.*lbf }
Using a chisel and hammer, stake the lock nut to the driven sprocket.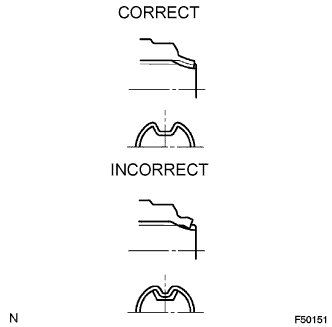
- NOTICE:
- Securely stake the shaft to the lock nut's groove.
- Be careful not to damage parts around the lock nut.
- Do not apply excessive force to the shaft.
- Securely stake the shaft to the lock nut's groove.
| 4. INSTALL FRONT PROPELLER SHAFT ASSEMBLY |
Align the matchmarks on the yoke and differential flange.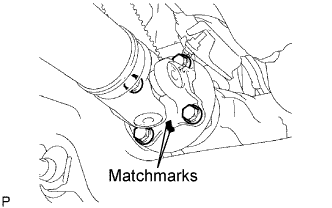
Install the propeller shaft assembly with the 4 bolts, 4 nuts and 4 washers.
- Torque:
- 88 N*m{ 899 kgf*cm , 65 ft.*lbf }
Align the matchmarks on the yoke and transfer flange.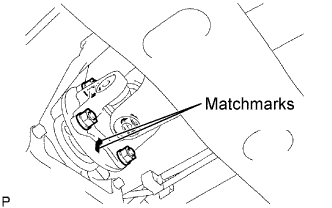
Install the propeller shaft assembly with the 4 nuts and 4 washers.
- Torque:
- 88 N*m{ 899 kgf*cm , 65 ft.*lbf }
| 5. INSTALL LOWER TRANSFER CASE PROTECTOR |
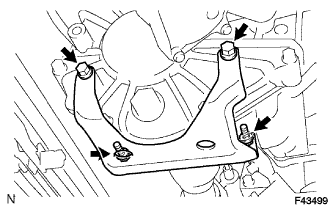 |
Install the protector with the 4 bolts.
- Torque:
- 18 N*m{ 183 kgf*cm , 13 ft.*lbf }
| 6. ADD TRANSFER OIL |
Remove the case plug (for filler) and gasket.
Pour oil so that the oil level is between 0 to 5.0 mm (0 to 0.197 in.) from the bottom lip of the case plug (for filler) hole.
- NOTICE:
- When adding oil, pour it slowly.
- Add oil a little at a time, waiting several minutes between each addition of oil.
- When adding oil, pour it slowly.
Wait approximately 5 minutes and check that the oil level has not changed.
Install a new gasket and the case plug (for filler).
- Torque:
- 37 N*m{ 377 kgf*cm , 27 ft.*lbf }
| 7. CHECK FOR TRANSFER OIL LEAKAGE |
Remove the case plug (for filler) and gasket.
Check that the oil level is between 0 to 5.0 mm (0 to 0.20 in.) from the bottom lip of the case plug (for filler) hole.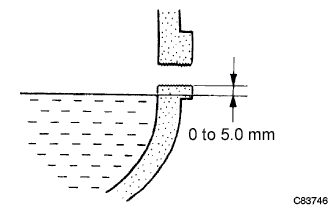
If the result is not as specified, add transfer oil.- Oil grade:
- GL-3
- Viscosity:
- SAE 75W-90
- Standard capacity:
- 1.0 liter (1.1 US qts, 0.9 Imp. qts)
- NOTICE:
- After changing the oil, drive the vehicle and check the oil level again.
- Too much or too little oil will lead to transfer problems.
- After changing the oil, drive the vehicle and check the oil level again.
When the oil level is too low, check for oil leakage.
Install a new gasket into the case plug (for filler) and then tighten the plug.
- Torque:
- 37 N*m{ 377 kgf*cm , 27 ft.*lbf }