B1603/83 Front Satellite Sensor Bus RH Initialization Incomplete
Diagnostic trouble codes · Vehicles built Jul 2007 – Jul 2012
Also covers:
- B1612/83 Lost Communication with Front Airbag Sensor RH
- B1613/83 Front Airbag Sensor RH Initialization Incomplete
DESCRIPTION
The front airbag sensor RH consists of parts including the diagnostic circuit and the frontal deceleration sensor.When the center airbag sensor assembly receives signals from the frontal deceleration sensor, it determines whether or not the SRS should be activated.
DTC B1603/83, B1612/83 or B1613/83 is set when a malfunction is detected in the front airbag sensor RH circuit.
| DTC No. |
DTC Detecting Condition |
Trouble Area |
| B1603/83 B1612/83 B1613/83 |
|
|
WIRING DIAGRAM
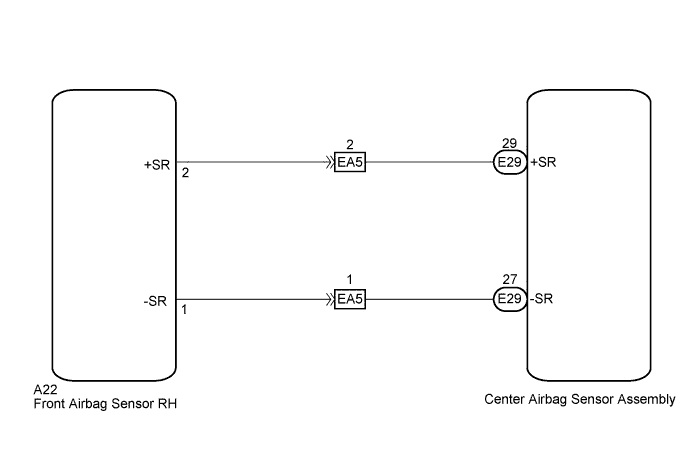

INSPECTION PROCEDURE
- NOTICE:
- In order to prevent unexpected airbag deployment, disconnect the following connectors before inspecting parts such as wire harnesses, if the application of tester probes to the center airbag sensor assembly connector is necessary.
- Turn the ignition switch off.
- Disconnect the negative (-) terminal cable from the battery, and wait for at least 90 seconds
- Disconnect the connector from the center airbag sensor assembly.
- Disconnect the connectors from the steering pad.
- Disconnect the connectors from the front passenger airbag assembly.
- Disconnect the connector from the front seat outer belt assembly LH.
- Disconnect the connector from the front seat outer belt assembly RH.
- HINT:
- Skip the following steps if side airbags and curtain shield airbags are not fitted.
- Disconnect the connector from the front seat side airbag assembly LH.
- Disconnect the connector from the front seat side airbag assembly RH.
- Disconnect the connector from the curtain shield airbag assembly LH.
- Disconnect the connector from the curtain shield airbag assembly RH.
| 1. CHECK CONNECTOR (INSTRUMENT PANEL WIRE - CENTER AIRBAG SENSOR ASSEMBLY) |

Turn the ignition switch off.
Disconnect the negative (-) terminal cable from the battery, and wait for at least 90 seconds.
Disconnect the instrument panel wire connector from the center airbag sensor assembly.
Check the instrument panel wire connector and terminals (on the center airbag sensor assembly side) and check that the connector is properly connected to the center airbag sensor assembly.
- Result:
Result
Proceed to
No problem.
A
Connector or terminals incorrect.
B
Connector connected improperly.
C
|
|
||||
|
|
||||

| A | |
 |
| 2. CHECK CONNECTOR (ENGINE ROOM MAIN WIRE - FRONT AIRBAG SENSOR RH) |
Disconnect the engine room main wire connector from the front airbag sensor RH.
Check the engine room main wire connector and terminals (on the front airbag sensor RH side) and check that the connector is properly connected to the front airbag sensor RH.
- Result:
Result
Proceed to
No problem.
A
Connector or terminals incorrect.
B
Connector connected improperly.
C
|
|
||||
|
|
||||
| A | |
|
| 3. CHECK FRONT AIRBAG SENSOR RH CIRCUIT |
Check for open in the circuit.
Using a service wire, connect A22-1 and A22-2 of connector E.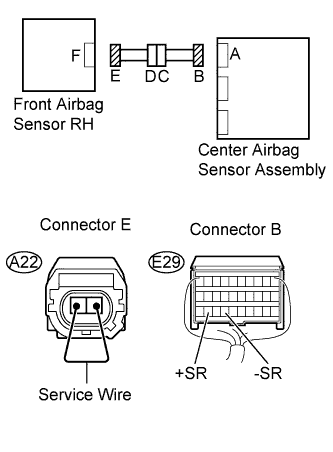
- NOTICE:
- Do not forcibly insert the service wire into the terminals of the connector when connecting.
Measure the resistance.
- Standard resistance:
Tester Connection
Condition
Specified Condition
E29-29 (+SR) - E29-27 (-SR)
Always
Below 1Ω
Check for short in the circuit.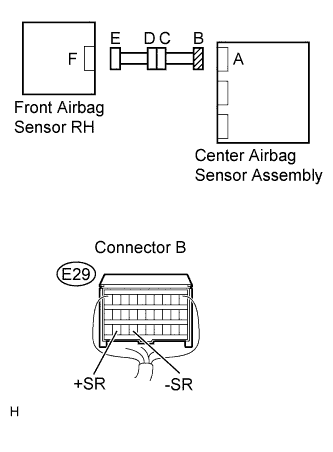
Disconnect the service wire from connector E.
Measure the resistance.
- Standard resistance:
Tester Connection
Condition
Specified Condition
E29-29 (+SR) - E29-27 (-SR)
Always
1 MΩ or higher
Check for short to ground in the circuit.
Measure the resistance.
- Standard resistance:
Tester Connection
Condition
Specified Condition
E29-29 (+SR) - Body ground
Always
1 MΩ or higher
E29-27 (-SR) - Body ground
Always
1 MΩ or higher
Check for short to B+ in the circuit.
Connect the negative (-) terminal cable to the battery, and wait for at least 2 seconds.
Turn the ignition switch to the on position.
Measure the voltage.
- Standard voltage:
Tester Connection
Switch Condition
Specified Condition
E29-29 (+SR) - Body ground
Ignition switch on
Below 1 V
E29-27 (-SR) - Body ground
Ignition switch on
Below 1 V
Turn the ignition switch off.
Disconnect the negative (-) terminal cable from the battery, and wait for at least 90 seconds.
|
|
||||

| OK | |
|
| 4. CHECK FRONT AIRBAG SENSOR RH |
Connect the connector to the center airbag sensor assembly.
Interchange the front airbag sensor RH with the front airbag sensor LH and connect the connectors to them.
Connect the negative (-) terminal cable to the battery, and wait for at least 2 seconds.
Turn the ignition switch to the on position, and wait for at least 60 seconds.
Clear the DTCs stored in the memory (Click here).
Turn the ignition switch to the lock position.
Turn the ignition switch to the on position, and wait for at least 60 seconds.
Check for DTCs (Click here).
- Result:
Result
Proceed to
DTC B1603/83, B1612/83 or B1613/83 is output.
A
DTC B1608/84, B1617/84 or B1618/84 is output.
B
DTC B1603/83, B1612/83, B1613/83, B1608/84, B1617/84 or B1618/84 is not output.
C
|
|
||||
| A | ||
 |
||
| ||
| 5. CHECK CONNECTOR (ENGINE ROOM MAIN WIRE - INSTRUMENT PANEL WIRE) |
Disconnect the engine room main wire connector from the instrument panel wire.
Check the engine room main wire connector and terminals (on the instrument panel wire side) and check that the connector is properly connected to the instrument panel wire.
- Result:
Result
Proceed to
No problem.
A
Connector or terminals incorrect.
B
Connector connected improperly.
C
|
|
||||
|
|
||||
| A | |
|
| 6. CHECK ENGINE ROOM MAIN WIRE |
Check for open in the circuit.
Using a service wire, connect A22-1 and A22-2 of connector E.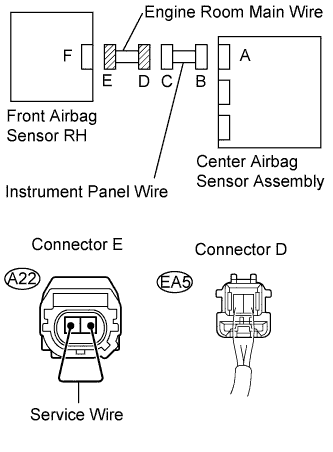
- NOTICE:
- Do not forcibly insert the service wire into the terminals of the connector when connecting.
Measure the resistance.
- Standard resistance:
Tester Connection
Condition
Specified Condition
EA5-1 - EA5-2
Always
Below 1Ω
Check for short in the circuit.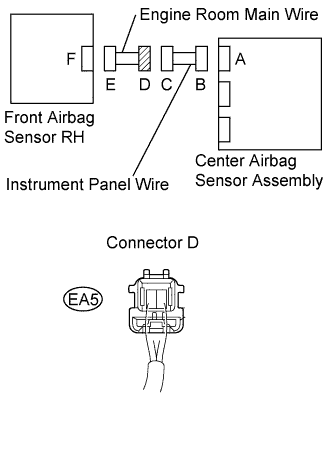
Disconnect the service wire from connector E.
Measure the resistance.
- Standard resistance:
Tester Connection
Condition
Specified Condition
EA5-1 - EA5-2
Always
1 MΩ or higher
Check for short to ground in the circuit.
Measure the resistance.
- Standard resistance:
Tester Connection
Condition
Specified Condition
EA5-1 - Body ground
Always
1 MΩ or higher
EA5-2 - Body ground
Always
1 MΩ or higher
Check for short to B+ in the circuit.
Connect the negative (-) terminal cable to the battery, and wait for at least 2 seconds.
Turn the ignition switch to the on position.
Measure the voltage.
- Standard voltage:
Tester Connection
Switch Condition
Specified Condition
EA5-1 - Body ground
Ignition switch on
Below 1 V
EA5-2 - Body ground
Ignition switch on
Below 1 V
Turn the ignition switch off.
Disconnect the negative (-) terminal cable from the battery, and wait for at least 90 seconds.
|
|
||||
| OK | ||
|
||
| ||