REASSEMBLY
Removal / installation · Vehicles built from Jul 2007
| 1. INSTALL REAR PROPELLER SHAFT UNIVERSAL JOINT SPIDER KIT |

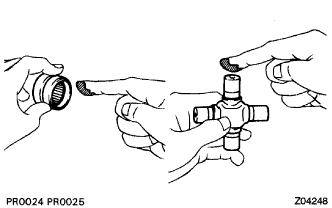  |
Apply MP grease to a new spider and spider bearings.
Fit the spider into the flange yoke.
Using SST, install the spider bearings onto the spider.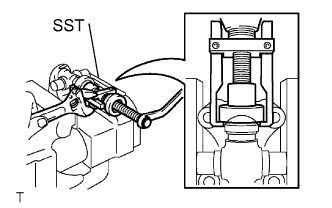
- SST
- 09332-25010
Using SST, adjust both bearings so that the snap ring grooves are at maximum and equal in width.
- SST
- 09332-25010
Install 4 new snap rings of equal thickness which will allow no axial play.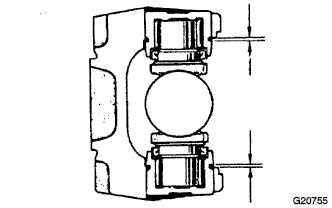
- HINT:
- Do not reuse the snap rings.
Thickness of snap ring Parts No.
Thickness mm (in.)
Mark
90520-25039
2.28 to 2.30
1
90520-25040
2.30 to 2.32
2
90520-25041
2.32 to 2.34
-
90520-25042
2.34 to 2.36
Brown
90520-25043
2.36 to 2.38
Blue
90520-25044
2.38 to 2.40
6
90520-25045
2.40 to 2.42
7
90520-25046
2.42 to 2.44
8
90520-25047
2.44 to 2.46

90520-25048
2.46 to 2.48
10
90520-25049
2.48 to 2.50
A
90520-25050
2.50 to 2.52
B
90520-25051
2.52 to 2.54
C
90520-25052
2.54 to 2.56
D
90520-25053
2.56 to 2.58
E
90520-25054
2.18 to 2.20
J
90520-25055
2.20 to 2.22
K
90520-25056
2.22 to 2.24
F
90520-25057
2.24 to 2.26
G
90520-25058
2.26 to 2.28
H
- NOTICE:
- Use a new snap ring.
- Use snap rings as close as possible the same thickness on both ends.
- Use a new snap ring.
Using a hammer, tap the yoke until there is no clearance between the spider bearing outer race and snap ring.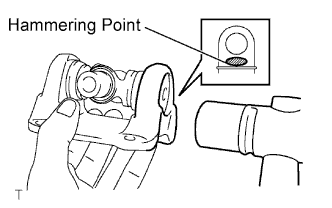
- HINT:
- Install new spider bearings onto the sleeve side in the procedure described above.
Align the matchmarks on the flange yoke and the sleeve yoke.
Using SST, install the spider bearings onto the spider.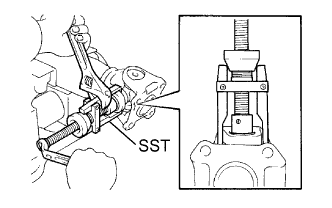
- SST
- 09332-25010
Using SST, adjust both bearings so that the snap ring grooves are at maximum and equal in width.
- SST
- 09332-25010
Install 4 new snap rings of equal thickness which will allow no axial play.
- HINT:
- Do not reuse the snap rings.
Thickness of snap ring Parts No.
Thickness mm (in.)
Mark
90520-25039
2.28 to 2.30
1
90520-25040
2.30 to 2.32
2
90520-25041
2.32 to 2.34
-
90520-25042
2.34 to 2.36
Brown
90520-25043
2.36 to 2.38
Blue
90520-25044
2.38 to 2.40
6
90520-25045
2.40 to 2.42
7
90520-25046
2.42 to 2.44
8
90520-25047
2.44 to 2.46
90520-25048
2.46 to 2.48
10
90520-25049
2.48 to 2.50
A
90520-25050
2.50 to 2.52
B
90520-25051
2.52 to 2.54
C
90520-25052
2.54 to 2.56
D
90520-25053
2.56 to 2.58
E
90520-25054
2.18 to 2.20
J
90520-25055
2.20 to 2.22
K
90520-25056
2.22 to 2.24
F
90520-25057
2.24 to 2.26
G
90520-25058
2.26 to 2.28
H
- NOTICE:
- Use a new snap ring.
- Use snap rings as close as possible to the same thickness on both ends.
- Use a new snap ring.
Using a plastic hammer, tap the yoke until there is no clearance between the spider bearing outer race and snap ring.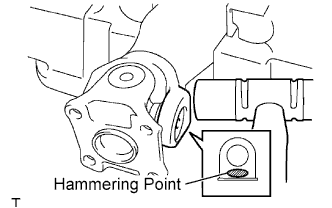
- HINT:
- Install new spider bearings onto the sleeve side in the procedure described above.
| 2. INSPECT UNIVERSAL JOINT SPIDER BEARING |
Check that the joints move smoothly.
Check the spider bearing axial play by turning the yoke while holding the shaft tightly.
- Maximum bearing axial play:
- 0 mm (0 in.)
| 3. INSPECT REAR PROPELLER SHAFT ASSEMBLY |
- HINT:
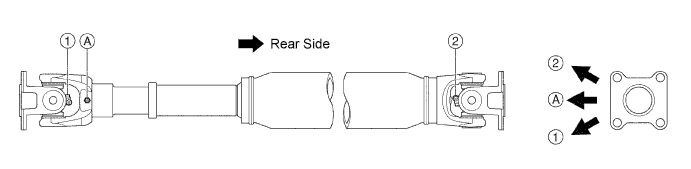
- When replacing the spider bearing, be sure that the grease fitting hole is facing in the direction shown in the illustration.