INSTALLATION
Removal / installation · Vehicles built from Nov 2010
Versions by build date: Jul 2007 – Jul 2009 Aug 2009 – Oct 2010 from Nov 2010
| 1. INSTALL FRONT DIFFERENTIAL DRIVE PINION BEARING SPACER |

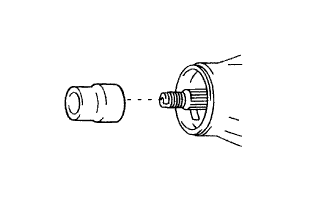  |
Install a new bearing spacer.
- HINT:
- Install the spacer in the correct direction.
| 2. INSTALL FRONT DIFFERENTIAL OIL STORAGE RING |
Using a brass bar and hammer, tap in a new oil storage ring.
- NOTICE:
- Be careful not to damage the oil storage ring.
| 3. INSTALL FRONT DRIVE PINION REAR TAPERED ROLLER BEARING |
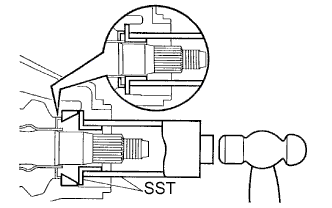 |
Using SST and a hammer, install the roller bearing (outer).
- SST
- 09316-60011
(09316-00011, 09316-00021)
Install the roller bearing (inner).
| 4. INSTALL FRONT DIFFERENTIAL DRIVE PINION OIL SLINGER |
| 5. INSTALL FRONT DIFFERENTIAL CARRIER OIL SEAL |
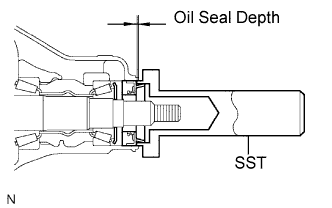 |
Apply MP grease to the lip of a new oil seal.
Using SST and a hammer, tap in the oil seal.
- SST
- 09554-22010
- Oil seal depth:
- 3.9 to 4.8 mm (0.154 to 0.188 in.)
| 6. INSTALL FRONT DRIVE PINION COMPANION FLANGE SUB-ASSEMBLY |
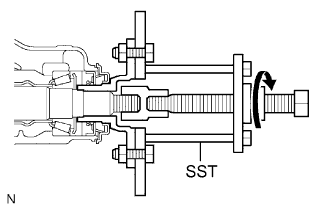 |
Using SST, instal the companion flange.
- SST
- 09950-30012
(09951-03010, 09953-03010, 09954-03010, 09955-03030, 09956-03020)
- NOTICE:
- Before using SST (center bolt), apply hypoid gear oil to its threads and tip.
Using SST to hold the companion flange, install the nut.
- SST
- 09330-00021
(09330-00030)
- Torque:
- 370 N*m{ 3,770 kgf*cm , 273 ft.*lbf } or less
| 7. INSPECT DIFFERENTIAL DRIVE PINION PRELOAD |
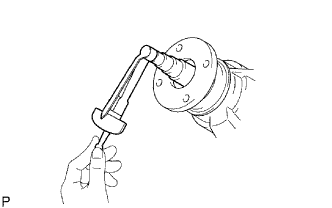 |
Using a torque wrench, measure the preload.
- Preload (at starting):
Item
Specified Condition
New bearing
0.98 to 1.57 N*m (10 to 16 kgf*cm, 8.7 to 13.9 in.*lbf)
Used bearing
0.49 to 0.78 N*m (5 to 8 kgf*cm, 4.3 to 6.9 in.*lbf)
| 8. STAKE FRONT DRIVE PINION COMPANION FLANGE NUT |
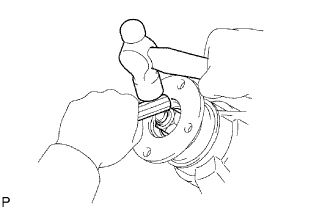 |
Using a chisel and hammer, stake the nut.
| 9. INSTALL FRONT PROPELLER SHAFT ASSEMBLY |
Align the matchmarks on the yoke and differential flange.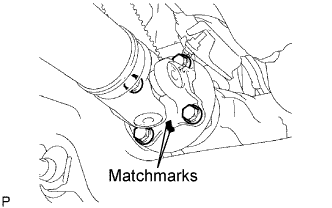
Install the propeller shaft assembly with the 4 bolts, 4 nuts and 4 washers.
- Torque:
- 88 N*m{ 899 kgf*cm , 65 ft.*lbf }
Align the matchmarks on the yoke and transfer flange.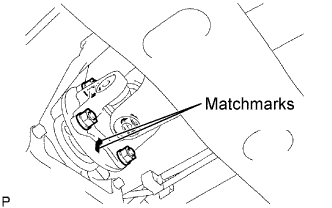
Install the propeller shaft assembly with the 4 nuts and 4 washers.
- Torque:
- 88 N*m{ 899 kgf*cm , 65 ft.*lbf }
| 10. ADD DIFFERENTIAL OIL |
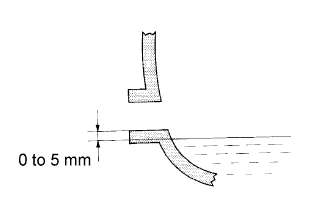 |
Stop the vehicle on a level surface.
Remove the differential filler plug and gasket.
Check that the oil level is between 0 to 5 mm (0 to 0.20 in.) from the bottom lip of the differential filler plug hole.
- NOTICE:
- After changing the oil seal, drive the vehicle and then check the oil level again.
- After changing the oil seal, drive the vehicle and then check the oil level again.
- Too much or too little oil will lead to differential problems.
- Too much or too little oil will lead to differential problems.
- HINT:
- If necessary, fill the differential carrier assembly with hypoid gear oil.
- Differential oil type and viscosity:
- Toyota Genuine Differential gear oil LT 75W-85 API GL-5 SAE 75W-85 or equivalent
- Differential Oil Capacity:
Item
Capacity
Front Differential
w/o A.D.D.
1.35 to 1.45 Liters
(1.43 to 1.53 US qts, 1.19 to 1.28 Imp qts.)
w/ A.D.D.
1.50 to 1.60 Liters
(1.59 to 1.69 US qts, 1.32 to 1.41 Imp qts.)
Rear Differential
w/o Differential Lock
2.45 to 2.55 Liters
(2.59 to 2.69 US qts, 2.16 to 2.24 Imp qts.)
w/ Differential Lock
2.40 to 2.50 Liters
(2.54 to 2.64 US qts, 2.11 to 2.20 Imp qts.)
Check for oil leakage when the oil level is low.
Install the differential filler plug with a new gasket.
- Torque:
- Front differential:
- 39 N*m{ 400 kgf*cm , 29 ft.*lbf }
- Rear differential:
- 49 N*m{ 500 kgf*cm , 36 ft.*lbf }
| 11. CHECK FOR DIFFERENTIAL OIL LEAKAGE |
| 12. INSTALL REAR ENGINE UNDER COVER ASSEMBLY |
Install the rear engine under cover with the 4 bolts.
- Torque:
- 29 N*m{ 296 kgf*cm , 21 ft.*lbf }
| 13. INSTALL NO. 1 ENGINE UNDER COVER |
Hook the engine under cover to the frame.
Install the 4 bolts.
- Torque:
- 29 N*m{ 296 kgf*cm , 21 ft.*lbf }