INSTALLATION
Removal / installation · Vehicles built from Aug 2012
Versions by build date: Jul 2007 – Oct 2010 Nov 2010 – Jul 2012 from Aug 2012
| 1. INSTALL REAR COMBINATION LIGHT ASSEMBLY |

Connect the 3 connectors and install the rear combination light.
Install the 3 nuts.
- Torque:
- 6.0 N*m{ 61 kgf*cm , 53 in.*lbf }
| 2. INSTALL DECK TRIM SIDE PANEL ASSEMBLY RH (for RH Side) |
w/ Rear Power Outlet Socket:
Connect the 2 connectors.
Engage the 6 clips and the 8 claws and install the deck trim side panel.
Install the 3 screws.
Install the bolt.
- Torque:
- 5.5 N*m{ 56 kgf*cm , 49 in.*lbf }
| 3. INSTALL DECK TRIM SIDE PANEL ASSEMBLY LH (for LH Side) |
Engage the 6 clips and the 8 claws and install the deck trim side panel.
Install the 3 screws.
| 4. INSTALL REAR SEAT OUTER BELT ASSEMBLY |
Install the anchor plate with the bolt.
- Torque:
- 42 N*m{ 428 kgf*cm , 31 ft.*lbf }
Make sure that the anchor plate rotates smoothly.
| 5. INSTALL LAP BELT OUTER ANCHOR COVER |
- HINT:
- Use the same procedure for both sides.
Engage the 3 claws and install the lap belt outer anchor cover.
| 6. INSTALL AMPLIFIER BOX SPEAKER ASSEMBLY (w/ Woofer) |
Install the amplifier box speaker with the 4 screws.
- Torque:
- 8.1 N*m{ 83 kgf*cm , 72 in.*lbf }
Connect the connectors.
| 7. INSTALL SPEAKER MOUNTING COVER (w/ Woofer) |
Engage the 8 clips and 2 guides and install the speaker mounting cover.
| 8. INSTALL DECK SIDE GARNISH (w/ Woofer) |
Engage the 6 claws and install the deck side garnish.
| 9. INSTALL QUARTER TRIM POCKET (w/o Woofer) |
Engage the 6 claws and install the quarter trim pocket.
| 10. INSTALL SIDE TRIM COVER (w/o Woofer) |
Engage the 6 claws and the 2 guides and install the side trim cover.
| 11. INSTALL QUARTER TRIM POCKET TRAY (w/o Woofer) |
Engage the 7 claws and install the quarter trim pocket tray.
| 12. INSTALL PACKAGE HOLDER NET HOOK |
- HINT:
- Use the same procedure to install all the package holder net hooks.
Install the package holder net hook with the bolt.
- Torque:
- 8.1 N*m{ 83 kgf*cm , 72 in.*lbf }
| 13. INSTALL FRONT DOOR OPENING TRIM WEATHERSTRIP |
Align the locating marks with the paint marks first, and install the front door opening trim weatherstrip, as shown in the illustration.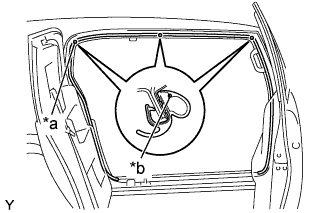

Text in Illustration *a
Locating Mark
*b
Paint Mark
- Paint mark:
Area
Color
RH side
White
LH side
Red
| 14. INSTALL REAR DOOR SCUFF PLATE |
Engage the 6 claws and install the access door scuff plate.
| 15. INSTALL FRONT DOOR SCUFF PLATE |
Engage the 14 claws and install the door scuff plate.
| 16. INSTALL REAR FLOOR MAT ASSEMBLY |
Install the rear floor mat with the 2 clips.
| 17. INSTALL LUGGAGE HOLD BELT STRIKER ASSEMBLY |
- HINT:
- Use the same procedure for both sides.
Install the luggage hold belt striker with the bolt.
- Torque:
- 18 N*m{ 184 kgf*cm , 13 ft.*lbf }
Install the cap.
| 18. INSTALL REAR FLOOR MAT SUPPORT PLATE |
Engage the 11 claws and install the rear floor mat support plate.
Install the 5 screws.
| 19. INSTALL REAR FLOOR BOARD |
Engage the clip and claw and install the rear floor board.
Install the luggage hold belt striker with the bolt.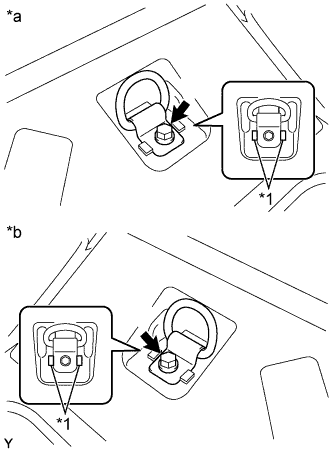
Text in Illustration *1
Guide
*a
for RH Side
*b
for LH Side
- Torque:
- 18 N*m{ 184 kgf*cm , 13 ft.*lbf }
- HINT:
- Use the same procedure for both sides.
| 20. INSTALL REAR SEATBACK ASSEMBLY RH (for RH Side) |
Engage the hook and temporarily install the rear seatback with the 2 bolts.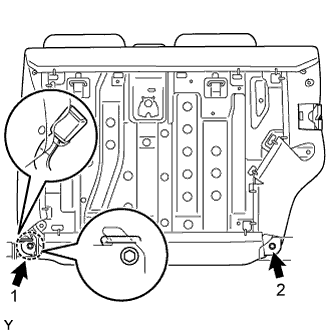
Tighten the 2 bolts in the sequence shown in the illustration.
- Torque:
- 37 N*m{ 375 kgf*cm , 27 ft.*lbf }
Pull up the rear seatback.
Install the rear seat inner belt into the rear seatback holder.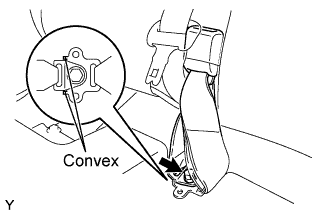
Install the anchor plate of the rear center seat outer belt with the bolt.
- Torque:
- 42 N*m{ 428 kgf*cm , 31 ft.*lbf }
- NOTICE:
- Do not place the anchor plate over the convex area of the rear seat inner belt.
| 21. INSTALL REAR SEATBACK BOARD CARPET ASSEMBLY RH (for RH Side) |
Pull the rear seatback lock release button and tilt the rear seatback forward.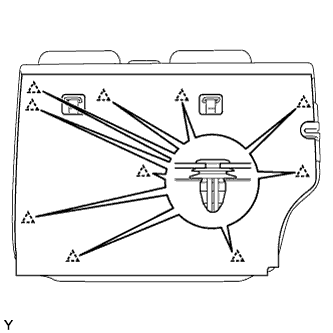
Engage the 10 clips and install the rear seatback board carpet.
Pull up the rear seatback.
| 22. INSTALL REAR SEATBACK ASSEMBLY LH (for LH Side) |
Engage the hook and temporarily install the rear seatback with the 2 bolts.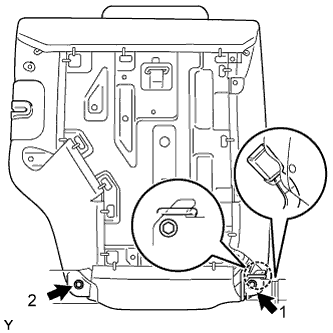
Tighten the 2 bolts in the sequence shown in the illustration.
- Torque:
- 37 N*m{ 375 kgf*cm , 27 ft.*lbf }
Install the rear center seat inner belt into the rear seatback holder.
| 23. INSTALL REAR SEATBACK BOARD CARPET ASSEMBLY LH (for LH Side) |
Engage the 8 clips and install the rear seatback board carpet.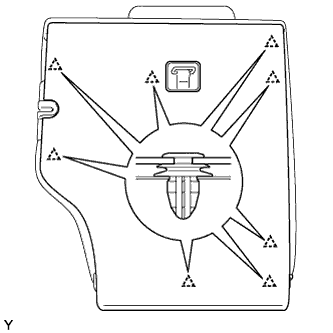
Pull up the rear seatback.