INSTALLATION
Removal / installation · Vehicles built Aug 2009 – Jul 2014
Versions by build date: Jul 2007 – Jul 2009 Aug 2009 – Jul 2014 from Aug 2014
| 1. INSTALL VVT SENSOR (for Exhaust Side of Bank 2) |

Apply a light coat of engine oil to the O-ring of the sensor.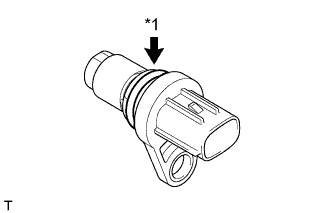

Text in Illustration *1
O-Ring
- NOTICE:
- When reusing the sensor, inspect the O-ring.
- If the O-ring has scratches or cuts, replace the sensor.
- When reusing the sensor, inspect the O-ring.
Install the sensor with the bolt.
- Torque:
- 10 N*m{ 102 kgf*cm , 7 ft.*lbf }
Connect the sensor connector.
| 2. INSTALL VVT SENSOR (for Intake Side of Bank 2) |
Apply a light coat of engine oil to the O-ring of the sensor.
- NOTICE:
- When reusing the sensor, inspect the O-ring.
- If the O-ring has scratches or cuts, replace the sensor.
- When reusing the sensor, inspect the O-ring.
Install the sensor with the bolt.
- Torque:
- 10 N*m{ 102 kgf*cm , 7 ft.*lbf }
Connect the sensor connector.
| 3. INSTALL VVT SENSOR (for Exhaust Side of Bank 1) |
Apply a light coat of engine oil to the O-ring of the sensor.
- NOTICE:
- When reusing the sensor, inspect the O-ring.
- If the O-ring has scratches or cuts, replace the sensor.
- When reusing the sensor, inspect the O-ring.
Install the sensor with the bolt.
- Torque:
- 10 N*m{ 102 kgf*cm , 7 ft.*lbf }
Connect the sensor connector.
| 4. INSTALL VVT SENSOR (for Intake Side of Bank 1) |
Apply a light coat of engine oil to the O-ring of the sensor.
- NOTICE:
- When reusing the sensor, inspect the O-ring.
- If the O-ring has scratches or cuts, replace the sensor.
- When reusing the sensor, inspect the O-ring.
Install the sensor with the bolt.
- Torque:
- 10 N*m{ 102 kgf*cm , 7 ft.*lbf }
Connect the sensor connector.
| 5. INSTALL AIR CLEANER HOSE ASSEMBLY |
Install the air cleaner hose assembly with the 2 hose clamps.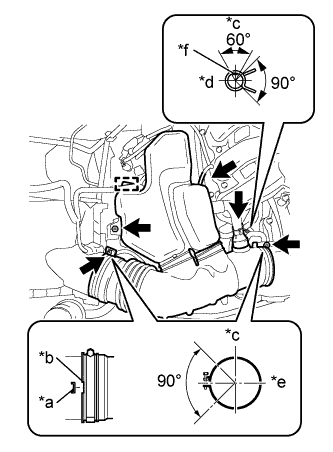
- Torque:
- 5.0 N*m{ 51 kgf*cm , 44 in.*lbf }
Text in Illustration *a
Protrusion
*b
Groove
*c
Top
*d
RH
*e
Front
*f
Paint mark of the hose
Install the bolt.
- Torque:
- 5.0 N*m{ 51 kgf*cm , 44 in.*lbf }
Connect the vacuum hose and ventilation hose.
- HINT:
- Connect the hose so that the direction of the hose clamp is as indicated in the illustration.
Engage the wire harness clamp.
| 6. INSTALL V-BANK COVER |
Engage the 2 V-bank cover hooks to the bracket.
Align the 2 V-bank cover grommets with the 2 pins and press down on the V-bank cover to engage the pins.