INSTALLATION
Removal / installation · Vehicles built from Aug 2014
Versions by build date: Jul 2007 – Jul 2009 Aug 2009 – Jul 2014 from Aug 2014
| 1. INSTALL VVT SENSOR (for Exhaust Side of Bank 2) |

Apply a light coat of engine oil to the O-ring of the sensor.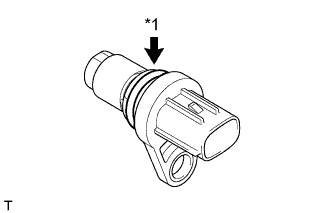

Text in Illustration *1
O-Ring
- NOTICE:
- When reusing the sensor, inspect the O-ring.
- If the O-ring has scratches or cuts, replace the sensor.
- When reusing the sensor, inspect the O-ring.
Install the sensor with the bolt.
- Torque:
- 10 N*m{ 102 kgf*cm , 7 ft.*lbf }
Connect the sensor connector.
| 2. INSTALL VVT SENSOR (for Intake Side of Bank 2) |
Apply a light coat of engine oil to the O-ring of the sensor.
- NOTICE:
- When reusing the sensor, inspect the O-ring.
- If the O-ring has scratches or cuts, replace the sensor.
- When reusing the sensor, inspect the O-ring.
Install the sensor with the bolt.
- Torque:
- 10 N*m{ 102 kgf*cm , 7 ft.*lbf }
Connect the sensor connector.
| 3. INSTALL VVT SENSOR (for Exhaust Side of Bank 1) |
Apply a light coat of engine oil to the O-ring of the sensor.
- NOTICE:
- When reusing the sensor, inspect the O-ring.
- If the O-ring has scratches or cuts, replace the sensor.
- When reusing the sensor, inspect the O-ring.
Install the sensor with the bolt.
- Torque:
- 10 N*m{ 102 kgf*cm , 7 ft.*lbf }
Connect the sensor connector.
| 4. INSTALL VVT SENSOR (for Intake Side of Bank 1) |
Apply a light coat of engine oil to the O-ring of the sensor.
- NOTICE:
- When reusing the sensor, inspect the O-ring.
- If the O-ring has scratches or cuts, replace the sensor.
- When reusing the sensor, inspect the O-ring.
Install the sensor with the bolt.
- Torque:
- 10 N*m{ 102 kgf*cm , 7 ft.*lbf }
Connect the sensor connector.
| 5. INSTALL AIR CLEANER HOSE ASSEMBLY |
Install the air cleaner hose assembly to the air cleaner cap sub-assembly and intake air surge tank and tighten the 2 hose clamps.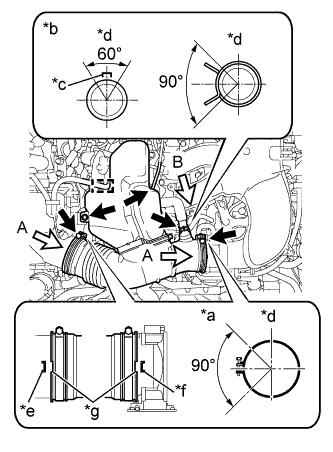
Text in Illustration *a
View A
*b
View B
*c
Paint Mark of Ventilation Hose
*d
Upper of Vehicle
*e
Protrusion of Air Cleaner Cap Sub-assembly
*f
Protrusion of Intake Air Surge Tank
*g
Indentation of Air Cleaner Hose Assembly
- Torque:
- 5.0 N*m{ 51 kgf*cm , 44 in.*lbf }
- HINT:
- Align the protrusions of the air cleaner cap sub-assembly and intake air surge tank with the indentation of the air cleaner hose assembly.
- Make sure the 2 hose clamps are facing in the directions shown in the illustration.
- Align the protrusions of the air cleaner cap sub-assembly and intake air surge tank with the indentation of the air cleaner hose assembly.
Install the air cleaner hose assembly to the resonator bracket with the bolt.
- Torque:
- 5.0 N*m{ 51 kgf*cm , 44 in.*lbf }
Engage the clamp to install the wire harness to the air cleaner hose assembly.
Connect the vacuum hose to the air cleaner hose assembly.
Connect the ventilation hose to the air cleaner hose assembly and slide the hose clip to secure it.
- HINT:
- Make sure the ventilation hose and hose clip are facing the directions shown in the illustration.
| 6. INSTALL V-BANK COVER |
Engage the 2 hooks to install the V-bank cover to the No. 1 V-bank cover bracket.
Align the 2 cushions of the V-bank cover with the 2 pins and press down on the V-bank cover to engage the 2 cushions to the 2 pins.