Temporarily tighten the crankshaft pulley bolt to the crankshaft.
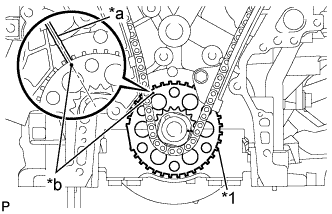
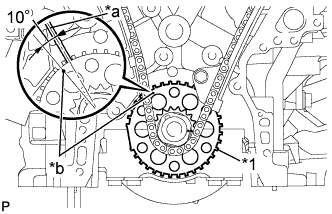
Turn the crankshaft clockwise to align the timing mark on the crank angle sensor plate with the RH cylinder block bore center line (TDC/compression).
Text in Illustration
*1
Crank Angle Sensor Plate
*a
RH Cylinder Block Bore Center Line
*b
Timing Mark
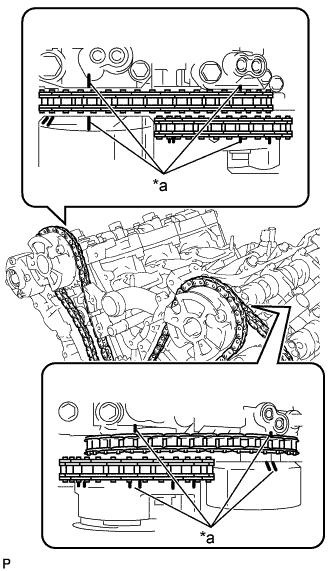
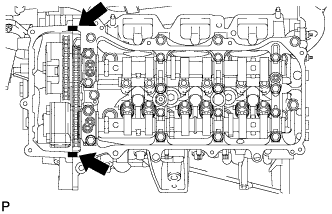
Check that the timing marks of the camshaft timing gears are aligned with the timing marks of the camshaft bearing caps as shown in the illustration. If not, turn the crankshaft clockwise 1 revolution (360°) and align the timing marks as above.
Text in Illustration
*a
Timing Mark
3.
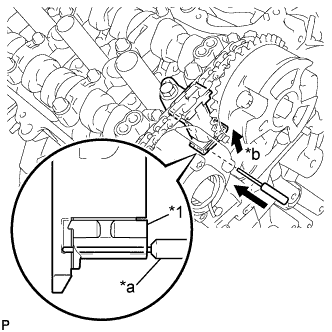
REMOVE NO. 1 CHAIN TENSIONER ASSEMBLY
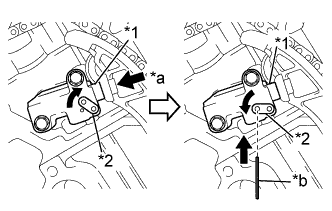
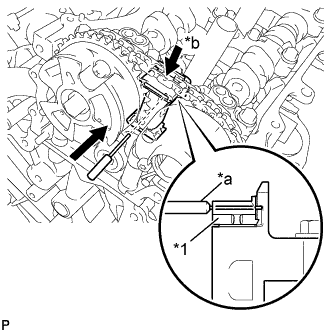
Move the stopper plate upward to release the lock, and push the plunger deep into the tensioner.
Text in Illustration
*1
Plunger
*2
Stopper Plate
*a
Push
*b
Pin of 12.7 mm (0.05 in.) diameter
Move the stopper plate downward to set the lock, and insert a pin of 1.27 mm (0.05 in.) diameter into the stopper plate hole.
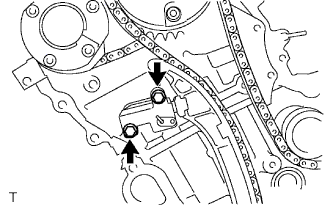
Remove the 2 bolts and No. 1 chain tensioner assembly from the cylinder head sub-assembly.
4.
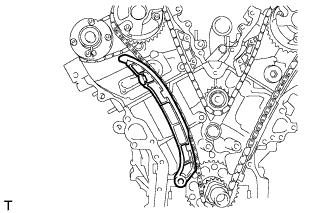
REMOVE CHAIN TENSIONER SLIPPER
Remove the chain tensioner slipper from the cylinder block sub-assembly.
5.
REMOVE CHAIN SUB-ASSEMBLY
Turn the crankshaft counterclockwise 10° to loosen the chain sub-assembly of the crankshaft timing sprocket.
Text in Illustration
*1
Crank Angle Sensor Plate
*a
RH Cylinder Block Bore Center Line
*b
Timing Mark
Remove the crankshaft pulley bolt from the crankshaft.
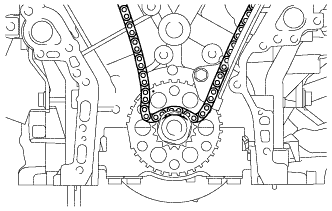
Remove the chain sub-assembly from the crankshaft timing sprocket and place it on the crankshaft timing sprocket.
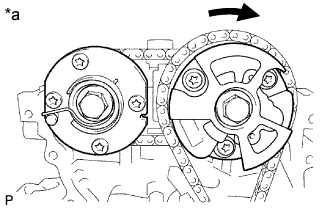
Turn the camshaft timing gear assembly on bank 1 clockwise approximately 60° so that it is as shown in the illustration. Be sure to loosen the chain sub-assembly between the banks.
Remove the chain sub-assembly.
Text in Illustration
*a
Bank 1
Clockwise Approximately 60°
6.
REMOVE NO. 1 IDLE GEAR SHAFT
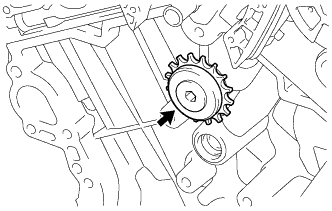
Using a 10 mm hexagon wrench, remove the No. 2 idle gear shaft, No. 1 idle gear and No. 1 idle gear shaft from the cylinder block sub-assembly.
7.
REMOVE NO. 1 CHAIN VIBRATION DAMPER
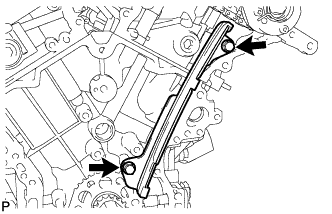
Remove the 2 bolts and No. 1 chain vibration damper from the cylinder head LH and cylinder block sub-assembly.
8.
REMOVE NO. 2 CHAIN VIBRATION DAMPER
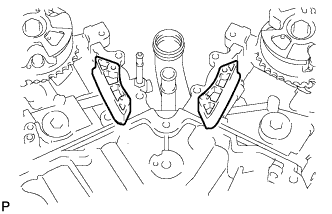
Remove the 2 No. 2 chain vibration dampers from the cylinder head sub-assembly and cylinder head LH.
9.
REMOVE CRANKSHAFT TIMING SPROCKET
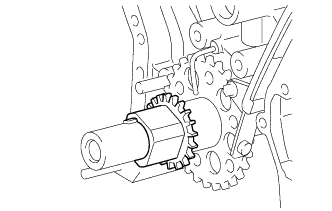
Remove the crankshaft timing sprocket from the crankshaft.
10.
REMOVE CAMSHAFT TIMING GEARS AND NO. 2 CHAIN (for Bank 1)
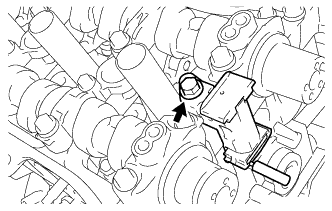
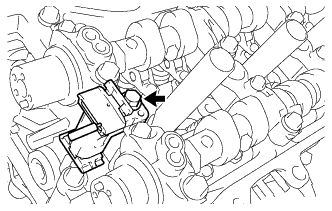
While raising the plunger, insert a pin of 1.0 mm (0.0394 in.) diameter into the plunger hole to hold the No. 2 chain tensioner assembly.
Text in Illustration
*1
Plunger
*a
Pin of 1.0 mm (0.0394 in.) diameter
*b
Rise
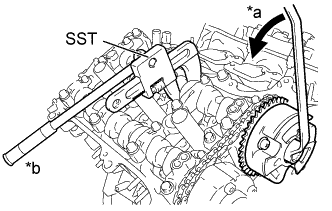
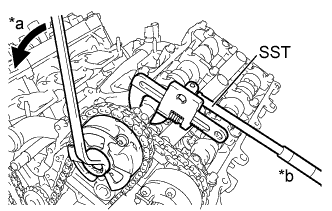
Using SST to hold the hexagonal portion of each camshaft, loosen the bolts of the camshaft timing gear assembly and camshaft timing exhaust gear assembly RH.
Text in Illustration
*a
Turn
*b
Hold
SST
09922-10010
NOTICE:
Do not loosen the other 4 bolts. If any of the 4 bolts is loosened, replace the camshaft timing gear assembly and/or camshaft timing exhaust gear assembly RH with a new one.
Remove the 2 bolts from the camshaft and No. 2 camshaft.
Remove the camshaft timing gear assembly and camshaft timing exhaust gear assembly RH together with the No. 2 chain sub-assembly from the camshaft and No. 2 camshaft.
11.
REMOVE NO. 2 CHAIN TENSIONER ASSEMBLY
Remove the bolt and No. 2 chain tensioner assembly from the camshaft housing sub-assembly RH.
12.
REMOVE CAMSHAFT BEARING CAP (for Bank 1)
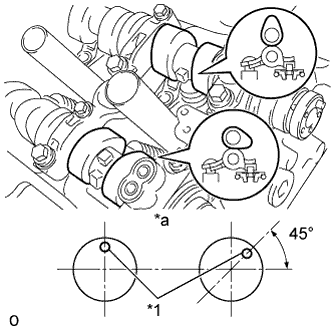
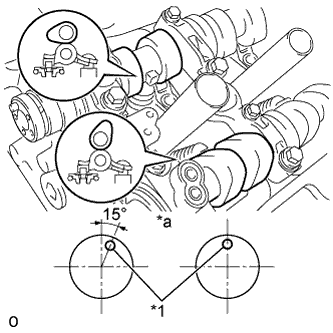
Check that the camshafts are positioned as shown in the illustration.
Text in Illustration
*1
Knock Pin
*a
Front View
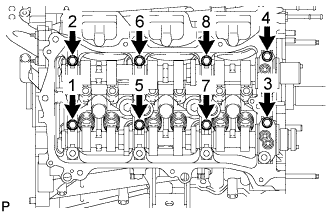
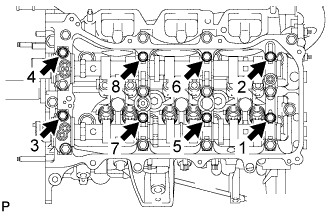
Uniformly loosen and remove the 8 bolts in several steps and in the sequence shown in the illustration.
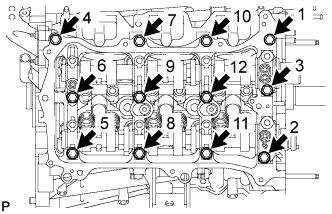
Uniformly loosen and remove the 12 bolts in several steps in the sequence shown in the illustration.
NOTICE:
Uniformly loosen the bolts while keeping the camshaft and No. 2 camshaft level.
Remove the 5 camshaft bearing caps from the camshaft housing sub-assembly RH.
Remove the camshaft and No. 2 camshaft from the camshaft housing sub-assembly RH.
13.
REMOVE CAMSHAFT HOUSING SUB-ASSEMBLY RH
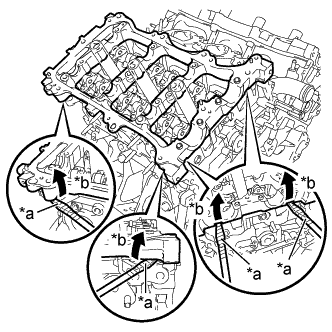
Using a screwdriver with its tip wrapped in protective tape, remove the camshaft housing sub-assembly RH by prying between the cylinder head sub-assembly and camshaft housing sub-assembly RH.
Text in Illustration
*a
Protective Tape
*b
Pry
NOTICE:
Be careful not to damage the contact surfaces of the cylinder head sub-assembly and camshaft housing sub-assembly RH.
14.
REMOVE CAMSHAFT TIMING GEARS AND NO. 2 CHAIN (for Bank 2)
While pushing the plunger, insert a pin of 1.0 mm (0.0394 in.) diameter into the plunger hole to hold the No. 3 chain tensioner assembly.
Text in Illustration
*1
Plunger
*a
Pin of 1.0 mm (0.0394 in.) diameter
*b
Push
Using SST to hold the hexagonal portion of each camshaft, loosen the bolts of the camshaft timing gear assembly and camshaft timing exhaust gear assembly LH.
Text in Illustration
*a
Turn
*b
Hold
SST
09922-10010
NOTICE:
Do not loosen the other 4 bolts. If any of the 4 bolts is loosened, replace the camshaft timing gear assembly and/or camshaft timing exhaust gear assembly LH with a new one.
Remove the 2 bolts from the No. 3 camshaft sub-assembly and No. 4 camshaft sub-assembly
Remove the camshaft timing gear assembly and camshaft timing exhaust gear assembly LH together with the No. 2 chain sub-assembly from the No. 3 camshaft sub-assembly and No. 4 camshaft sub-assembly.
15.
REMOVE NO. 3 CHAIN TENSIONER ASSEMBLY
Remove the bolt and No. 3 chain tensioner assembly from the camshaft housing sub-assembly LH.
16.
REMOVE CAMSHAFT BEARING CAP (for Bank 2)
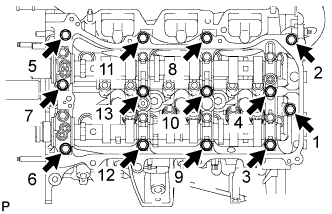
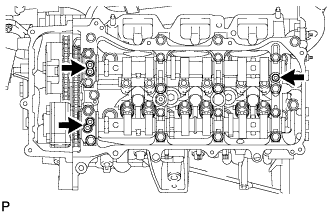
Check that the camshafts are positioned as shown in the illustration.
Text in Illustration
*1
Knock Pin
*a
Front View
Uniformly loosen and remove the 8 bolts in several steps and in the sequence shown in the illustration.
Uniformly loosen and remove the 13 bolts in several steps and in the sequence shown in the illustration.
NOTICE:
Uniformly loosen the bolts while keeping the No. 3 camshaft sub-assembly and No. 4 camshaft sub-assembly level.
Remove the 5 camshaft bearing caps from the camshaft housing sub-assembly LH.
Remove the No. 3 camshaft sub-assembly and No. 4 camshaft sub-assembly from the camshaft housing sub-assembly LH.
17.
REMOVE CAMSHAFT HOUSING SUB-ASSEMBLY LH
Remove any old seal packing material and be careful not to drop any oil on the contact surfaces of the camshaft housing sub-assembly LH, timing chain cover sub-assembly or cylinder head cover sub-assembly LH.
Apply seal packing as shown in the illustration.
Text in Illustration
Seal Packing
Seal packing:
Toyota Genuine Seal Packing Black, Three Bond 1207B or equivalent
Standard seal diameter:
2 to 3 mm (0.0787 to 0.118 in.)
NOTICE:
Remove any oil from the contact surface.
Install the cylinder head cover sub-assembly LH within 3 minutes and tighten the bolts within 15 minutes after applying seal packing.
Install 3 new gaskets to the camshaft bearing caps as shown in the illustration.
Install a new No. 2 cylinder head cover gasket to the cylinder head cover sub-assembly LH.
Install a new seal washer to the bolt.
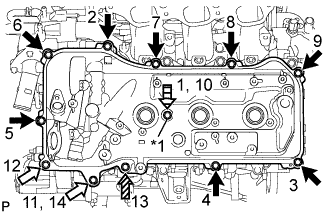
Temporarily install the cylinder head cover sub-assembly LH to the camshaft housing sub-assembly LH and timing chain cover sub-assembly with the 12 bolts. Tighten the bolts uniformly in several steps.
Text in Illustration
*1
Seal Washer
Bolt A (25 mm (0.984 in.))
Bolt B (35 mm (1.38 in.))
Bolt C (70 mm (2.76 in.))
Bolt D (60 mm (2.36 in.))
Torque:
for bolt A and D:
10 N*m{
102 kgf*cm
, 7 ft.*lbf
}
for bolt B and C:
21 N*m{
214 kgf*cm
, 15 ft.*lbf
}
NOTICE:
Do not start the engine for at least 2 hours after the installation.
18.
REMOVE NO. 1 VALVE ROCKER ARM SUB-ASSEMBLY
Remove the 24 No. 1 valve rocker arm sub-assemblies from the cylinder head sub-assembly and cylinder head LH.
HINT:
Arrange the removed parts in the correct order.
19.
REMOVE VALVE LASH ADJUSTER ASSEMBLY
Remove the 24 valve lash adjuster assemblies from the cylinder head sub-assembly and cylinder head LH.
HINT:
Arrange the removed parts in the correct order.
20.
REMOVE VALVE STEM CAP
Remove the 24 valve stem caps from the cylinder head sub-assembly and cylinder head LH.
HINT:
Arrange the removed parts in the correct order.
21.
REMOVE CYLINDER HEAD SUB-ASSEMBLY
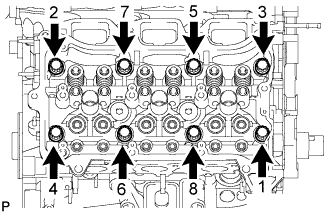
Using a 10 mm bi-hexagon wrench, uniformly loosen the 8 cylinder head bolts in the sequence shown in the illustration. Remove the 8 cylinder head bolts and plate washers.
NOTICE:
Be careful not to drop washers into the cylinder head sub-assembly.
Cylinder head warpage or cracking could result from removing bolts in an incorrect order.
HINT:
Arrange the removed parts in the correct order.
Remove the cylinder head sub-assembly.
22.
REMOVE CYLINDER HEAD LH
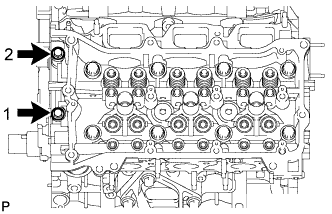
Uniformly loosen and remove the 2 cylinder head set bolts in several steps and in the sequence shown in the illustration.
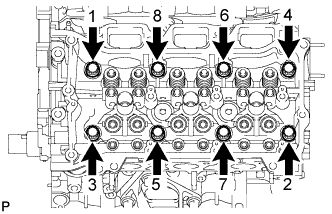
Using a 10 mm bi-hexagon wrench, uniformly loosen the 8 bolts in the sequence shown in the illustration. Remove the 8 cylinder head bolts and plate washers.
NOTICE:
Be careful not to drop washers into the cylinder head sub-assembly.
Cylinder head warpage or cracking could result from removing bolts in an incorrect order.
HINT:
Be sure to keep the removed parts for each installation position separate.