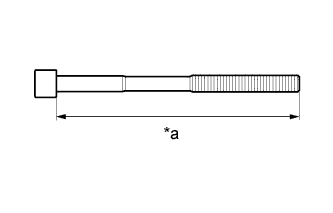
Using a vernier caliper, measure the length of the cylinder head bolt from the seat to the end.
Text in Illustration
*a
Measurement Length
Standard length:
141.3 to 142.7 mm (5.56 to 5.62 in.)
Maximum length:
143.7 mm (5.66 in.)
If the length is more than the maximum, replace the cylinder head bolt.
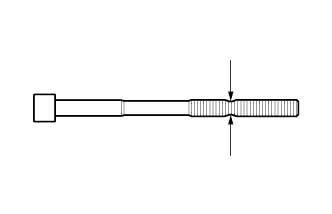
Using a vernier caliper, measure the diameter of the elongated thread at the narrowest visible area.
Standard diameter:
10.73 to 10.97 mm (0.422 to 0.432 in.)
Minimum diameter:
10.40 mm (0.409 in.)
If the diameter is less than the minimum, replace the cylinder head bolt.
HINT:
If a visual check reveals no excessively thin areas, check the center of the bolt (refer to illustration) and find the area that has the smallest diameter.
2.
INSPECT CYLINDER HEAD SUB-ASSEMBLY
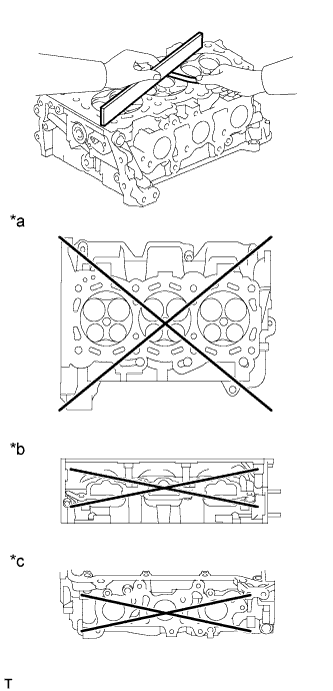
Using a precision straightedge and feeler gauge, measure the warpage of the surfaces which contact the cylinder block sub-assembly and manifolds.
Text in Illustration
*a
Cylinder Block Side:
*b
Intake Side:
*c
Exhaust Side:
Standard Warpage:
Item
Specified Condition
Cylinder block side
0.05 mm (0.00197 in.)
Intake side
0.08 mm (0.00315 in.)
Exhaust side
0.08 mm (0.00315 in.)
Maximum Warpage:
Item
Specified Condition
Cylinder block side
0.10 mm (0.00394 in.)
Intake side
0.10 mm (0.00394 in.)
Exhaust side
0.10 mm (0.00394 in.)
If the warpage is more than the maximum, replace the cylinder head sub-assembly.
Using a dye penetrant, check the intake ports, exhaust ports and cylinder surface for cracks. If cracked, replace the cylinder head sub-assembly.
3.
INSTALL CYLINDER HEAD GASKET
Remove any old seal packing material and be careful not to drop any oil on the contact surfaces of the cylinder head or cylinder block.
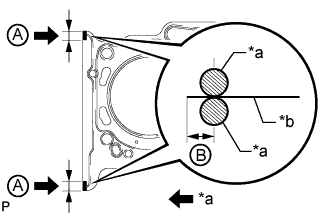
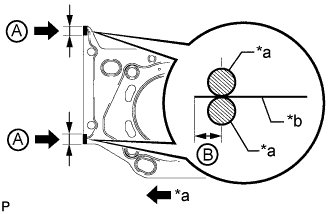
Apply seal packing to a new cylinder head gasket as shown in the illustration.
Text in Illustration
*a
Seal Packing
*b
Gasket
Seal packing:
Toyota Genuine Seal Packing Black, Three Bond 1207B or equivalent
Standard seal diameter:
2.5 to 3.0 mm (0.0984 to 0.118 in.)
Seal packing application range
A
10 to 15 mm (0.394 to 0.591 in.)
B
1.25 to 1.5 mm (0.0492 to 0.0591 in.)
NOTICE:
Remove any oil from the contact surface.
Install the cylinder head gasket within 3 minutes and tighten the bolts within 15 minutes after applying seal packing.
Do not add engine oil within 2 hours of installation.
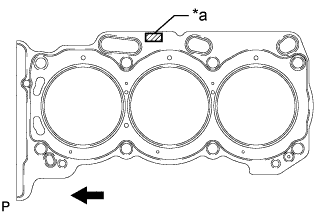
Place the cylinder head gasket on the cylinder block surface with the front face of the Lot No. stamp upward.
NOTICE:
Make sure that the gasket is installed facing the proper direction.
Text in Illustration
*a
Lot No.
Engine Front
4.
INSTALL CYLINDER HEAD SUB-ASSEMBLY
Place the cylinder head on the cylinder block.
NOTICE:
Gently place the cylinder head in order not to damage the gasket with the bottom part of the head.
Make sure that no oil is on the mounting surface of the cylinder head.
HINT:
The cylinder head bolts are tightened in 3 progressive steps.
Apply a light coat of engine oil to the threads and under the heads of the cylinder head bolts.
Step 1:
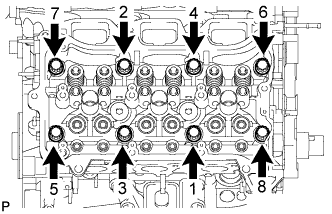
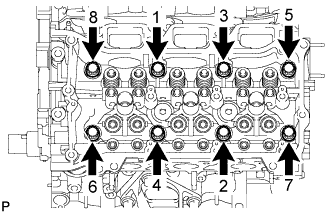
Using a 10 mm bi-hexagon wrench, install and uniformly tighten the 8 cylinder head bolts with the plate washers in several steps and in the sequence shown in the illustration.
Torque:
36 N*m{
367 kgf*cm
, 27 ft.*lbf
}
Step 2:
Mark the front side of each cylinder head bolt head with paint.
Tighten the cylinder head bolts another 90°.
Step 3:
Tighten the cylinder head bolts an additional 90°.
Check that the paint mark is now at a 180° angle to the front.
NOTICE:
Thoroughly wipe clean any seal packing.
5.
INSTALL NO. 2 CYLINDER HEAD GASKET
Remove any old seal packing material and be careful not to drop any oil on the contact surfaces of the cylinder head or cylinder block.
Apply seal packing to a new cylinder head gasket as shown in the illustration.
Text in Illustration
*a
Seal Packing
*b
Gasket
Seal packing:
Toyota Genuine Seal Packing Black, Three Bond 1207B or equivalent
Standard seal diameter:
2.5 to 3.0 mm (0.0984 to 0.118 in.)
Seal packing application range
A
10 to 15 mm (0.394 to 0.591 in.)
B
1.25 to 1.5 mm (0.0492 to 0.0591 in.)
NOTICE:
Remove any oil from the contact surface.
Install the cylinder head gasket within 3 minutes and tighten the bolts within 15 minutes after applying seal packing.
Do not add engine oil within 2 hours of installation.
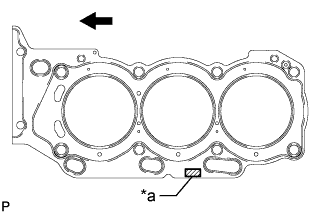
Place the cylinder head gasket on the cylinder block surface with the front face of the Lot No. stamp upward.
NOTICE:
Make sure that the gasket is installed facing the proper direction.
Text in Illustration
*a
Lot No.
Engine Front
6.
INSTALL CYLINDER HEAD LH
Place the cylinder head on the cylinder block.
NOTICE:
Gently place the cylinder head in order not to damage the gasket with the bottom part of the head.
Make sure that no oil is on the mounting surface of the cylinder head.
HINT:
The cylinder head bolts are tightened in 3 progressive steps.
Apply a light coat of engine oil to the threads and under the heads of the cylinder head bolts.
Step 1:
Using a 10 mm bi-hexagon wrench, install and uniformly tighten the 8 cylinder head bolts with the plate washers in several steps in the sequence shown in the illustration.
Torque:
36 N*m{
367 kgf*cm
, 27 ft.*lbf
}
Step 2:
Mark the front side of each cylinder head bolt head with paint.
Tighten the cylinder head bolts another 90°.
Step 3:
Tighten the cylinder head bolts an additional 90°.
Check that the paint mark is now at a 180° angle to the front.
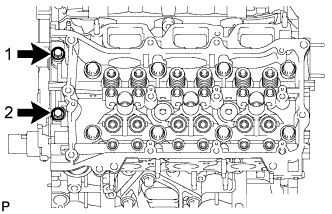
Tighten the 2 bolts in the order shown in the illustration.
Torque:
30 N*m{
306 kgf*cm
, 22 ft.*lbf
}
NOTICE:
Thoroughly wipe clean any seal packing.
7.
INSTALL VALVE STEM CAP
Apply a light coat of engine oil to the valve stem caps.
Install the 24 valve stem caps to the cylinder head.
Install the 24 valve lash adjusters to the cylinder head.
NOTICE:
Install the lash adjuster at the same place it was removed from.
9.
INSTALL NO. 1 VALVE ROCKER ARM SUB-ASSEMBLY
Apply engine oil to the lash adjuster tips and valve stem cap ends.
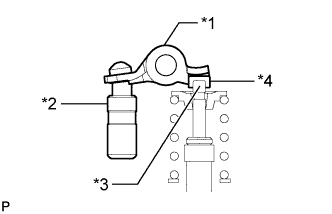
Install the 24 valve rocker arms as shown in the illustration.
Text in Illustration
*1
Valve Rocker Arm
*2
Lash Adjuster
*3
Valve Stem
*4
Valve Stem Cap
10.
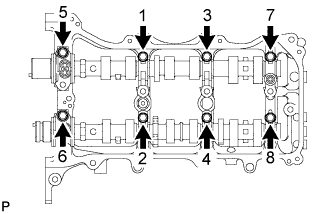
INSTALL CAMSHAFT BEARING CAP (for Bank 2)
Apply a light coat of engine oil to the camshaft journals, camshaft housings and bearing caps.
Install the No. 3 camshaft and No. 4 camshaft to the camshaft housing.
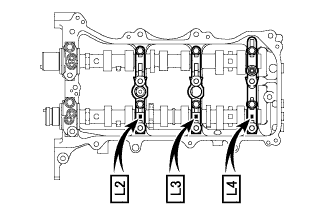
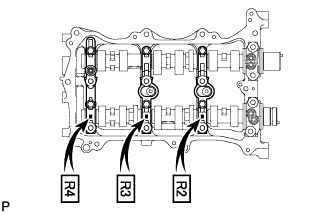
Check the marks and numbers on the camshaft bearing caps and place each of them in the proper position facing the proper direction.
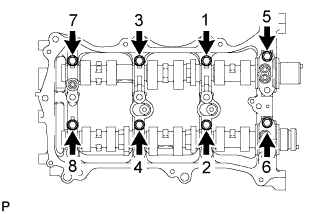
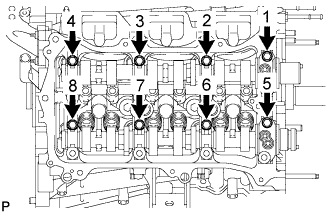
Temporarily tighten the 8 bolts in the order shown in the illustration.
Torque:
10 N*m{
102 kgf*cm
, 7 ft.*lbf
}
11.
INSTALL CAMSHAFT HOUSING SUB-ASSEMBLY LH
Make sure that the valve rocker arm is installed as shown in the illustration.
Text in Illustration
*1
Valve Rocker Arm
*2
Lash Adjuster
*3
Valve Stem
*4
Valve Stem Cap
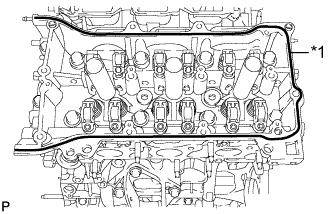
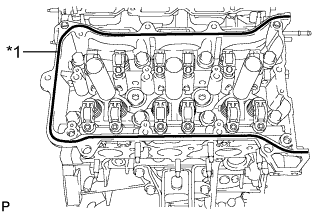
Apply seal packing in a continuous line as shown in the illustration.
Text in Illustration
*1
Seal Packing
Seal packing:
Toyota Genuine Seal Packing Black, Three Bond 1207B or equivalent
Seal diameter:
3.5 to 4.5 mm (0.138 to 0.177 in.)
NOTICE:
Remove any oil from the contact surface.
Install the camshaft housing within 3 minutes and tighten the bolts within 15 minutes after applying seal packing.
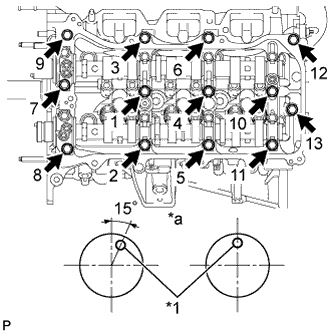
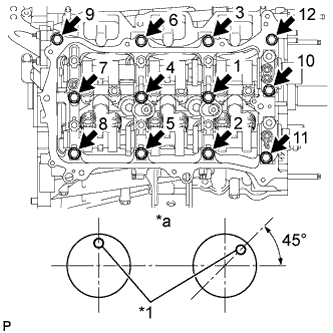
Install the camshaft housing sub-assembly LH and tighten the 13 bolts in the order shown in the illustration.
Text in Illustration
*1
Knock Pin
*a
Front View
Torque:
28 N*m{
286 kgf*cm
, 21 ft.*lbf
}
NOTICE:
When installing the camshaft housing sub-assembly LH, it is necessary to correctly position the camshafts as shown in the illustration. Failure to correctly position these parts may result in damage due to contact between the pistons and valves. If a camshaft is rotated with a piston at TDC, valve contact will occur.
If any of the bolts are loosened during installation, remove the camshaft housing sub-assembly LH, clean the installation surfaces, and reapply seal packing.
If the camshaft housing sub-assembly LH is removed because any of the bolts are loosened during installation, make sure that the previously applied seal packing does not enter any oil passages.
Do not start the engine for at least 2 hours after installing.
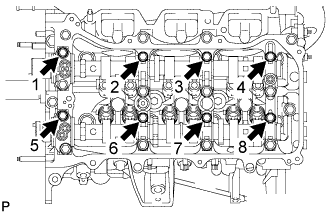
Tighten the 8 bolts in the order shown in the illustration.
Torque:
16 N*m{
163 kgf*cm
, 12 ft.*lbf
}
NOTICE:
Thoroughly wipe clean any seal packing.
12.
INSTALL CAMSHAFT BEARING CAP (for Bank 1)
Apply a light coat of engine oil to the camshaft journals, camshaft housings and bearing caps.
Install the camshaft and No. 2 camshaft to the camshaft housing.
Check the marks and numbers on the camshaft bearing caps and place each of them in the proper position facing the proper direction.
Temporarily tighten the 8 bearing cap bolts in the order shown in the illustration.
Torque:
10 N*m{
102 kgf*cm
, 7 ft.*lbf
}
13.
INSTALL CAMSHAFT HOUSING SUB-ASSEMBLY RH
Make sure that the No. 1 valve rocker arm sub-assembly is installed as shown in the illustration.
Text in Illustration
*1
Valve Rocker Arm
*2
Lash Adjuster
*3
Valve Stem
*4
Valve Stem Cap
Apply seal packing in a continuous line as shown in the illustration.
Text in Illustration
*1
Seal Packing
Seal packing:
Toyota Genuine Seal Packing Black, Three Bond 1207B or equivalent
Seal diameter:
3.5 to 4.5 mm (0.138 to 0.177 in.)
NOTICE:
Remove any oil from the contact surface.
Install the camshaft housing within 3 minutes and tighten the bolts within 15 minutes after applying seal packing.
Install the camshaft housing sub-assembly RH and tighten the 12 bolts in the order shown in the illustration.
Text in Illustration
*1
Knock Pin
*a
Front View
Torque:
28 N*m{
286 kgf*cm
, 21 ft.*lbf
}
NOTICE:
When installing the camshaft housing RH, it is necessary to correctly position the camshafts as shown in the illustration. Failure to correctly position these parts may result in damage due to contact between the pistons and valves. If a camshaft is rotated with a piston at TDC, valve contact will occur.
If any of the bolts are loosened during installation, remove the camshaft housing sub-assembly RH, clean the installation surfaces, and reapply seal packing.
If the camshaft housing sub-assembly RH is removed because any of the bolts are loosened during installation, make sure that the previously applied seal packing does not enter any oil passages.
Do not start the engine for at least 2 hours after installing.
Tighten the 8 bolts in the order shown in the illustration.
Torque:
16 N*m{
163 kgf*cm
, 12 ft.*lbf
}
NOTICE:
Thoroughly wipe clean any seal packing.
14.
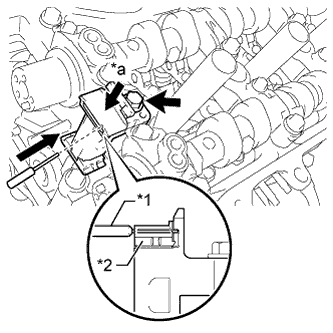
INSTALL NO. 3 CHAIN TENSIONER ASSEMBLY (for Bank 2)
Install the No. 3 chain tensioner assembly with the bolt.
Torque:
21 N*m{
214 kgf*cm
, 15 ft.*lbf
}
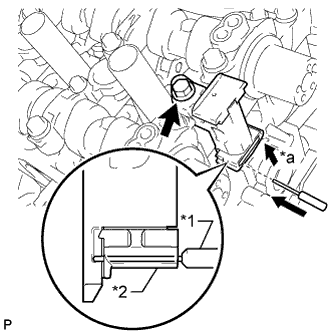
Push in the tensioner and insert a pin with a diameter of 1.0 mm (0.0394 in.) into the hole to hold the tensioner.
Text in Illustration
*1
Pin
*2
Plunger
*a
Push
15.
INSTALL CAMSHAFT TIMING GEARS AND NO. 2 CHAIN (for Bank 2)
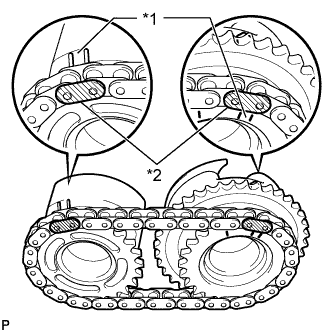
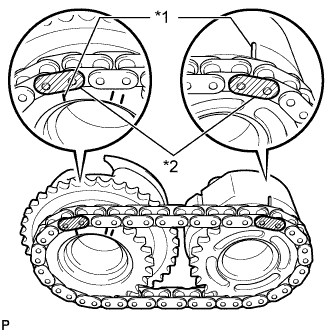
Align the mark plates (yellow) with the timing marks of the camshaft timing gear assemblies as shown in the illustration.
Text in Illustration
*1
Timing Mark
*2
Mark Plate
Apply a light coat of engine oil to the bolt threads and bolt-seating surface.
Align the knock pin of the camshaft with the pin hole of the camshaft timing gear assembly. Install the camshaft timing gear assembly and camshaft timing exhaust gear LH with the No. 2 chain sub-assembly installed.
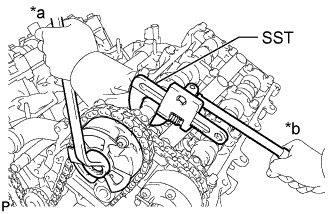
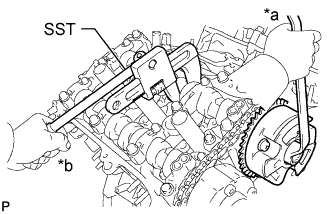
Using SST to hold the hexagonal portion of each camshaft, tighten the bolts of the camshaft timing gear assembly and the camshaft timing exhaust gear assembly.
Text in Illustration
*a
Turn
*b
Hold
SST
09922-10010
Torque:
100 N*m{
1020 kgf*cm
, 74 ft.*lbf
}
Remove the pin from the No. 3 chain tensioner assembly.
16.
INSTALL NO. 2 CHAIN TENSIONER ASSEMBLY (for Bank 1)
Install the No. 2 chain tensioner assembly with the bolt.
Torque:
21 N*m{
214 kgf*cm
, 15 ft.*lbf
}
Push in the No. 2 chain tensioner assembly and insert a pin with a diameter of 1.0 mm (0.0394 in.) into the hole to hold the tensioner.
Text in Illustration
*1
Pin
*2
Plunger
*a
Push
17.
INSTALL CAMSHAFT TIMING GEARS AND NO. 2 CHAIN (for Bank 1)
Align the mark plates (yellow) with the timing marks of the camshaft timing gear assemblies as shown in the illustration.
Text in Illustration
*1
Timing Mark
*2
Mark Plate
Apply a light coat of engine oil to the bolt threads and bolt-seating surface.
Align the knock pin of the camshaft with the pin hole of the camshaft timing gear assembly. Install the camshaft timing gear assembly and camshaft timing exhaust gear assembly with the No. 2 chain sub-assembly installed.
Using SST to hold the hexagonal portion of each camshaft, tighten the bolts of the camshaft timing gear assembly and the camshaft timing exhaust gear assembly.
Text in Illustration
*a
Turn
*b
Hold
SST
09922-10010
Torque:
100 N*m{
1020 kgf*cm
, 74 ft.*lbf
}
Remove the pin from the No. 2 chain tensioner assembly.
18.
INSTALL NO. 1 CHAIN VIBRATION DAMPER
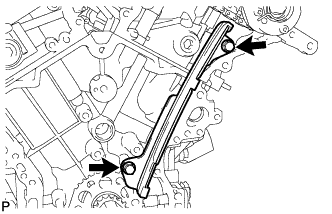
Install the No. 1 chain vibration damper with the 2 bolts.
Torque:
23 N*m{
229 kgf*cm
, 17 ft.*lbf
}
19.
INSTALL NO. 2 CHAIN VIBRATION DAMPER
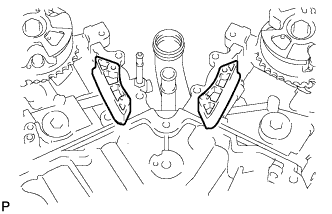
Install the 2 No. 2 chain vibration dampers.
20.
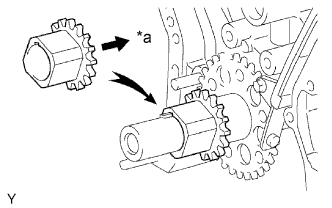
INSTALL CRANKSHAFT TIMING SPROCKET
Align the key groove of the timing sprocket with the timing sprocket set key.
Install the timing sprocket to the crankshaft with the sprocket facing inward as shown in the illustration.
Text in Illustration
*a
Inward
21.
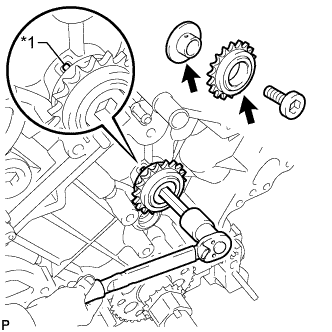
INSTALL NO. 1 IDLE GEAR SHAFT
Apply a light coat of engine oil to the rotating surface of the No. 1 idle gear shaft.
Temporarily install the No. 1 idle gear shaft and No. 1 idle gear with the No. 2 idle gear shaft while aligning the knock pin of the No. 1 idle gear shaft with the knock pin groove of the cylinder block.
Text in Illustration
*1
Knock Pin
NOTICE:
Make sure that the idle gear is installed facing the proper direction.
Using a 10 mm hexagon wrench, tighten the No. 2 idle gear shaft.
Torque:
60 N*m{
612 kgf*cm
, 44 ft.*lbf
}
Remove the bar from the chain tensioner.
22.
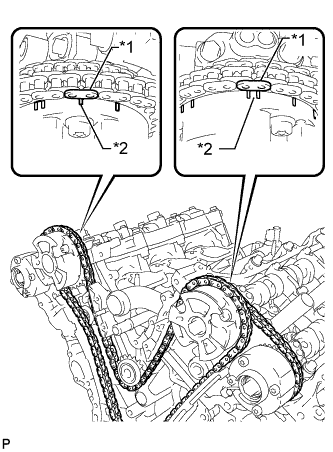
INSTALL CHAIN SUB-ASSEMBLY
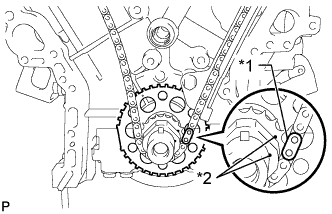
Align the mark plate and timing marks as shown in the illustration and install the chain.
Text in Illustration
*1
Mark Plate
*2
Timing Mark
HINT:
The camshaft mark plates are orange.
Do not pass the chain over the crankshaft, just temporarily place it on the crankshaft.
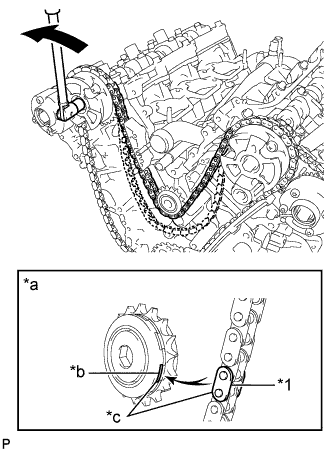
Turn the camshaft timing gear assembly on bank 1 counterclockwise to tighten the chain between the banks.
Text in Illustration
*1
Chain Plate
*a
When the idle sprocket is reused:
*b
Mark
*c
Align
Turn
NOTICE:
When the idle sprocket assembly is reused, align the chain plate with the mark where the plate had been in order to tighten the chain between the banks.
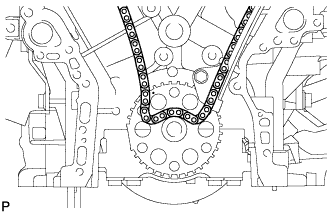
Align the mark plate and timing marks as shown in the illustration and install the chain to the crankshaft timing sprocket.
Text in Illustration
*1
Mark Plate
*2
Timing Mark
HINT:
The crankshaft mark plate is yellow.
Temporarily tighten the pulley set bolt.
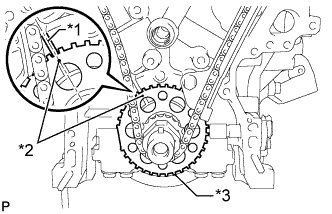
Turn the crankshaft clockwise to set it to the RH block bore center line (TDC/compression).
Text in Illustration
*1
Center Line
*2
Timing Mark
*3
Sensor Plate
23.
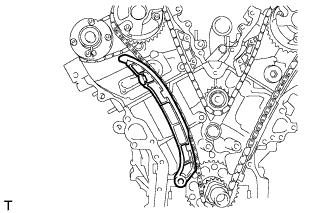
INSTALL CHAIN TENSIONER SLIPPER
Install the chain tensioner slipper.
24.
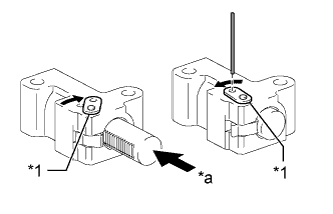
INSTALL NO. 1 CHAIN TENSIONER ASSEMBLY
Turn the stopper plate of the tensioner clockwise and push in the plunger of the tensioner as shown in the illustration.
Text in Illustration
*1
Stopper Plate
*a
Push
Turn the stopper plate of the tensioner counterclockwise and insert a pin of φ1.27 mm (0.0500 in.) into the holes on the stopper plate and tensioner to fix the stopper plate in place.
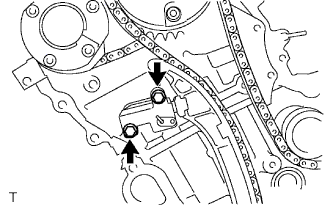
Install the chain tensioner with the 2 bolts.
Torque:
10 N*m{
102 kgf*cm
, 7 ft.*lbf
}
Remove the pin from the No. 1 chain tensioner.
25.
INSPECT VALVE TIMING
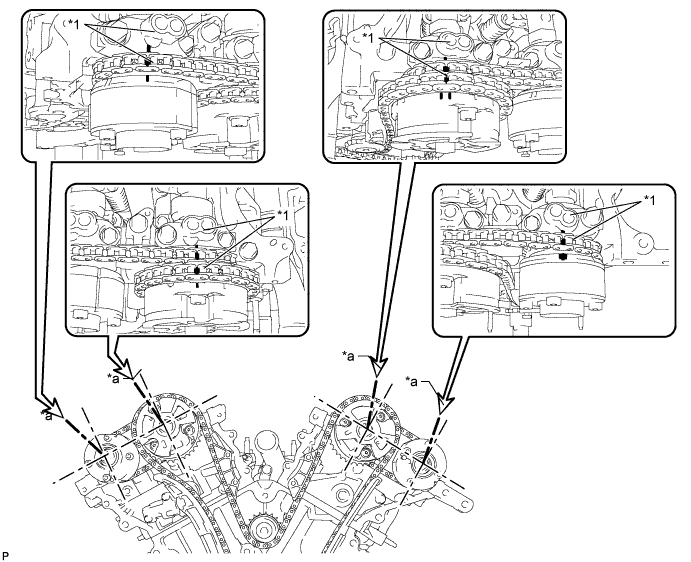
Check the camshaft timing marks.
NOTICE:
Check each timing mark from a viewpoint directly inline with the center of the camshaft and the timing mark on each camshaft timing gear.
If the timing marks are checked from any other viewpoint, the valve timing may appear misaligned.
Check that each camshaft timing mark is positioned as shown in the illustration.
Text in Illustration
*1
Timing Mark
-
-
*a
Viewpoint
-
-
HINT:
for the intake camshaft:
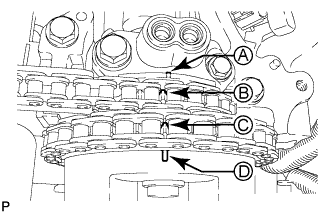
Be sure to check mark A at the point when marks B, C, and D are positioned in line. If the marks are checked from any other viewpoint, they cannot be checked correctly.
If the valve timing is misaligned, reinstall the timing chain.