INSTALLATION
Removal / installation · Vehicles built Nov 2010 – Jul 2013
Versions by build date: Jul 2007 – Jul 2009 Aug 2009 – Oct 2010 Nov 2010 – Jul 2013 Aug 2013 – Jul 2014 from Aug 2014
| 1. INSPECT CAMSHAFT TIMING GEAR ASSEMBLY |

Fix the camshaft place.
- NOTICE:
- Be careful not to damage the camshaft.
Put the camshaft timing gear assembly and camshaft together by aligning the key groove and straight pin.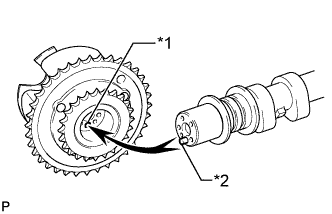

Text in Illustration *1
Pin Hole
*2
Straight Pin
Lightly press and turn the camshaft timing gear assembly against the camshaft, and press harder after the pin enters the hole.
- NOTICE:
- Be sure not to turn the camshaft timing gear assembly in the retard direction.
Check that there is no clearance between the camshaft timing gear assembly flange and the camshaft.
Tighten the flange bolt while holding the camshaft.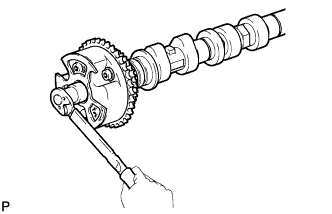
- Torque:
- 100 N*m{ 1020 kgf*cm , 74 ft.*lbf }
Check the lock of the camshaft timing gear assembly.
Fix the camshaft in place, and confirm that the camshaft timing gear assembly is locked.
- NOTICE:
- Be careful not to damage the camshaft.
Release the lock pin.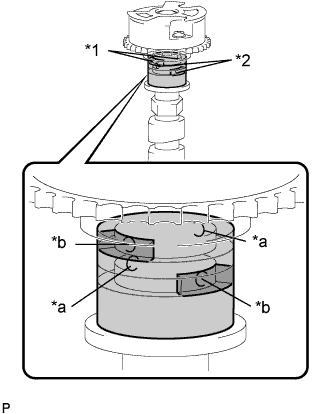
Text in Illustration *1
Advance Side Path
*2
Retard Side Path
*a
Open
*b
Close

Rubber

Vinyl Tape
Cover the 4 oil paths of the cam journal with vinyl tape as shown in the illustration.
- HINT:
- The 2 advance side paths are located in the camshaft groove. Plug one of the paths with a rubber piece.
Break through the tape on the advance side path and the retard side path on the opposite side of the hole of the advance side path, as shown in the illustration.
Apply approximately 200 kPa (2.0 kgf/cm2, 28 psi) of air pressure to the 2 opened paths.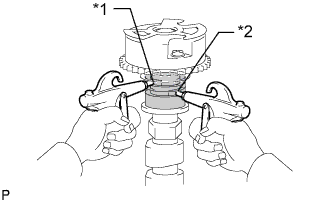
Text in Illustration *1
Advance Side Path
*2
Retard Side Path
- CAUTION:
- Cover the paths with a piece of cloth when applying pressure to prevent oil from spraying.
Check that the camshaft timing gear assembly rotates in the advance direction when reducing the air pressure applied to the retard side path.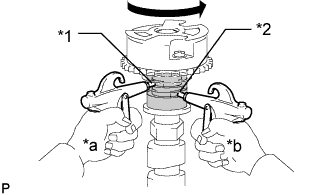
Text in Illustration *1
Advance Side Path
*2
Retard Side Path
*a
Hold Pressure
*b
Decompress
- HINT:
- This operation releases the lock pin at the most retarded position.
When the camshaft timing gear assembly reaches the most advanced position, release the air pressure first from the retard side path and next from advance side path.
- NOTICE:
- Do not release the air pressure from the advance side path first. The gear may abruptly shift in the retard direction and break the lock pin.
Check for smooth rotation.
Turn the camshaft timing gear assembly within its movable range (21°) 2 or 3 times, but do not turn it to the most retarded position. Make sure that the gear turns smoothly.
- NOTICE:
- Do not use air pressure to perform the smooth operation check.
Check the lock in the most retarded position.
Confirm that the camshaft timing gear assembly locks at the most retarded position.
Remove the flange bolt and camshaft timing gear assembly.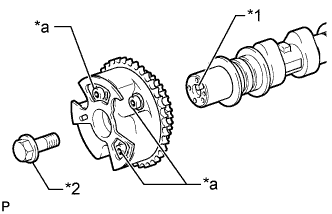
Text in Illustration *1
Straight Pin
*2
Flange Bolt
*a
Do Not Remove
- NOTICE:
- Do not remove the other 3 bolts.
- If planning to reuse the camshaft timing gear, be sure to release the straight pin lock before installing the camshaft timing gear.
- Do not remove the other 3 bolts.
| 2. INSPECT CAMSHAFT TIMING EXHAUST GEAR ASSEMBLY |
Fix the camshaft in place.
- NOTICE:
- Be careful not to damage the camshaft.
Put the camshaft timing exhaust gear assembly and camshaft together by aligning the key groove and straight pin.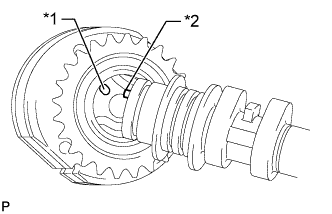
Text in Illustration *1
Pin Hole
*2
Straight Pin
Lightly press and turn the camshaft timing gear assembly against the camshaft, and press harder after the pin enters the hole.
- NOTICE:
- Be sure not to turn the camshaft timing exhaust gear in the retard direction.
Check that there is no clearance between the gear flange and the camshaft.
Tighten the flange bolt while holding the camshaft.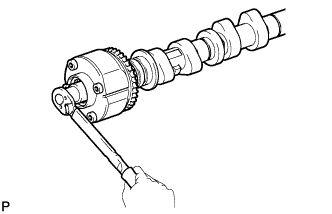
- Torque:
- 100 N*m{ 1020 kgf*cm , 74 ft.*lbf }
Check the camshaft timing exhaust gear lock.
Make sure that the camshaft timing exhaust gear assembly locks.
Release the lock pin.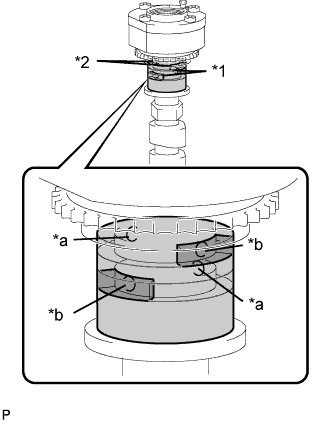
Text in Illustration *1
Advance Side Path
*2
Retard Side Path
*a
Open
*b
Close
Rubber
Vinyl Tape
Cover the 4 oil paths of the cam journal with vinyl tape as shown in the illustration.
- HINT:
- The 2 advance side paths are located in the camshaft groove. Plug one of the paths with a rubber piece.
Break through the tape on the advance side path and the retard side path on the opposite side of the hole of the advance side path, as shown in the illustration.
Apply approximately 200 kPa (2.0 kgf/cm2, 28 psi) of air pressure to the 2 opened paths (the advance side path and the retard side path).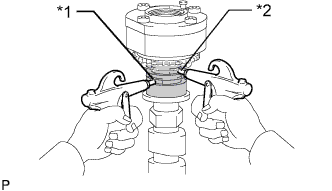
Text in Illustration *1
Advance Side Path
*2
Retard Side Path
- CAUTION:
- Cover the paths with a piece of cloth when applying pressure to prevent oil from spraying.
Make sure that the camshaft timing exhaust gear assembly rotates in the retard direction when reducing the air pressure applied to the advance side path.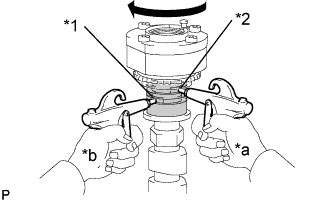
Text in Illustration *1
Advance Side Path
*2
Retard Side Path
*a
Hold Pressure
*b
Decompress
- HINT:
- The lock pin is released and the camshaft timing exhaust gear assembly turns in the retard direction.
When the camshaft timing exhaust gear assembly moves to the most retarded position, release the air pressure first from the advance side path, and then release the air pressure from the retard side path.
- NOTICE:
- Be sure to release the air pressure from the advance side path first. If the air pressure of the retard side path is released first, the camshaft timing exhaust gear assembly may abruptly shift in the advance direction and break the lock pin or other parts.
Check for smooth rotation.
Turn the camshaft timing exhaust gear assembly within its movable range (18.5°) 2 or 3 times, but do not turn it to the most advanced position. Make sure that the gear assembly turns smoothly.
- NOTICE:
- When the air pressure is released from the advance side path and then from the retard side path, the gear assembly automatically returns to the most advanced position due to the advance assist spring operation and locks. Gradually release the air pressure from the retard side path before performing the smooth rotation check.
Check the lock at the most advanced position.
Make sure that the camshaft timing exhaust gear assembly locks at the most advanced position.
Remove the flange bolt and camshaft timing exhaust gear assembly.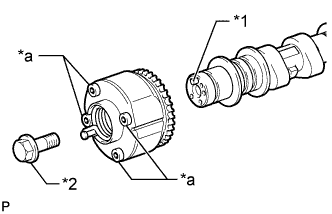
Text in Illustration *1
Straight Pin
*2
Flange Bolt
*a
Do Not Remove
- NOTICE:
- Be sure not to remove the other 4 bolts.
- If planning to reuse the gear, be sure to release the straight pin lock before installing the gear.
- Be sure not to remove the other 4 bolts.
| 3. INSTALL CAMSHAFT TIMING GEAR ASSEMBLY |
Fix the camshaft in place.
- NOTICE:
- Be careful not to damage the camshaft.
Put the camshaft timing gear assembly and camshaft together by aligning the pin hole and straight pin.
Text in Illustration *1
Pin Hole
*2
Straight Pin
Lightly press and turn the camshaft timing gear assembly against the camshaft, and press harder after the pin enters the hole.
- NOTICE:
- Be sure not to turn the camshaft timing gear assembly in the retard direction.
Check that there is no clearance between the camshaft timing gear assembly flange and the camshaft.
Tighten the flange bolt while holding the camshaft.
- Torque:
- 100 N*m{ 1020 kgf*cm , 74 ft.*lbf }
Check the lock of the camshaft timing gear assembly.
Fix the camshaft in place and confirm that the camshaft timing gear assembly is locked.
- NOTICE:
- Be careful not to damage the camshaft.
| 4. INSTALL CAMSHAFT TIMING EXHAUST GEAR ASSEMBLY |
Fix the camshaft in place.
- NOTICE:
- Be careful not to damage the camshaft.
Put the camshaft timing exhaust gear assembly and camshaft together by aligning the pin hole and straight pin.
Text in Illustration *1
Pin Hole
*2
Straight Pin
Lightly press and turn the camshaft timing gear assembly against the camshaft, and press harder after the pin enters the hole.
- NOTICE:
- Be sure not to turn the camshaft timing exhaust gear in the retard direction.
Check that there is no clearance between the gear flange and the camshaft.
Tighten the flange bolt while holding the camshaft.
- Torque:
- 100 N*m{ 1020 kgf*cm , 74 ft.*lbf }
Check the camshaft timing exhaust gear lock.
Make sure that the camshaft timing exhaust gear assembly locks.
| 5. INSTALL NO. 3 CAMSHAFT SUB-ASSEMBLY |
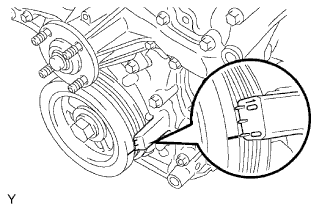 |
Check that the notch is aligned with the "0" timing mark of the timing chain cover.
Align the mark plate (yellow) with the timing mark of the camshaft timing gear as shown in the illustration and install the No. 2 chain to the camshaft timing gear.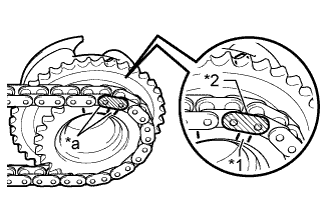
Text in Illustration *1
Timing Mark
*2
Mark Plate (yellow)
*a
Align
- HINT:
- The mark plate is yellow.
Clean the camshaft housing LH and camshaft journals and apply engine oil to them.
Make sure that the No. 1 valve rocker arm sub-assembly is installed as shown in the illustration.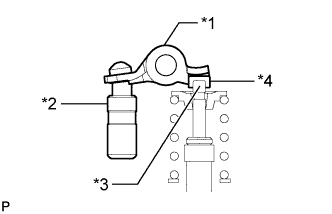
Text in Illustration *1
Valve Rocker Arm
*2
Lash Adjuster
*3
Valve Stem
*4
Valve Stem Cap
Install the chain to the No. 3 camshaft, and then install the camshaft to the camshaft housing LH.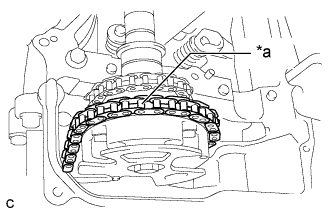
Text in Illustration *a
Place on camshaft timing gear
- HINT:
- Place the chain on the camshaft timing gear but do not engage the teeth of the sprocket and the chain.
- Install the camshaft so that the timing mark is facing upward.
- Place the chain on the camshaft timing gear but do not engage the teeth of the sprocket and the chain.
| 6. INSTALL NO. 4 CAMSHAFT SUB-ASSEMBLY |
Clean the camshaft housing LH and camshaft journals and apply engine oil to them.
Pass the No. 4 camshaft through the No. 2 chain from the front of the vehicle, align the mark plate (yellow) with the timing mark and install the No. 2 chain to the camshaft timing exhaust gear.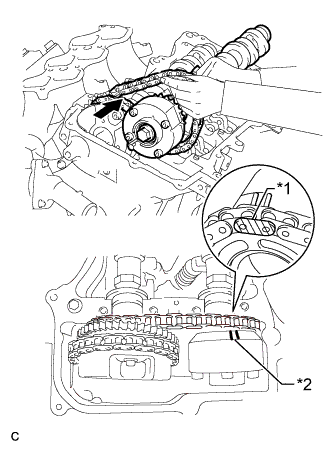
Text in Illustration *1
Mark Plate (yellow)
*2
Timing Mark
- HINT:
- The mark plate is yellow.
While lifting up the No. 4 camshaft, pass the No. 3 chain tensioner assembly through the No. 2 chain and set it in place.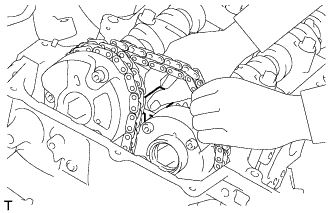
Install the No. 4 camshaft to the camshaft housing LH, and then install the No. 3 chain tensioner assembly with the bolt.
- Torque:
- 21 N*m{ 214 kgf*cm , 15 ft.*lbf }
| 7. INSTALL CAMSHAFT BEARING CAP (for Bank 2) |
Clean the camshaft bearing caps and apply engine oil to them.
Make sure that the No. 1 valve rocker arm sub-assembly is installed as shown in the illustration.
Text in Illustration *1
Valve Rocker Arm
*2
Lash Adjuster
*3
Valve Stem
*4
Valve Stem Cap
Check the marks and numbers on the camshaft bearing caps, and then remove the replacement bolts and washers in the order shown in the illustration. Immediately after removing the replacement bolts and washers in the location for a bearing cap, install the bearing cap with the bolts in the order shown in the illustration.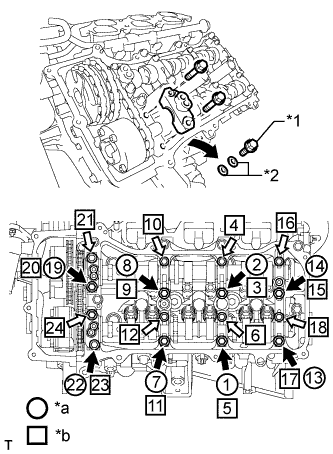
Text in Illustration *1
Bolt
*2
Washer
*a
Replacement Bolts and Washers Removal
*b
Part Installation

Bolt A

Bolt B
- Torque:
- for bolt A:
- 28 N*m{ 286 kgf*cm , 21 ft.*lbf }
- for bolt B:
- 16 N*m{ 163 kgf*cm , 12 ft.*lbf }
- NOTICE:
- Be sure to follow the numerical order when performing this procedure.
- Do not drop replacement bolts and washers into the cylinder head.
- Be sure to follow the numerical order when performing this procedure.
Check the torque of each bolt again.
| 8. CONNECT CHAIN SUB-ASSEMBLY (for Bank 2) |
Align the paint marks on the camshaft timing gear and No. 1 chain and install the No. 1 chain to the camshaft timing gear.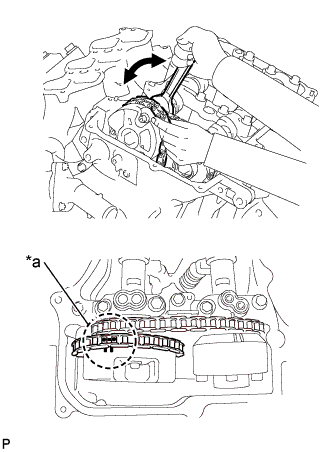
Text in Illustration *a
Paint Mark
- HINT:
- If the paint marks are not aligned, align them by turning the camshaft slightly.
| 9. INSTALL CAMSHAFT |
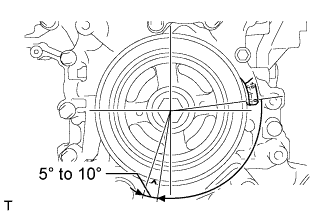 |
Turn the crankshaft clockwise until it is in the position shown in the illustration so that the chain can be removed easily.
- HINT:
- When turning the crankshaft, engine oil may spray out of the oil holes.
Align the mark plate (yellow) with the timing mark of the camshaft timing gear as shown in the illustration and install the No. 2 chain to the camshaft timing gear.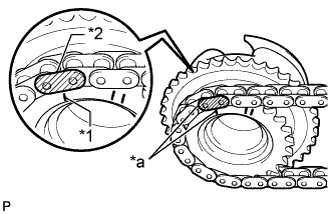
Text in Illustration *1
Timing Mark
*2
Mark Plate (yellow)
*a
Align
- HINT:
- The mark plate is yellow.
Clean the camshaft housing RH and camshaft journals and apply engine oil to them.
Make sure that the No. 1 valve rocker arm sub-assembly is installed as shown in the illustration.
Text in Illustration *1
Valve Rocker Arm
*2
Lash Adjuster
*3
Valve Stem
*4
Valve Stem Cap
Install the chain to the camshaft, and then install the camshaft to the camshaft housing RH.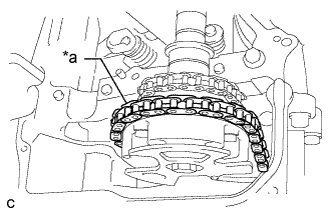
Text in Illustration *a
Place on camshaft timing gear
- HINT:
- Place the chain on the camshaft timing gear but do not engage the teeth of the sprocket and the chain.
- Install the camshaft so that the timing mark is facing upward.
- Place the chain on the camshaft timing gear but do not engage the teeth of the sprocket and the chain.
| 10. INSTALL NO. 2 CAMSHAFT |
Clean the camshaft housing RH and camshaft journals and apply engine oil to them.
Pass the No. 2 camshaft through the No. 2 chain from the front of the vehicle, align the mark plate (yellow) with the timing mark and install the No. 2 chain to the camshaft timing exhaust gear.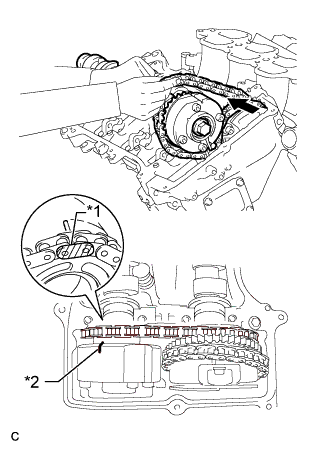
Text in Illustration *1
Mark Plate (yellow)
*2
Timing Mark
- HINT:
- The mark plate is yellow.
While lifting up the No. 2 camshaft, pass the No. 2 chain tensioner assembly through the No. 2 chain and set it in place.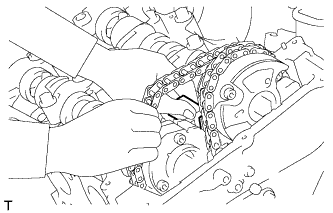
Install the No. 2 camshaft to the camshaft housing RH, and then install the No. 2 chain tensioner assembly with the bolt.
- Torque:
- 21 N*m{ 214 kgf*cm , 15 ft.*lbf }
| 11. INSTALL CAMSHAFT BEARING CAP (for Bank 1) |
Clean the camshaft bearing caps and apply engine oil to them.
Make sure that the No. 1 valve rocker arm sub-assembly is installed as shown in the illustration.
Text in Illustration *1
Valve Rocker Arm
*2
Lash Adjuster
*3
Valve Stem
*4
Valve Stem Cap
Check the marks and numbers on the camshaft bearing caps, and then remove the replacement bolts and washers in the order shown in the illustration. Immediately after removing the replacement bolts and washers in the location for a bearing cap, install the bearing cap with the bolts in the order shown in the illustration.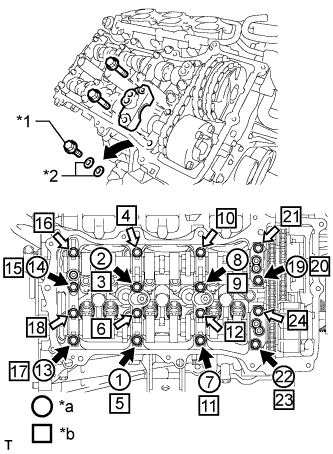
Text in Illustration *1
Bolt
*2
Washer
*a
Replacement Bolts and Washers Removal
*b
Part Installation
Bolt A
Bolt B
- Torque:
- for bolt A:
- 28 N*m{ 286 kgf*cm , 21 ft.*lbf }
- for bolt B:
- 16 N*m{ 163 kgf*cm , 12 ft.*lbf }
- NOTICE:
- Be sure to follow the numerical order when performing this procedure.
- Do not drop replacement bolts and washers into the cylinder head.
- Be sure to follow the numerical order when performing this procedure.
Check the torque of each bolt again.
| 12. CONNECT CHAIN SUB-ASSEMBLY (for Bank 1) |
Align the paint marks on the camshaft timing gear and No. 1 chain and install the No. 1 chain to the camshaft timing gear.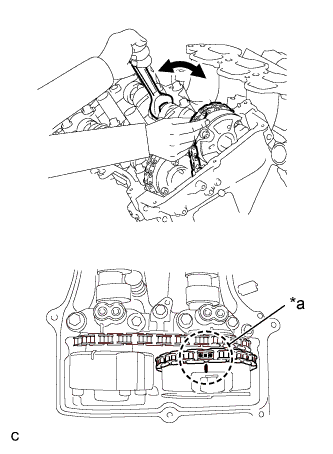
Text in Illustration *a
Paint Mark
- HINT:
- If the paint marks are not aligned, align them by turning the camshaft slightly.
| 13. INSTALL NO. 1 CHAIN TENSIONER ASSEMBLY |
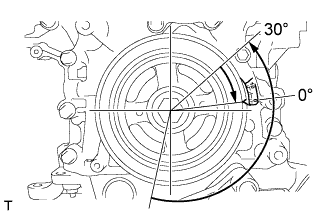 |
Turn the crankshaft counterclockwise 30° past the "0" timing mark, and then turn it clockwise to align the notch with the "0" timing mark.
Turn the crankshaft slightly to eliminate the slack in the chain.
- HINT:
- Make sure there is some slack in the chain around the area where the chain tensioner is installed.
While turning the stopper plate of the tensioner clockwise, push in the plunger of the tensioner as shown in the illustration.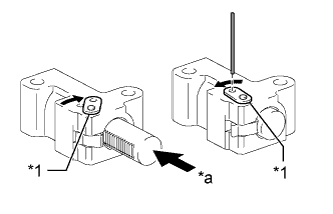
Text in Illustration *1
Stopper Plate
*a
Push
While turning the stopper plate of the tensioner counterclockwise, insert a pin of φ1.27 mm (0.0500 in.) into the holes on the stopper plate and tensioner to fix the stopper plate in place.
Install the chain tensioner with the 2 bolts.
- Torque:
- 10 N*m{ 102 kgf*cm , 7 ft.*lbf }
Remove the pin from the No. 1 chain tensioner.
| 14. INSPECT VALVE TIMING |
Check the camshaft timing marks.
- NOTICE:
- Check each timing mark from a viewpoint directly inline with the center of the camshaft and the timing mark on each camshaft timing gear.
- If the timing marks are checked from any other viewpoint, the valve timing may appear misaligned.
- Check each timing mark from a viewpoint directly inline with the center of the camshaft and the timing mark on each camshaft timing gear.
Check that each camshaft timing mark is positioned as shown in the illustration.
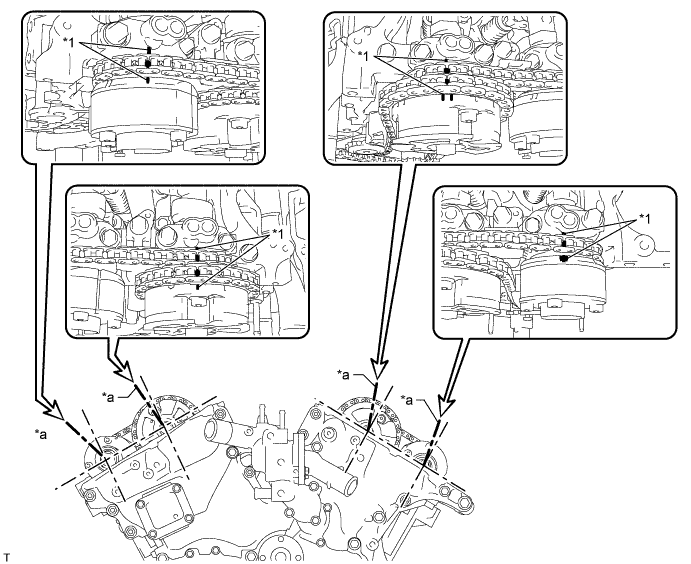
Text in Illustration *1
Timing Mark
-
-
*a
Viewpoint
-
-
- HINT:
-
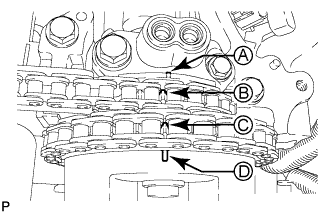
- for the intake camshaft:
- Be sure to check mark A at the point when marks B, C, and D are positioned in line. If the marks are checked from any other viewpoint, they cannot be checked correctly.
If the valve timing is misaligned, reinstall the timing chain.
Turn the crankshaft 2 revolutions, set the No. 1 cylinder to TDC/compression and check the timing marks again.
| 15. INSTALL TIMING CHAIN COVER PLATE |
Install a new gasket and the timing chain cover plate with the 4 bolts.
- Torque:
- 9.0 N*m{ 92 kgf*cm , 80 in.*lbf }
| 16. POUR ENGINE OIL |
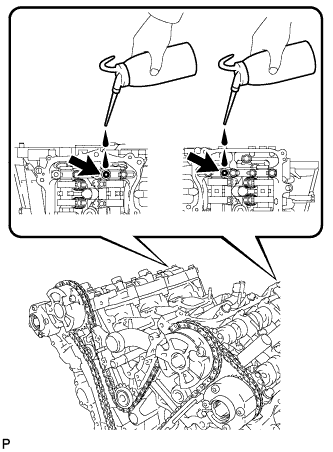 |
- HINT:
- Before installing the cylinder head cover, pour engine oil into the locations shown in the illustration.
| 17. INSTALL CYLINDER HEAD COVER SUB-ASSEMBLY |
Remove any old packing (FIPG) material and be careful not to drop any oil on the contact surfaces of the cylinder head, timing chain cover or cylinder head cover.
Apply seal packing as shown in the illustration.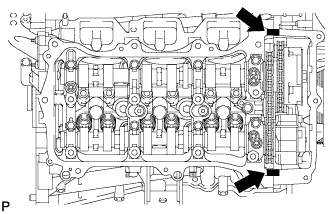
Text in Illustration
Seal Packing
- Seal packing:
- Toyota Genuine Seal Packing Black, Three Bond 1207B or equivalent
- Standard seal diameter:
- 2.0 to 3.0 mm (0.0787 to 0.118 in.)
- NOTICE:
- Remove any oil from the contact surface.
- Install the cylinder head cover within 3 minutes and tighten the bolts within 15 minutes after applying seal packing.
- Remove any oil from the contact surface.
Install 3 new gaskets as shown in the illustration.
Install a new gasket to the cylinder head cover.
Install a new seal washer to the bolt.
Temporarily install the cylinder head cover with the 12 bolts. Tighten the bolts uniformly in several steps.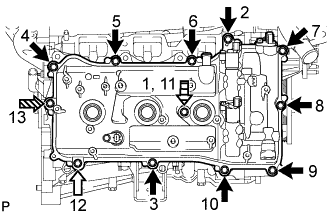
Text in Illustration
Bolt A
Bolt B

Bolt C

Bolt D
- Torque:
- for bolt A and D:
- 10 N*m{ 102 kgf*cm , 7 ft.*lbf }
- for bolt B and C:
- 21 N*m{ 214 kgf*cm , 15 ft.*lbf }
- Bolt Length:
Item
Length
A
25 mm (0.984 in.)
B
35 mm (1.38 in.)
C
65 mm (2.56 in.)
D
60 mm (2.36 in.)
- NOTICE:
- Do not start the engine for at least 2 hours after the installation.
| 18. INSTALL CYLINDER HEAD COVER SUB-ASSEMBLY LH |
Remove any old packing (FIPG) material and be careful not to drop any oil on the contact surfaces of the cylinder head, timing chain cover or cylinder head cover.
Apply seal packing as shown in the illustration.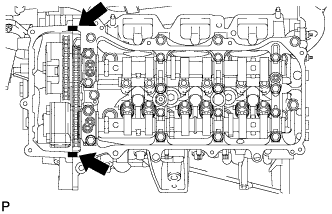
Text in Illustration
Seal Packing
- Seal packing:
- Toyota Genuine Seal Packing Black, Three Bond 1207B or equivalent
- Standard seal diameter:
- 2.0 to 3.0 mm (0.0787 to 0.118 in.)
- NOTICE:
- Remove any oil from the contact surface.
- Install the cylinder head cover within 3 minutes and tighten the bolts within 15 minutes after applying seal packing.
- Remove any oil from the contact surface.
Install 3 new gaskets as shown in the illustration.
Install a new gasket to the cylinder head cover.
Install a new seal washer to the bolt.
Temporarily install the cylinder head cover with the 12 bolts. Tighten the bolts uniformly in several steps.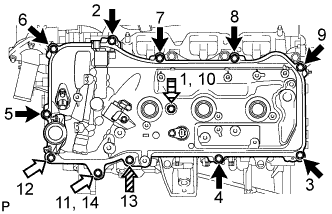
Text in Illustration
Bolt A
Bolt B
Bolt C
Bolt D
- Torque:
- for bolt A and D:
- 10 N*m{ 102 kgf*cm , 7 ft.*lbf }
- for bolt B and C:
- 21 N*m{ 214 kgf*cm , 15 ft.*lbf }
- Bolt Length:
Item
Length
A
25 mm (0.984 in.)
B
35 mm (1.38 in.)
C
70 mm (2.76 in.)
D
60 mm (2.36 in.)
- NOTICE:
- Do not start the engine for at least 2 hours after the installation.
| 19. CONNECT FUEL PIPE SUB-ASSEMBLY |
Connect the fuel pipe with the 2 bolts.
- Torque:
- 9.0 N*m{ 92 kgf*cm , 80 in.*lbf }
| 20. INSTALL REAR CYLINDER HEAD COVER |
Temporarily install the cover with the 3 bolts.
Tighten the 3 bolts in the sequence shown in the illustration.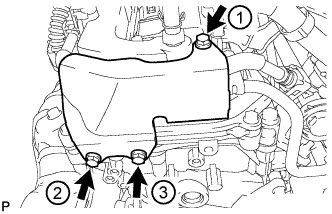
- Torque:
- 9.0 N*m{ 92 kgf*cm , 80 in.*lbf }
| 21. INSTALL NO. 2 OIL PIPE |
Make sure that there is no foreign matter on the mesh of the oil control valve filter RH.
- NOTICE:
- Do not touch the mesh when installing the oil control valve filter.
Install a new gasket and temporarily install the oil pipe (on the cylinder head side) with the oil check valve bolt.
Install the oil control valve filter RH to the oil pipe union. Install new gaskets and temporarily install the oil pipe (on the head cover side).
Tighten the oil pipe union (on the cylinder head side).
- Torque:
- 65 N*m{ 663 kgf*cm , 48 ft.*lbf }
- NOTICE:
- If the link that connects the gaskets is broken, remove the connecting link by using side cutters or a similar tool.
Tighten the oil pipe union (on the head cover side).
- Torque:
- 65 N*m{ 663 kgf*cm , 48 ft.*lbf }
| 22. INSTALL NO. 1 OIL PIPE |
Make sure that there is no foreign matter on the mesh of the oil control valve filter LH.
- NOTICE:
- Do not touch the mesh when installing the oil control valve filter.
Install a new gasket and temporarily install the oil pipe (on the cylinder head side) with the oil check valve bolt.
Install the oil control valve filter LH to the oil pipe union. Install new gaskets and temporarily install the oil pipe (on the head cover side).
Tighten the oil pipe union (on the cylinder head side).
- Torque:
- 65 N*m{ 663 kgf*cm , 48 ft.*lbf }
- NOTICE:
- If the link that connects the gaskets is broken, remove the connecting link by using side cutters or a similar tool.
Tighten the oil pipe union (on the head cover side).
- Torque:
- 65 N*m{ 663 kgf*cm , 48 ft.*lbf }
| 23. INSTALL WATER BY-PASS PIPE SUB-ASSEMBLY (w/ Oil Cooler) |
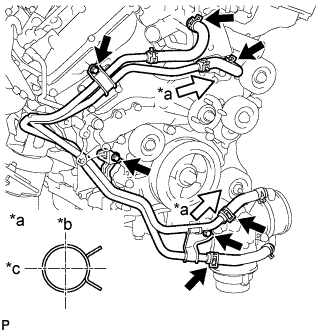 |
Install the water by-pass pipe with the 3 bolts.
- Torque:
- 10 N*m{ 102 kgf*cm , 7 ft.*lbf }
Connect the 4 hoses.
Text in Illustration *a
View A
*b
Upper
*c
Rear
- HINT:
- The direction of the hose clamp is indicated in the illustration.
| 24. INSTALL ENGINE OIL LEVEL DIPSTICK GUIDE |
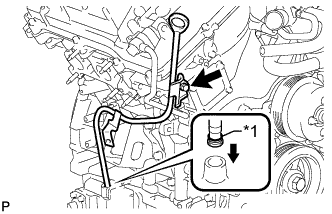 |
Install a new O-ring to the dipstick guide.
Text in Illustration *1
New O-Ring
Apply a light coat of engine oil to the O-ring.
Push the dipstick guide end into the guide hole.
Install the dipstick guide with the bolt.
- Torque:
- 10 N*m{ 102 kgf*cm , 7 ft.*lbf }
Install the dipstick.
| 25. INSTALL GENERATOR ASSEMBLY |
Install the generator assembly (Click here).
| 26. INSTALL VANE PUMP ASSEMBLY |
Install the vane pump with the 2 bolts.
- Torque:
- 43 N*m{ 438 kgf*cm , 32 ft.*lbf }
Connect the 2 clamps and vane pump connector.
| 27. INSTALL IGNITION COIL ASSEMBLY |
Install the 6 ignition coils with the 6 bolts.
- Torque:
- 10 N*m{ 102 kgf*cm , 7 ft.*lbf }
Connect the 6 ignition coil connectors.
| 28. INSTALL INTAKE AIR SURGE TANK |
Install a new gasket to the intake air surge tank.
Install the intake air surge tank in the order shown in the illustration.
Using a 8 mm socket hexagon wrench, temporarily tighten the 4 bolts to the intake air surge tank.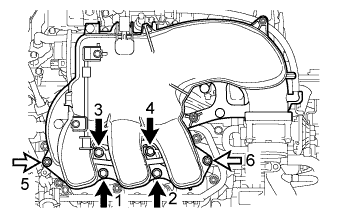
Temporarily tighten the 2 nuts to the intake air surge tank.
Text in Illustration
Nut
Tighten the 4 bolts and 2 nuts.
- Torque:
- 28 N*m{ 286 kgf*cm , 21 ft.*lbf }
Install the No. 2 surge tank stay with the 2 bolts in the order shown in the illustration.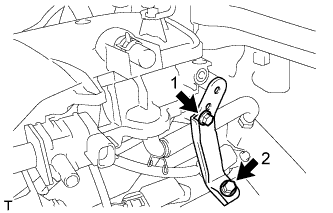
- Torque:
- 21 N*m{ 214 kgf*cm , 15 ft.*lbf }
Install the No. 1 surge tank stay with the 2 bolts in the order shown in the illustration.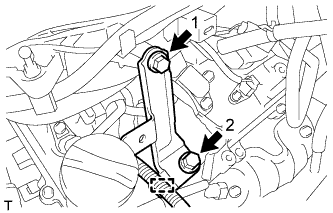
- Torque:
- 21 N*m{ 214 kgf*cm , 15 ft.*lbf }
Engage the wire harness clamp.
Install the throttle body bracket with the 2 bolts in the order shown in the illustration.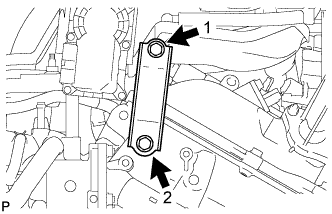
- Torque:
- 21 N*m{ 214 kgf*cm , 15 ft.*lbf }
Connect the No. 1 ventilation hose.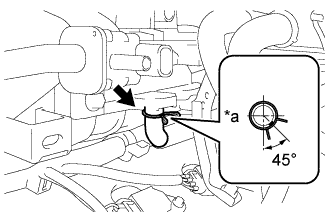
Text in Illustration *a
Front
Connect the No. 1 vacuum switching valve connector.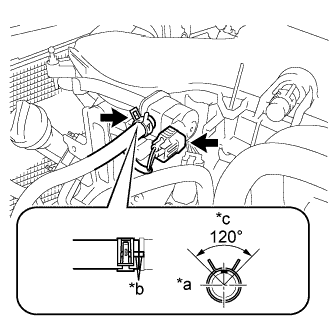
Text in Illustration *a
Front
*b
Matchmark
*c
Top
Connect the No. 1 fuel feed hose.
- HINT:
- Connect the hose so that the direction of the hose clamp is as indicated in the illustration.
Connect the throttle body connector.
Connect the No. 4 water by-pass hose.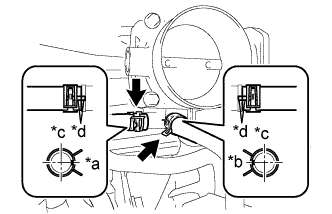
Text in Illustration *a
RH
*b
Rear
*c
Top
*d
Matchmark
- HINT:
- Connect the hose so that the direction of the hose clamp is as indicated in the illustration.
Connect the No. 5 water by-pass hose.
- HINT:
- Connect the hose so that the direction of the hose clamp is as indicated in the illustration.
Connect the 2 heater hose clamps.
| 29. INSTALL FAN SHROUD |
Install the fan shroud (Click here).
| 30. INSTALL AIR CLEANER CASE SUB-ASSEMBLY |
Install the air cleaner case sub-assembly with the 3 bolts.
| 31. INSTALL AIR CLEANER FILTER ELEMENT SUB-ASSEMBLY |
Install the air cleaner filter element sub-assembly to the air cleaner case sub-assembly.
| 32. INSTALL AIR CLEANER CAP AND HOSE |
Install the air cleaner cap with the 4 hinges.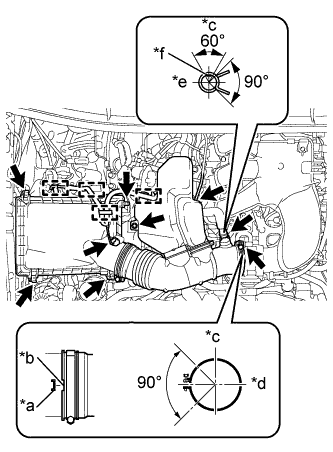
Install the No. 1 air cleaner hose with the clamp.
- Torque:
- 5.0 N*m{ 51 kgf*cm , 44 in.*lbf }
Text in Illustration *a
Protrusion
*b
Groove
*c
Top
*d
Front
*e
RH
*f
Paint mark of the hose
Install the bolt.
- Torque:
- 5.0 N*m{ 51 kgf*cm , 44 in.*lbf }
Connect the ventilation hose and vacuum hose.
- HINT:
- The direction of the hose clamp is indicated in the illustration.
Engage the 4 wire harness clamps.
Connect the MAF meter connector.
| 33. CONNECT CABLE TO NEGATIVE BATTERY TERMINAL |
- NOTICE:
- When disconnecting the cable, some systems need to be initialized after the cable is reconnected (Click here).
| 34. ADD ENGINE COOLANT |
Tighten the 2 cylinder block drain cock plugs.
- Torque:
- 13 N*m{ 130 kgf*cm , 9 ft.*lbf }
Tighten the radiator drain cock plug by hand.
Add engine coolant.
- Standard Capacity:
Item
Specified Condition
for Automatic Transmission
9.8 liters (10.4 US qts, 8.6 Imp. qts)
for Manual Transmission
9.4 liters (9.9 US qts, 8.3 Imp. qts)
- NOTICE:
- Do not substitute plain water for engine coolant.
- HINT:
- TOYOTA vehicles are filled with TOYOTA SLLC at the factory. In order to avoid damage to the engine cooling system and other technical problems, only use TOYOTA SLLC or similar high quality ethylene glycol based non-silicate, non-amine, non-nitrite, non-borate coolant with long-life hybrid organic acid technology (coolant with long-life hybrid organic acid technology consists of a combination of low phosphates and organic acids).
- Press the No. 1 and No. 2 radiator hoses several times by hand, and then check the coolant level. If the coolant level is low, add coolant.
- TOYOTA vehicles are filled with TOYOTA SLLC at the factory. In order to avoid damage to the engine cooling system and other technical problems, only use TOYOTA SLLC or similar high quality ethylene glycol based non-silicate, non-amine, non-nitrite, non-borate coolant with long-life hybrid organic acid technology (coolant with long-life hybrid organic acid technology consists of a combination of low phosphates and organic acids).
Slowly pour coolant into the radiator reservoir until it reaches the Full line.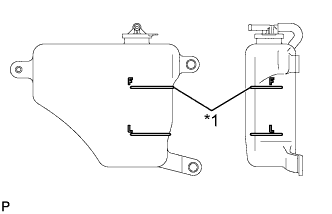
Text in Illustration *1
FULL Line
Install the reservoir cap.
Install the radiator cap.*1
Start the engine and stop it immediately.*2
Allow approximately 10 seconds to pass, and then remove the radiator cap and check the coolant level. If the coolant level has decreased, add coolant.*3
Repeat steps *1, *2 and *3 until the coolant level does not decrease.
- HINT:
- Be sure to perform this step while the engine is cold, as air in the No. 1 radiator hose will flow into the radiator if the engine is warmed up and the thermostat opens.
Install the radiator cap.*4
Set the air conditioning as follows.*5
Item
Condition
Fan speed
Any setting except off
Temperature
Toward WARM
Air conditioning switch
Off
Start the engine, warm it up until the thermostat opens, and then continue to run the engine for several minutes to circulate the coolant.*6
- CAUTION:
- Wear protective gloves. Hot areas on the parts may injure your hands.
- Be careful of the fan.
- Be careful as the engine, radiator and radiator hoses are hot and can cause burns.
- Wear protective gloves. Hot areas on the parts may injure your hands.
- NOTICE:
- Immediately after starting the engine, if the radiator reservoir becomes empty, perform the following: 1) stop the engine, 2) wait until the coolant has cooled down, and 3) add coolant until the coolant is filled to the Full line.
- Do not start the engine when there is no coolant in the radiator reservoir.
- Pay attention to the needle of the engine coolant temperature receiver gauge. Make sure that the needle does not show an abnormally high temperature.
- If there is not enough coolant, the engine may burn out or overheat.
- Immediately after starting the engine, if the radiator reservoir becomes empty, perform the following: 1) stop the engine, 2) wait until the coolant has cooled down, and 3) add coolant until the coolant is filled to the Full line.
- HINT:
- Press the No. 1 and No. 2 radiator hoses several times by hand to bleed air while warming up the engine.
- The thermostat opening timing can be confirmed by pressing the No. 2 radiator hose by hand and checking when the engine coolant starts to flow inside the hose.
- Press the No. 1 and No. 2 radiator hoses several times by hand to bleed air while warming up the engine.
Stop the engine, wait until the engine coolant cools down to ambient temperature, and then remove the radiator cap and check the coolant level.*7
- CAUTION:
- Do not remove the radiator cap while the engine and radiator are still hot. Pressurized, hot engine coolant and steam may be released and cause serious burns.
If the coolant level has decreased, add coolant and warm up the engine until the thermostat opens.*8
If the coolant level has not decreased, check that the coolant level in the radiator reservoir is at the Full line.
If the coolant level is below the Full line, repeat steps *4 through *8.
If the coolant level is above the Full line, drain coolant until the coolant level reaches the Full line.Text in Illustration *1
FULL Line
| 35. ADD ENGINE OIL |
Add fresh oil.
- Standard Engine Oil:
Oil grade
Oil Viscosity (SAE)
API grade SL "Energy- Conserving", SM "Energy- Conserving" or ILSAC multigrade engine oil
0W-20
5W-20
5W-30
10W-30
API grade SL or SM multigrade engine oil
15W-40
20W-50
- Standard Oil Capacity (w/o Oil Cooler):
Item
Specified Condition
Drain and refill without oil filter change
5.7 liters (6.0 US qts, 5.0 Imp. qts)
Drain and refill with oil filter change
6.1 liters (6.4 US qts, 5.4 Imp. qts)
Dry fill
6.9 liters (7.3 US qts, 6.1 Imp. qts)
- Standard Oil Capacity (w/ Oil Cooler):
Item
Specified Condition
Drain and refill without oil filter change
5.7 liters (6.0 US qts, 5.0 Imp. qts)
Drain and refill with oil filter change
6.2 liters (6.6 US qts, 5.5 Imp. qts)
Dry fill
7.1 liters (7.5 US qts, 6.3 Imp. qts)
| 36. INSPECT FOR COOLANT LEAK |
- CAUTION:
- To avoid being burned, do not remove the radiator reservoir cap while the engine and radiator are still hot. Thermal expansion may cause hot engine coolant and steam to blow out from the radiator.
Fill the radiator with engine coolant, and then attach a radiator cap tester.
Warm up the engine.
Using the radiator cap tester, increase the pressure inside the radiator to 123 kPa (1.3 kgf/cm2, 18 psi), and then check that the pressure does not drop.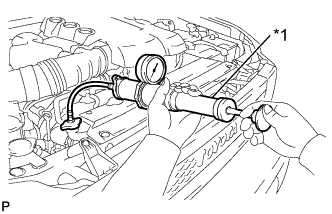
If the pressure drops, check the hoses, radiator and water pump for leakage. If there are no signs or traces of external engine coolant leakage, check the heater core, cylinder block and head.Text in Illustration *1
Radiator Cap Tester
| 37. INSPECT FOR ENGINE OIL LEAK |
Start the engine. Make sure that there are no oil leaks from the area that was worked on.
| 38. INSTALL V-BANK COVER |
Engage the 2 V-bank cover hooks to the bracket.
Align the 2 V-bank cover grommets with the 2 pins and press down on the V-bank cover to engage the pins.
| 39. INSTALL NO. 1 ENGINE UNDER COVER SUB-ASSEMBLY |
Hook the engine under cover to the frame.
Install the 4 bolts.
- Torque:
- 29 N*m{ 296 kgf*cm , 21 ft.*lbf }
| 40. INSPECT IGNITION TIMING |
- NOTICE:
- Turn all electrical systems off.
- Turn all electrical systems off.
- Perform the inspection when the cooling fan motor is turned off.
- Perform the inspection when the cooling fan motor is turned off.
Warm up the engine.
When using the intelligent tester:
Connect the intelligent tester to the DLC3.
Enter the following menus: Powertrain / Engine and ECT / Data List / All Data / IGN Advance.
Inspect the ignition timing during idling.
- Standard ignition timing:
- 8 to 12° BTDC idling (transmission in neutral and A/C switch off)
Check that the ignition timing advances immediately when the engine speed is increased.
When not using the intelligent tester: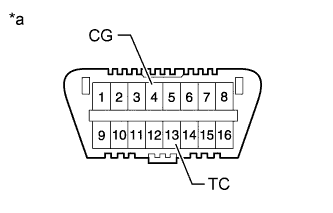
Text in Illustration *a
Front view of DLC3:
Using SST, connect terminals 13 (TC) and 4 (CG) of the DLC3.
- SST
- 09843-18040
- NOTICE:
- Be sure not to improperly connect the terminals. This may damage the engine.
Connect the tester probe of a timing light to the wire of the ignition coil connector for the No. 1 cylinder.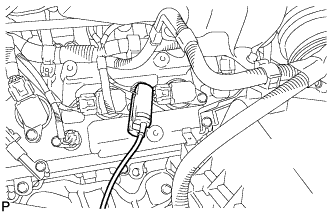
- NOTICE:
- Use a timing light that detects primary signals.
- Use a timing light that detects primary signals.
- After the inspection, be sure to wrap the wire harness with tape.
- After the inspection, be sure to wrap the wire harness with tape.
Inspect the ignition timing during idling.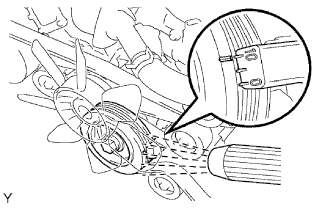
- Standard ignition timing:
- 8 to 12° BTDC idling (transmission in neutral and A/C switch off)
Remove SST from the DLC3.
Inspect the ignition timing during idling.
- Standard ignition timing:
- 7 to 24° BTDC idling (transmission in neutral and A/C switch off)
Disconnect the timing light from the engine.