INSTALLATION
Removal / installation · Vehicles built from Nov 2012
| 1. INSTALL NO. 1 FUEL TANK CUSHION |

Install 2 new No. 1 fuel tank cushions to the fuel sub tank sub-assembly at the positions shown in the illustration.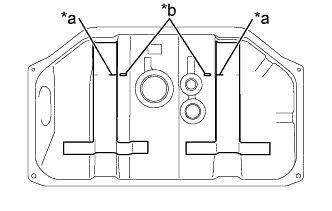

Text in Illustration *a
Slit in No. 1 Fuel Tank Cushion
*b
Protrusion on Fuel Sub Tank Sub-assembly
| 2. INSTALL FUEL TUBE GROMMET |
Engage the clamp and install the fuel tube grommet to the fuel sub tank sub-assembly.
| 3. INSTALL LOWER FUEL TANK FILLER PIPE SUB-ASSEMBLY |
Install a new gasket to the lower fuel tank filler pipe sub-assembly.
Install the lower fuel tank filler pipe sub-assembly to the fuel sub tank sub-assembly with the 8 screws.
- Torque:
- 3.0 N*m{ 31 kgf*cm , 27 in.*lbf }
| 4. INSTALL FUEL SUB-TANK FUEL SENDER GAUGE ASSEMBLY |
Install a new gasket to the fuel sub-tank fuel sender gauge assembly.
Install the fuel sub-tank fuel sender gauge assembly to the fuel sub tank sub-assembly with the 5 screws.
- Torque:
- 1.5 N*m{ 15 kgf*cm , 13 in.*lbf }
- NOTICE:
- Be careful not to bend the arm of the fuel sub-tank fuel sender gauge assembly.
Connect the fuel sub-tank fuel sender gauge assembly connector.
| 5. INSTALL FUEL CUT OFF VALVE ASSEMBLY |
Install the fuel cut off valve to the fuel sub tank sub-assembly.
| 6. INSTALL NO. 1 FUEL EVAPORATION TUBE SUB-ASSEMBLY |
Install a new gasket to the No. 1 fuel evaporation tube sub-assembly.
Engage the clamp and install the No. 1 fuel evaporation tube sub-assembly to the fuel sub tank sub-assembly.
Install the 4 screws to the No. 1 fuel evaporation tube sub-assembly.
- Torque:
- 1.5 N*m{ 15 kgf*cm , 13 in.*lbf }
| 7. INSTALL FUEL TANK VENT TUBE SUB-ASSEMBLY |
Install a new gasket to the fuel tank vent tube sub-assembly.
Engage the 2 clamps and install the fuel tank vent tube sub-assembly to the fuel sub tank sub-assembly.
Install the 7 screws to the fuel tank vent tube sub-assembly.
- Torque:
- 3.5 N*m{ 36 kgf*cm , 31 in.*lbf }
| 8. INSTALL FUEL SUB TANK SUB-ASSEMBLY |
Set a transmission jack underneath the fuel sub tank sub-assembly.
Install the fuel sub tank sub-assembly to the vehicle.
Install the 2 fuel tank bands to the vehicle with the 2 bolts, 2 clips and 2 pins.
- Torque:
- 40 N*m{ 408 kgf*cm , 30 ft.*lbf }
Connect the No. 2 frame wire connector.
| 9. CONNECT FUEL TANK TO FILLER PIPE HOSE |
Connect the fuel tank to filler pipe hose to the lower fuel tank filler pipe sub-assembly with the hose clamp.
| 10. CONNECT FUEL TANK BREATHER HOSE |
Connect the fuel tank breather hose to the lower fuel tank filler pipe sub-assembly with the hose clamp.
| 11. CONNECT FUEL HOSE |
Connect the fuel evaporation hose, fuel breather hose and fuel hose to the fuel tank vent tube sub-assembly and No. 1 fuel evaporation tube sub-assembly.
| 12. INSTALL NO. 1 FUEL TANK PROTECTOR SUB-ASSEMBLY |
Install the No. 1 fuel tank protector sub-assembly to the vehicle with the 5 bolts.
- Torque:
- 20 N*m{ 204 kgf*cm , 15 ft.*lbf }
| 13. INSTALL TAIL EXHAUST PIPE ASSEMBLY |
Install a new gasket to the center exhaust pipe assembly.
Install the tail exhaust pipe assembly with the 2 bolts and exhaust pipe support.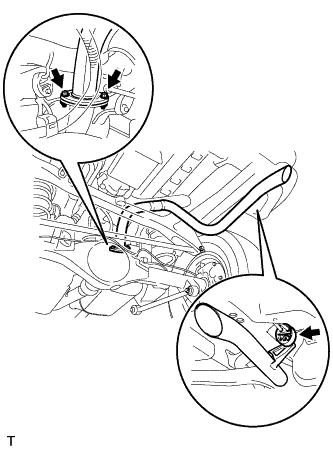
- Torque:
- 48 N*m{ 489 kgf*cm , 35 ft.*lbf }
| 14. INSPECT FOR FUEL LEAK |
Connect the intelligent tester to the DLC3.
Turn the ignition switch to ON.
- NOTICE:
- Do not start the engine.
Turn the intelligent tester ON.
Enter the following menus: Powertrain / Engine and ECT / Active Test / Control the Fuel Pump Speed / ON.
Check fuel pump operation.
Check for pressure in the fuel inlet tube from the fuel line. Check that the sound of fuel flowing in the fuel tank can be heard.
If there is no sound, check the integration relay, fuel pump, ECM and wiring connector.