 |
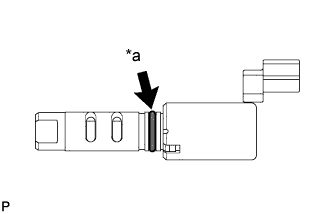
Apply a light coat of engine oil to a new O-ring and install it to the oil control valve.
| *a | New O-Ring |
CAMSHAFT OIL CONTROL VALVE > INSTALLATION |
| 1. INSTALL CAMSHAFT TIMING OIL CONTROL VALVE ASSEMBLY (for Exhaust Side of Bank 2) |
|
Apply a light coat of engine oil to a new O-ring and install it to the oil control valve.
| *a | New O-Ring |
Install the oil control valve with the bolt.
Connect the camshaft timing oil control valve connector.
| 2. INSTALL CAMSHAFT TIMING OIL CONTROL VALVE ASSEMBLY (for Exhaust Side of Bank 1) |
Apply a light coat of engine oil to a new O-ring and install it to the oil control valve.
Install the oil control valve with the bolt.
Connect the oil control valve connector.
| 3. INSTALL CAMSHAFT TIMING OIL CONTROL VALVE ASSEMBLY (for Intake Side of Bank 2) |
Apply a light coat of engine oil to a new O-ring and install it to the oil control valve.
Install the oil control valve with the bolt.
Connect the oil control valve connector.
| 4. INSTALL CAMSHAFT TIMING OIL CONTROL VALVE ASSEMBLY (for Intake Side of Bank 1) |
Apply a light coat of engine oil to a new O-ring and install it to the oil control valve.
Install the oil control valve with the bolt.
Connect the oil control valve connector.
| 5. INSTALL INTAKE AIR SURGE TANK |
Install the intake air surge tank (Click here).
| 6. ADD ENGINE COOLANT |
Tighten the cylinder block drain cock plug.
Tighten the radiator drain cock plug by hand.
Remove the vinyl hose from the radiator drain cock of the radiator assembly.
Add engine coolant.
| Item | Specified Condition |
| for Automatic Transmission | 9.8 liters (10.4 US qts, 8.6 Imp. qts) |
| for Manual Transmission | 9.4 liters (9.9 US qts, 8.3 Imp. qts) |
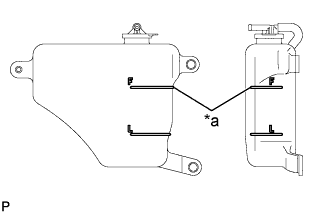 |
Slowly pour engine coolant into the radiator reservoir until it reaches the Full line.
| *a | Full Line |
Install the radiator reserve tank cap sub-assembly.
Install the radiator cap sub-assembly.*1
Start the engine and stop it immediately.*2
Allow approximately 10 seconds to pass, and then remove the radiator cap sub-assembly and check the engine coolant level. If the engine coolant level has decreased, add engine coolant.*3
Repeat steps *1, *2 and *3 until the engine coolant level does not decrease.
Install the radiator cap sub-assembly.*4
Set the air conditioning as follows.*5
| Item | Condition |
| Fan speed | Any setting except off |
| Temperature | Toward WARM |
| Air conditioning switch | Off |
Start the engine, warm it up until the thermostat opens, and then continue to run the engine for several minutes to circulate the engine coolant.*6
Stop the engine, wait until the engine coolant cools down to ambient temperature, and then remove the radiator cap sub-assembly and check the engine coolant level.*7
If the engine coolant level has decreased, add engine coolant and warm up the engine until the thermostat opens.*8
|
If the engine coolant level has not decreased, check that the engine coolant level in the radiator reservoir is at the Full line.
If the engine coolant level is below the Full line, repeat steps *4 through *8.
If the engine coolant level is above the Full line, drain engine coolant until the engine coolant level reaches the Full line.
| *a | Full Line |
Install the service hole cover to the engine under cover.
| 7. INSPECT FOR COOLANT LEAK |
Fill the radiator with engine coolant, and then attach a radiator cap tester.
Warm up the engine.
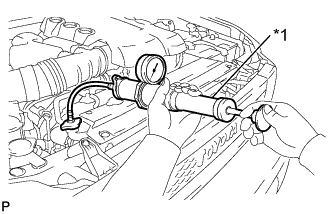 |
Using the radiator cap tester, increase the pressure inside the radiator to 123 kPa (1.3 kgf/cm2, 18 psi), and then check that the pressure does not drop.
If the pressure drops, check the hoses, radiator and water pump for leakage. If there are no signs or traces of external engine coolant leakage, check the heater core, cylinder block and head.
| *1 | Radiator Cap Tester |