Home › ENGINE › 1GR-FE FUEL › FUEL TANK

FUEL TANK > REMOVAL

for Preparation Click here


1. DISCHARGE FUEL SYSTEM PRESSURE
  1. Discharge the fuel system pressure (Click here).


2. REMOVE NO. 1 FUEL TANK PROTECTOR SUB-ASSEMBLY (for Automatic Transmission)


    A137217
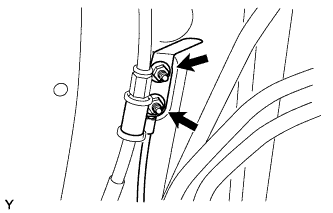
  1. Remove the 2 nuts and the fuel tank protector bracket.


    A129913
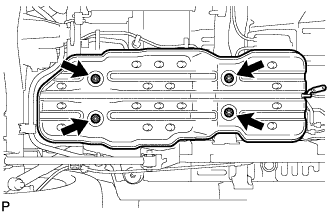
  1. Remove the 4 nuts and the fuel tank protector.


3. REMOVE NO. 1 FUEL TANK PROTECTOR SUB-ASSEMBLY (for Manual Transmission)


    A138100
  1. Remove the nut and the fuel tank protector bracket.


    A129913
  1. Remove the 4 nuts and the fuel tank protector.


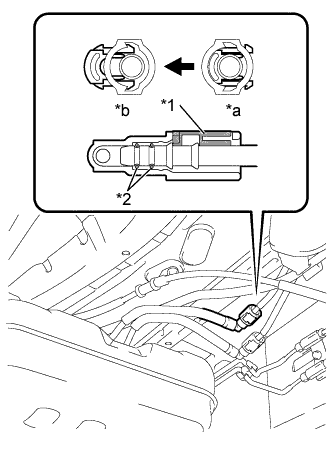
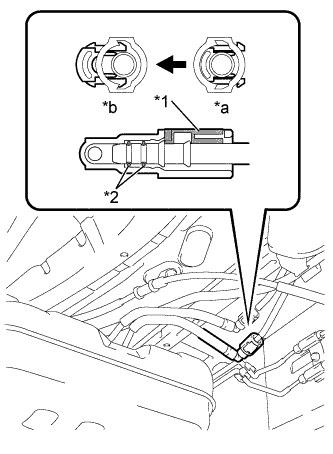
4. DISCONNECT FUEL TANK MAIN TUBE SUB-ASSEMBLY


    A226907E01
  1. Pinch the retainer to disengage the lock claws and pull out the fuel tank main tube.
    Text in Illustration 
    *1
    Retainer
    *2
    O-Ring
    *a
    Lock
    *b
    Unlock

    NOTICE:
    1. Check that there is no dirt or mud around the quick connector before performing this work, because the quick connector has an O-ring which seals the pipe and the connector. Clean the connector if necessary.
    2. Do not use any tools in this work.
    3. Do not bend or twist the nylon tube.
    4. To protect the tube, cover it with a vinyl bag after disconnecting it.
    5. When the connector and the pipe are stuck, turn the retainer carefully to disconnect them.


5. DRAIN FUEL
  1. Operate the fuel pump and drain the fuel from the fuel tank through the fuel tank main tube .


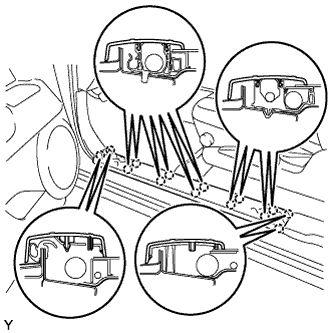
6. REMOVE FRONT DOOR SCUFF PLATE LH


    A130151
  1. Disengage the 14 claws and remove the front door scuff plate.


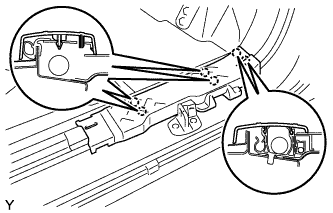
7. REMOVE REAR DOOR SCUFF PLATE LH


    A130152
  1. Disengage the 6 claws and remove the rear door scuff plate.


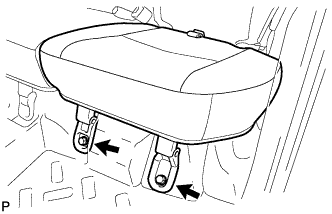
8. REMOVE REAR SEAT CUSHION ASSEMBLY LH


    A129905
  1. Remove the 2 bolts, then remove the rear seat cushion LH.


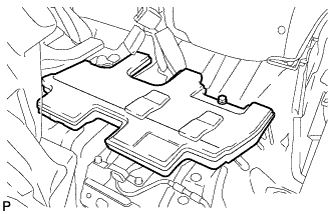
9. REMOVE REAR FLOOR SERVICE HOLE COVER


    A129907
  1. Pull back the floor carpet.

  1. Remove the center floor silencer pad LH.


    A129904
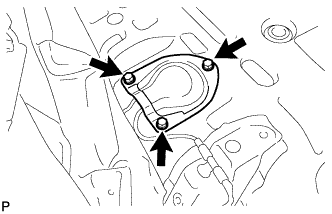
  1. Remove the 3 screws from the center floor.
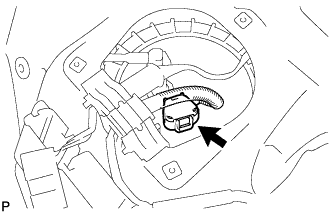


    A129908
  1. Disconnect the connector.


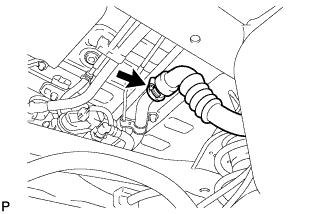
10. REMOVE FUEL TANK TO FILLER PIPE HOSE


    A129909
  1. Loosen the clamp bolt, and disconnect the fuel tank to filler pipe hose.


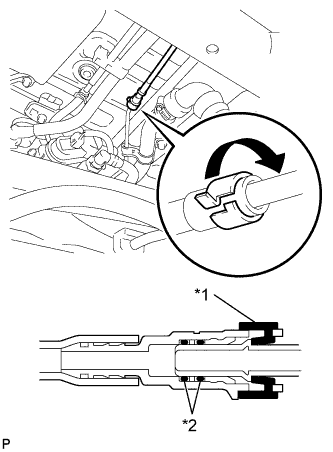
11. REMOVE FUEL TANK BREATHER TUBE SUB-ASSEMBLY


    A226910E01
  1. Turn the retainer to disengage the lock claws and pull out the fuel tank breather tube.
    Text in Illustration 
    *1
    Retainer
    *2
    O-Ring
    V100135
    Turn

    NOTICE:
    1. Check that there is no dirt or mud around the quick connector before performing this work, because the quick connector has an O-ring which seals the pipe and the connector. Clean the connector if necessary.
    2. Do not use any tools in this work.
    3. Do not bend or twist the nylon tube.
    4. To protect the tube, cover it with a vinyl bag after disconnecting it.
    5. When the connector and the pipe are stuck, turn the retainer carefully to free and then disconnect the fuel tank tube.


12. DISCONNECT FUEL TANK RETURN TUBE


    A226908E01
  1. Pinch the retainer to disengage the lock claws and pull out the fuel tank return tube.
    Text in Illustration 
    *1
    Retainer
    *2
    O-Ring
    *a
    Lock
    *b
    Unlock

    NOTICE:
    1. Check that there is no dirt or mud around the quick connector before performing this work, because the quick connector has an O-ring which seals the pipe and the connector. Clean the connector if necessary.
    2. Do not use any tools in this work.
    3. Do not bend or twist the nylon tube.
    4. To protect the tube, cover it with a vinyl bag after disconnecting it.
    5. When the connector and the pipe are stuck, turn the retainer carefully to disconnect them.


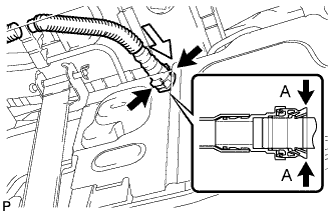
13. DISCONNECT FUEL TANK VENT HOSE


    A226909E01
  1. Disconnect the fuel tank breather tube from the fuel tank.
    Text in Illustration 
    V100135
    Pinch
    V100136
    Push

    1. Push the connector deep inside.

    2. Pinch portion A, as shown in the illustration.

    3. Pull out the connector.


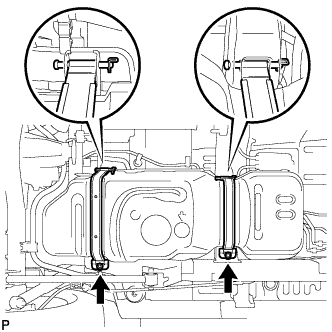
14. REMOVE FUEL TANK ASSEMBLY


    A129914
  1. Hold the fuel tank using a mission jack.

  1. Remove the 2 fuel tank bands.

    1. Remove the 2 bolts.

    2. Remove the 2 clips and 2 pins, then remove the 2 fuel tank bands.


15. REMOVE NO. 3 FUEL TANK PROTECTOR


  1. Remove the 2 bolts and disengage the 3 claws, then remove the No. 3 fuel tank protector.
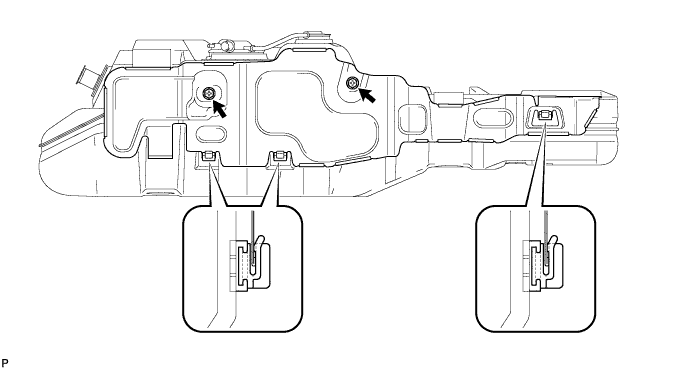

    A129923


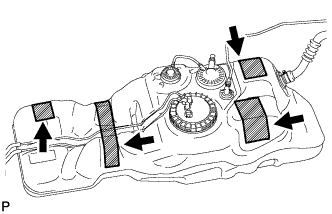
16. REMOVE FUEL TANK CUSHION


    A129919
  1. Remove the 4 fuel tank cushions from the fuel tank.


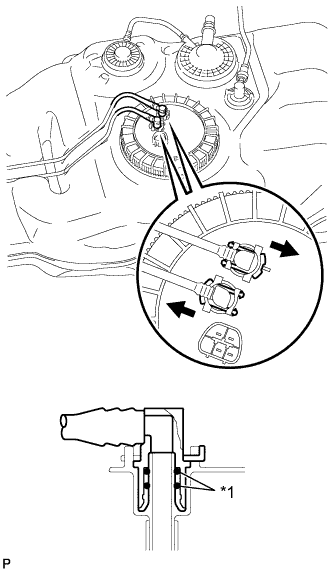
17. REMOVE FUEL TANK MAIN TUBE AND FUEL TANK RETURN TUBE


    A129915E02
  1. Remove the 2 joint clips, and pull out the 2 fuel tank tubes.
    Text in Illustration 
    *1
    O-Ring
    V100135
    Pull

    NOTICE:
    1. Check that there is no dirt or mud around the quick connector before performing this work, because the quick connector has an O-ring which seals the pipe and the connector. Clean the connector if necessary.
    2. Do not use any tools in this work.
    3. Do not bend or twist the nylon tube by force.
    4. After disconnecting, cover the fuel tube joint with a vinyl bag.
    5. When the fuel tube joint and fuel suction plate are stuck, turn the fuel tank main tube carefully to free and then disconnect it. Likewise, disconnect the fuel tank return tube.


18. REMOVE FUEL SUCTION WITH PUMP AND GAUGE TUBE ASSEMBLY


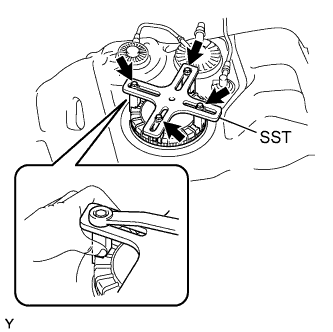
    A188048E01
  1. Set the plate and claws of SST onto the fuel pump gauge retainer and temporarily tighten the bolts.

    SST
    09808-14030   (09808-01010, 09808-01020, 09808-01030, 09808-01040, 09808-01050)

  1. While firmly pressing the claws of SST against the ribs of the retainer, fully tighten each bolt.

  1. Set SST handle in place.


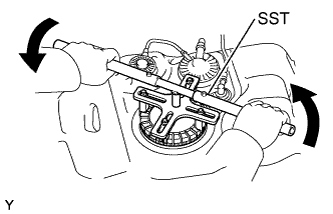
    A188049E01
  1. While pressing down tightly on SST to prevent it from rising up, slowly rotate the handle to loosen the retainer.

    NOTICE:
    1. Pressing the retainer against the pump with excessive force will make it difficult to turn and may damage the parts, so do not press down too strongly on SST.
    2. Applying excessive force at an angle may cause SST to slip off, so be sure to keep the handle level while rotating.
    3. To avoid damaging the parts, do not turn the handle of SST too forcefully, and do not use an impact wrench.
    4. If SST slips off the retainer, stop turning the handle, loosen the bolts of SST, and perform the SST set procedure again.

  1. Remove the retainer.

  1. Remove the fuel suction with pump and gauge tube assembly from the fuel tank.
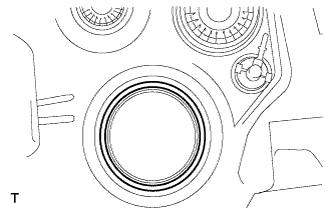
    NOTICE:
    Do not bend the arm of the sender gauge.


    A129944
  1. Remove the gasket from the fuel tank.


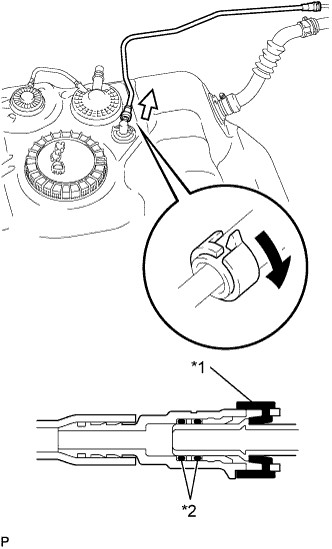
19. REMOVE FUEL TANK BREATHER TUBE SUB-ASSEMBLY


    A226911E01
  1. Pinch the retainer to disengage the lock claws and pull out the fuel tank breather tube.
    Text in Illustration 
    *1
    Retainer
    *2
    O-Ring
    V100135
    Turn
    V100136
    Pull

    NOTICE:
    1. Check that there is no dirt or mud around the quick connector before performing this work, because the quick connector has an O-ring which seals the pipe and the connector. Clean the connector if necessary.
    2. Do not use any tools in this work.
    3. Do not bend or twist the nylon tube.
    4. To protect the tube, cover it with a vinyl bag after disconnecting it.
    5. When the connector and the pipe are stuck, turn the fuel tank breather tube carefully to disconnect them.


20. REMOVE FUEL TANK TO FILLER PIPE HOSE


    A138097
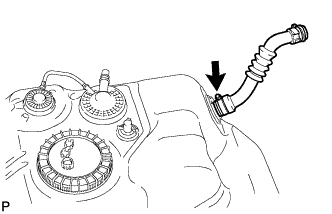
  1. Loosen the clamp bolt, and disconnect the fuel tank to filler pipe hose.