 |
Using a 27 mm socket wrench, install the plug.
- Torque:
- 49 N*m{ 500 kgf*cm , 36 ft.*lbf }
OIL PUMP > INSTALLATION |
| 1. INSTALL OIL PUMP RELIEF VALVE |
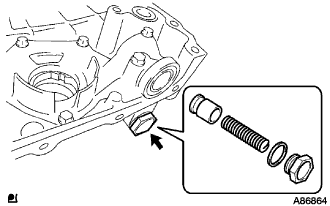
Coat the relief valve with engine oil.
Insert the relief valve and spring into the timing chain cover hole.
Install a new gasket to the plug.
|
Using a 27 mm socket wrench, install the plug.
| 2. INSTALL TIMING GEAR CASE OR TIMING CHAIN CASE OIL SEAL |
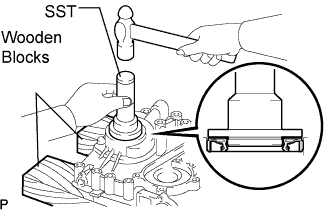 |
Place the timing chain cover on wooden blocks.
Using SST, tap in a new oil seal until its surface is flush with the timing gear case edge.
| 3. INSTALL WATER PUMP ASSEMBLY |
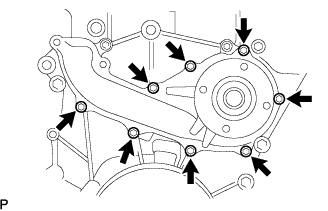 |
Install a new gasket and the water pump with the 8 bolts.
| 4. INSTALL TIMING CHAIN OR BELT COVER SUB-ASSEMBLY |
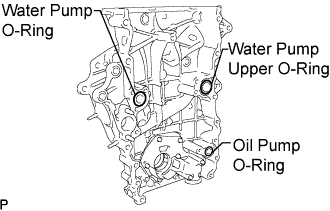 |
Install 3 new O-rings to the timing chain cover as shown in the illustration.
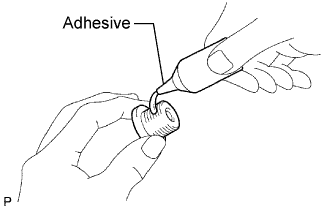 |
Apply adhesive to the timing chain cover plug.
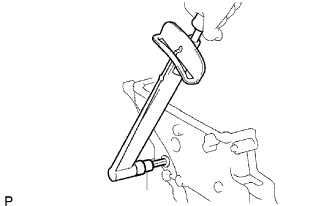 |
Using a 10 mm socket hexagon wrench, install the timing chain cover plug.
Apply seal packing in a continuous bead to the timing chain cover as shown in the following illustration.
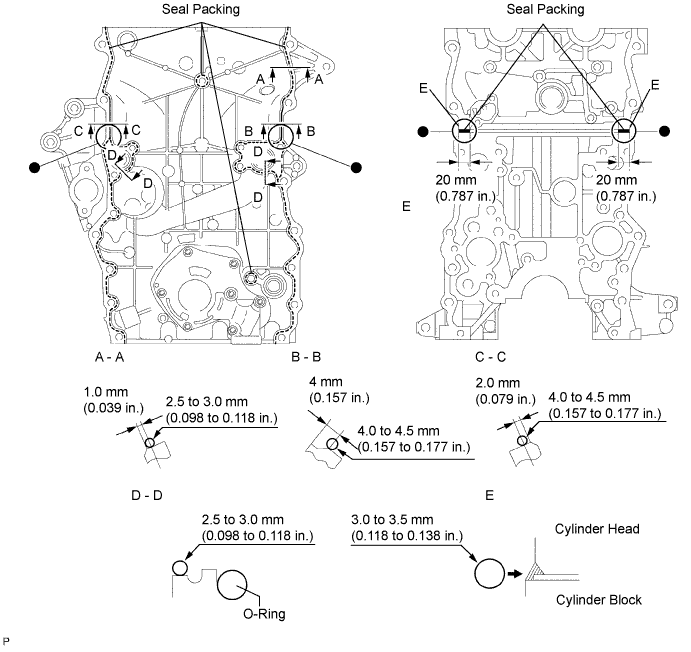
| Position | Specified Condition |
| A - A | 2.5 to 3.0 mm (0.098 to 0.118 in.) |
| B - B, C - C | 4.0 to 4.5 mm (0.157 to 0.177 in.) |
| D - D | 2.5 to 3.0 mm (0.098 to 0.118 in.) |
| E | 3.0 to 3.5 mm (0.118 to 0.138 in.) |
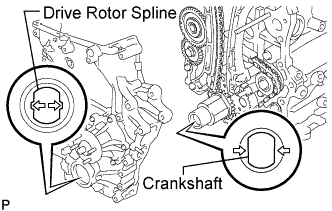 |
Align the oil pump's drive rotor spline and the crankshaft as shown in the illustration. Install the spline and chain cover to the crankshaft.
Temporarily install the timing chain cover with the 19 bolts and 2 nuts, but do not tighten the bolts and nuts yet.
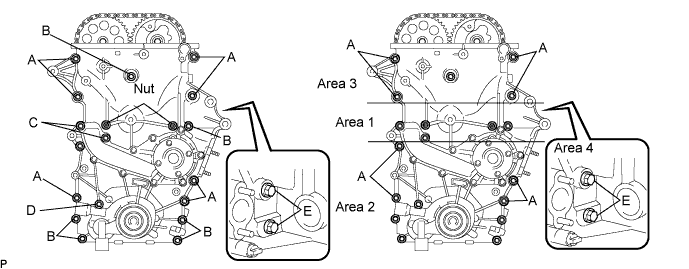
Excluding bolts A, fully tighten the bolts and nuts in this order: Area 1, Area 2 and Area 3.
Fully tighten the bolts A in this order: Area 2 and Area 3.
Fully tighten the bolts E in Area 4.
| 5. INSTALL OIL PAN SUB-ASSEMBLY |
Install the stud bolt.
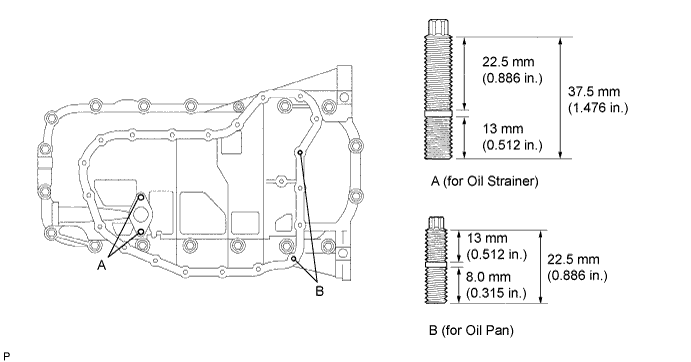
Using an E5 "torx" socket wrench, install the stud bolts labeled A for the oil pan as shown in the illustration.
Using an E7 "torx" socket wrench, install the stud bolts labeled B for the oil strainer as shown in the illustration.
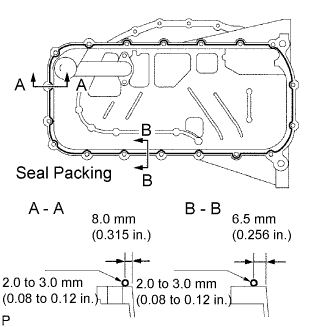 |
Apply seal packing in a continuous bead as shown in the illustration.
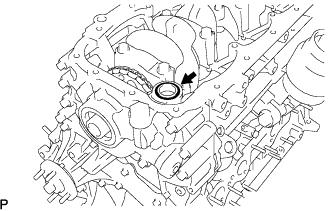 |
Install a new O-ring.
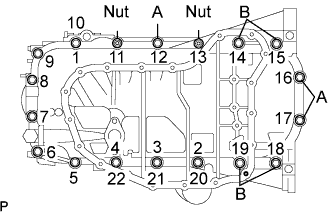 |
Temporarily install the oil pan with the 16 bolts and 2 nuts.
Uniformly tighten the 16 bolts and 2 nuts in the sequence shown in the illustration.
| 6. INSTALL OIL STRAINER SUB-ASSEMBLY |
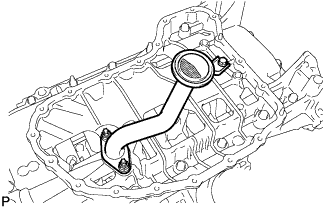 |
Install a new gasket and the oil strainer with the bolt and 2 nuts.
| 7. INSTALL OIL PAN SUB-ASSEMBLY NO.2 |
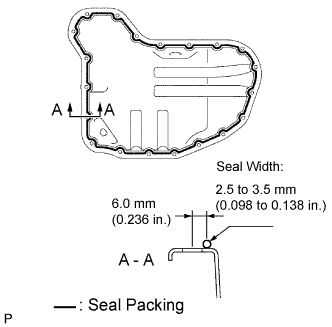 |
Apply seal packing in a continuous bead as shown in the illustration.
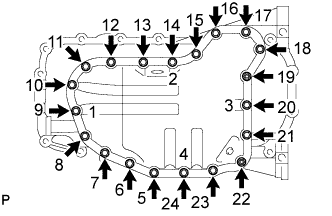 |
Temporarily install the oil pan with the 18 bolts and 2 nuts.
Uniformly tighten the 18 bolts and 2 nuts in the sequence shown in the illustration.
Install a new gasket and the drain plug.
| 8. INSTALL CRANKSHAFT PULLEY |
Align the pulley set key with the key groove of the pulley, and slide it on the pulley.
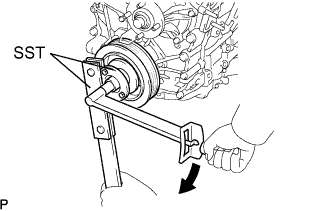 |
Using SST, install a new pulley bolt.
| 9. INSTALL CRANKSHAFT POSITION SENSOR |
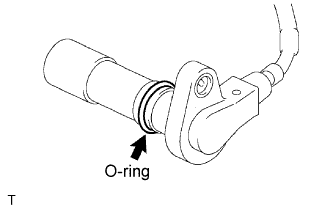 |
Apply engine oil to the O-ring.
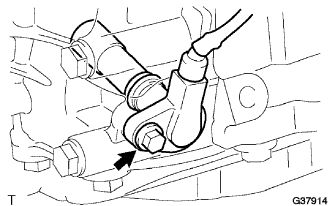 |
Install the crankshaft position sensor with the bolt.
| 10. INSTALL CYLINDER HEAD COVER SUB-ASSEMBLY |
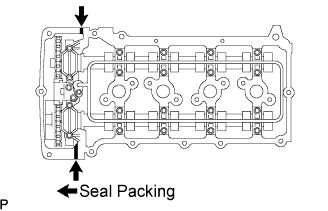 |
Apply seal packing as shown in the illustration.
Install the 2 gaskets to the head cover.
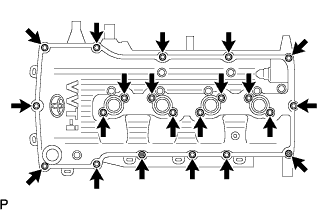 |
Temporarily install the cover with the 19 bolts and 2 nuts.
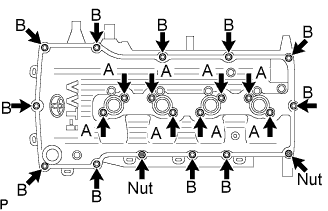 |
Fully tighten the bolts (A) shown in the illustration.
Fully tighten the bolts (B) shown in the illustration.
| 11. INSTALL IGNITION COIL ASSEMBLY |
Install the ignition coils with the bolts.
| 12. INSTALL V-RIBBED BELT TENSIONER ASSEMBLY |
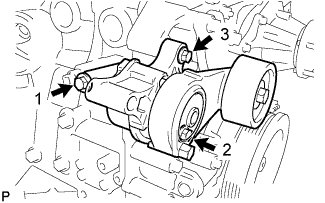 |
Temporarily install the belt tensioner with the 3 bolts.
Install the tensioner by tightening the 3 bolts in the order shown in the illustration.
| 13. INSTALL IDLER PULLEY SUB-ASSEMBLY NO.1 |
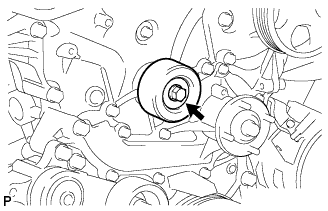 |
Install the idler pulley sub-assembly No.1, collar and pulley plate with the bolt.
| 14. INSTALL COMPRESSOR MOUNTING BRACKET NO.1 (w/ Air Conditioning) |
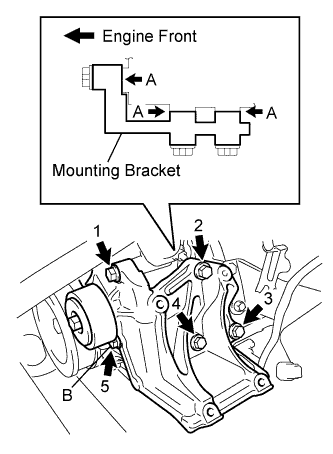 |
Temporarily install the mounting bracket with the 5 bolts.
Install the mounting bracket by tightening the 5 bolts in the order shown in the illustration.
| 15. INSTALL GENERATOR ASSEMBLY |
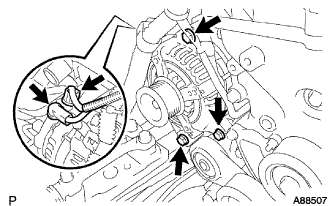 |
Install the generator assembly with the 3 bolts.
Install the generator wire with the nut to terminal B.
Install the terminal cap.
Connect the generator connector.
| 16. INSTALL THERMOSTAT |
Install a new gasket to the thermostat.
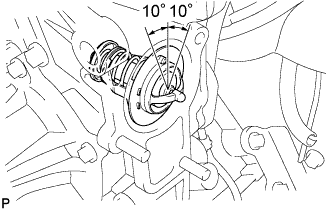 |
Install the thermostat with the jiggle valve upward.
| 17. INSTALL WATER INLET |
Install a new gasket and the water inlet with the bolt and 2 nuts.
| 18. INSTALL WATER BY-PASS PIPE NO.1 |
Install a new gasket and the water by-pass pipe with the 2 nuts and bolt.
| 19. INSTALL FAN PULLEY |
Install the fan spacer and fan pulley with the 4 nuts.
| 20. INSTALL INTAKE MANIFOLD |
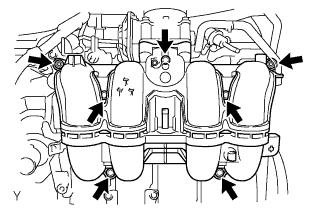 |
Install a new gasket and the intake manifold with the 5 bolts and 2 nuts.
Connect the ventilation hose No.3.
| 21. INSTALL INJECTOR ASSEMBLY |
Apply a light coat of grease or gasoline to new O-rings and install them to the injector spacers.
Install the injection spacers.
Apply a light coat of grease or gasoline to the place where the delivery pipe touches the O-ring.
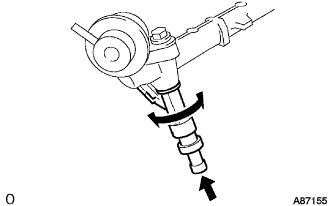 |
To install the fuel injector into the fuel delivery pipe, push the fuel injector while twisting it right and left.
| 22. INSTALL FUEL DELIVERY PIPE SUB-ASSEMBLY |
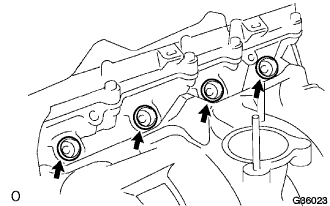 |
Install the 4 spacers to the cylinder head.
Install the delivery pipe spacers.
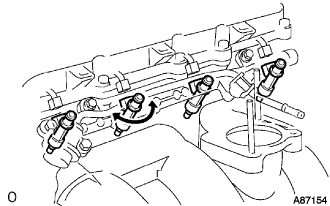 |
Temporarily install the 2 bolts and fuel delivery pipe together with the 4 injectors.
Fully tighten the 2 bolts.
Apply a light coat of grease or gasoline to the place where the delivery pipe touches the O-ring.
Install the 2 bolts and pressure pulsation damper assembly.
Connect the 2 fuel hoses.
| 23. INSTALL THROTTLE WITH MOTOR BODY ASSEMBLY |
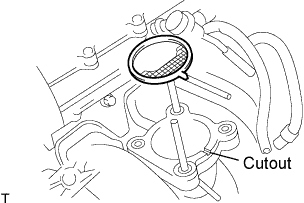 |
Install a new gasket onto the intake manifold.
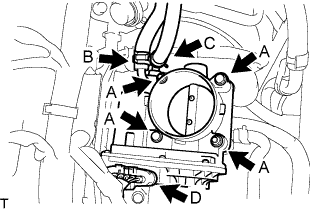 |
Install the throttle body assembly with the 2 bolts and 2 nuts. (A)
Connect the water by-pass hose. (B)
Connect the water by-pass hose No.2. (C)
Connect the throttle motor connector. (D)
| 24. CONNECT ENGINE WIRE |
Connect the +B terminal and connector of the starter.
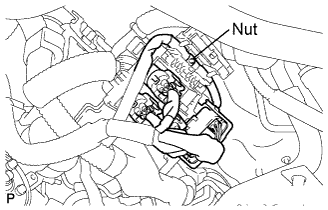 |
Install the connectors and nut as shown in the illustration.
Connect the clamps of the engine wire and earth cable.
Connect the connectors of the ECM.
Install the wire harness support of the engine ECM.
| 25. INSTALL COMPRESSOR AND MAGNETIC CLUTCH (w/ Air Conditioning) |
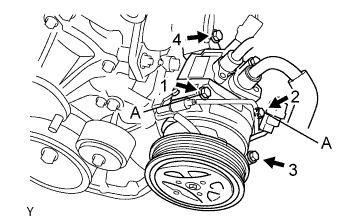 |
Temporarily install the bolt A to install the compressor.
Install the compressor completely by tightening the 4 bolts in the order shown in the illustration.
Connect the suction tube clamp with the bolt.
Connect the compressor connector.
| 26. INSTALL OIL LEVEL GAGE GUIDE |
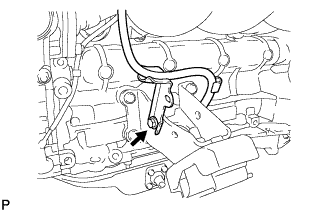 |
Install the gauge guide with the bolt.
| 27. INSTALL OIL LEVEL GAGE SUB-ASSEMBLY |
| 28. INSTALL VANE PUMP ASSEMBLY |
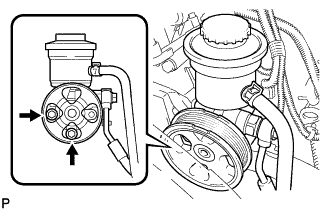 |
Install the vane pump with the 2 bolts.
Connect the PS fluid pressure switch connector.
| 29. CONNECT FUEL HOSE NO.2 |
Connect the fuel hose No.2 to the delivery pipe.
| 30. CONNECT FUEL HOSE |
Align the connector and pipe. Push on the connector until the retainer locks with a click sound. (Click here)
Pull the connector to check that the connector is securely connected. (Click here)
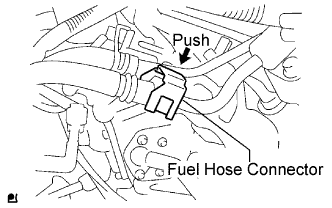 |
Install the connector and lock it with the fuel hose connector cover. (Click here)
| 31. INSTALL INTAKE AIR CONNECTOR |
Temporarily install the intake air connector to the throttle body assembly.
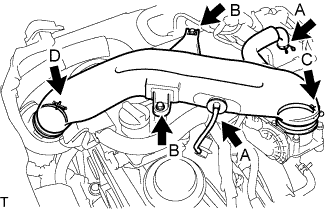 |
Connect the ventilation hose No.2 and the vacuum hose. (A)
Install the intake air connector with the 2 bolts. (B)
Tighten the 2 hose clamp bolts. (C)
Tighten the 2 hose clamp bolts. (D)
| 32. CONNECT UNION TO CONNECTOR TUBE HOSE |
Connect the union to connector tube hose to the intake manifold.
| 33. CONNECT FUEL VAPOR FEED HOSE ASSEMBLY |
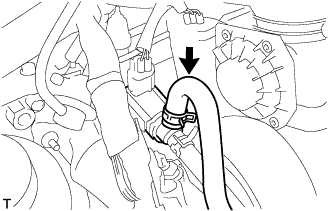 |
Connect the fuel vapor feed hose to the VSV.
| 34. CONNECT RADIATOR HOSE OUTLET |
Connect the radiator outlet hose to the clamp.
| 35. CONNECT RADIATOR HOSE INLET |
Connect the radiator inlet hose to the clamp.
| 36. INSTALL FAN AND GENERATOR V BELT |
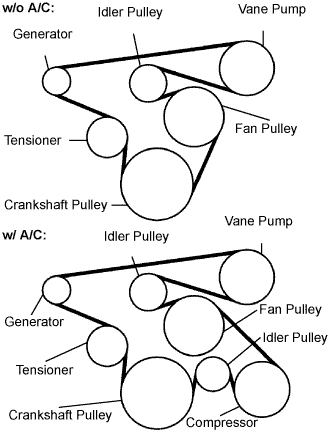 |
Install the drive belt to the pulleys except the drive belt tensioner pulley.
Use the hexagon-shaped part indicated by the arrow in the illustration to move the tensioner pulley downward and then install the drive belt to the tensioner pulley.
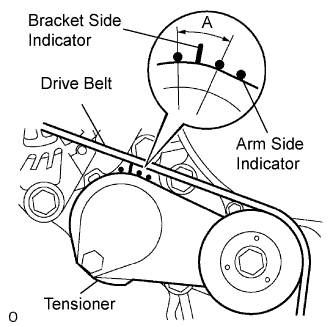 |
After a new belt has been installed, check that the tensioner indicator mark is within range A shown in the illustration.
| 37. INSTALL CAMSHAFT POSITION SENSOR |
Apply engine oil to the O-ring.
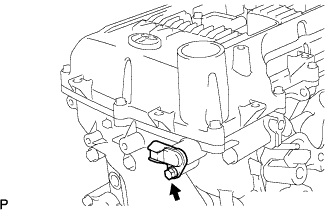 |
Install the camshaft position sensor with the bolt.
| 38. INSTALL ENGINE SERVICE HOLE SUB COVER SUB-ASSEMBLY |
Install the engine service hole sub cover with the 5 bolts.
| 39. INSTALL FRONT DOOR SCUFF PLATE RH |
| 40. INSTALL FRONT SEAT ASSEMBLY RH (for Hi-back Seat Type) |
Perform the same procedure as above on the opposite side.
| 41. REMOVE FRONT SEAT ASSEMBLY RH (for Low-back Seat Type) |
Perform the same procedure as above on the opposite side.
| 42. CONNECT BATTERY NEGATIVE TERMINAL |
| 43. ADD ENGINE OIL |
| 44. ADD ENGINE COOLANT |
Firmly tighten the drain plugs and fill the reservoir tank with coolant to the top of the inlet.
Remove the 2-way that is located near the throttle body.
When air is bled and the coolant drains out, firmly install the 2-way.
Add coolant up to the B line mark in the reservoir tank and install the radiator cap.
| Condition | Capacity |
| w/ rear heater | 15.0 liters (15.8 US qts, 13.2 lmp. qts) |
| w/o rear heater | 13.0 liters (13.7 US qts, 11.4 lmp. qts) |
Warm up the engine.
After the engine cools down, check that the coolant level is between the LOW and FULL level marks.
| 45. CHECK FOR FUEL LEAKS |
| 46. CHECK FOR ENGINE OIL LEAKS |
| 47. CHECK FOR ENGINE COOLANT LEAKS |
| 48. INSTALL ENGINE UNDER COVER NO.2 (w/ Engine Under Cover No.2) |
Install the engine under cover No.2 together with the engine side under cover LH and engine side under cover RH (for Wide Body).
| 49. INSTALL ENGINE UNDER COVER NO.1 (w/ Engine Under Cover No.1) |
| 50. INSPECT CHECK IDLE SPEED AND IGNITION TIMING |
Warm up and stop the engine.
When using the intelligent tester:
Connect the intelligent tester to the DLC3.
Start the engine and idle it.
Turn the intelligent tester main switch on.
Enter the following items:
Powertrain / Engine and ECT / Data list / IGN Advance
When not using the intelligent tester:
Connect the tester probe of a timing light to the wire of the ignition coil connector for the No.4 cylinder.
Turn the ignition switch to the ON position.
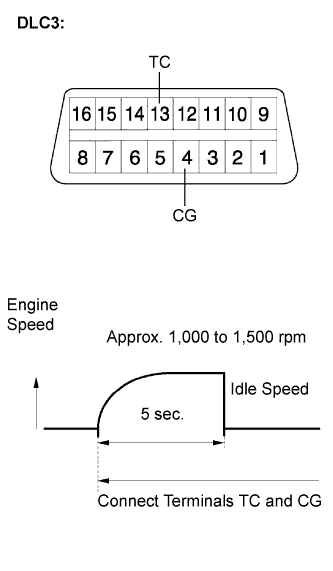 |
Using SST, connect terminals 13 (TC) and 4 (CG) of the DLC3.
Inspect the ignition timing
Disconnect terminals 13 (TC) and 4 (CG) of the DLC3.
Inspect the ignition timing
Check that the ignition timing advances immediately when the engine speed is increased.
Turn the ignition switch off.
Remove the timing light.
| 51. CHECK FUNCTION OF THROTTLE BODY |
| 52. INSPECT ABS SENSOR SIGNAL |
| 53. PERFORM INITIALIZATION |