Home › ENGINE · 2TR-FE › ENGINE CONTROL SYSTEM › SFI SYSTEM (w/ Secondary Air Injection System)

DTC    P0037    Oxygen Sensor Heater Control Circuit Low (Bank 1 Sensor 2)

DTC    P0038    Oxygen Sensor Heater Control Circuit High (Bank 1 Sensor 2)

for Preparation Click here


DESCRIPTION

HINT:
Sensor 2 refers to the sensor mounted behind the Three-Way Catalytic Converter (TWC) and located far from the engine assembly.

Refer to DTC P0136 (Click here).

HINT:
  1. When either of these DTCs are set, the ECM enters fail-safe mode. The ECM turns off the Heated Oxygen (HO2) sensor heater in fail-safe mode. Fail-safe mode continues until the ignition switch is turned to OFF.
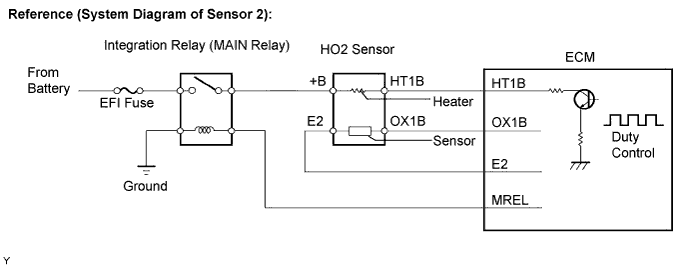
  2. The ECM provides a pulse width modulated control circuit to adjust the current through the heater. The HO2 sensor heater circuit uses a relay on the +B side of the circuit.


A110707E01


DTC No.
DTC Detection Conditions
Trouble Areas
P0037
Heated Oxygen (HO2) sensor heater current less than 0.3 A
(1 trip detection logic)
  1. Open or short in HO2 sensor heater circuit
  2. HO2 sensor heater
  3. Integration relay (MAIN relay)
  4. ECM
P0038
Heated Oxygen (HO2) sensor heater current more than 2 A
(1 trip detection logic)
  1. Open or short in HO2 sensor heater circuit
  2. HO2 sensor heater
  3. Integration relay (MAIN relay)
  4. ECM

MONITOR DESCRIPTION

The sensing portion of the Heated Oxygen (HO2) sensor has a zirconia element which is used to detect the oxygen concentration in the exhaust gas. If the zirconia element is at the appropriate temperature, and the difference between the oxygen concentrations surrounding the inside and outside surfaces of the sensor is large, the zirconia element generates voltage signals. In order to increase the oxygen concentration detecting capacity of the zirconia element, the ECM supplements the heat from the exhaust with heat from a heating element inside the sensor. When the current in the sensor heater is outside the standard operating range, the ECM interprets this as a malfunction in the sensor heater and sets a DTC.
Example:
The ECM sets DTC P0038 when the current in the HO2 sensor heater is more than 2 A. Conversely, when the heater current is less than 0.3 A, DTC P0037 is set.

WIRING DIAGRAM

Refer to DTC P0136 .

INSPECTION PROCEDURE

HINT:
  1. If other DTCs relating to different systems that have terminal E2 as the ground terminal are output simultaneously, terminal E2 may have an open circuit.
  2. Read freeze frame data using an intelligent tester. The ECM records vehicle and driving condition information as freeze frame data the moment a DTC is stored. When troubleshooting, freeze frame data can be helpful in determining whether the vehicle was running or stopped, whether the engine was warmed up or not, whether the air-fuel ratio was lean or rich, as well as other data recorded at the time of a malfunction.

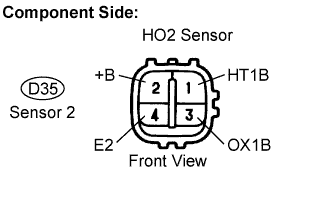
1.INSPECT HEATED OXYGEN SENSOR (HEATER RESISTANCE)


    A058685E01
  1. Disconnect the D35 Heated Oxygen(HO2) sensor connector.

  1. Measure the resistance between the terminals of the HO2 sensor connector.

    Resistance:
    Tester Connections
    Specified Conditions
    HT1B (1) - +B (2)
    11 to 16 Ω at 20°C (68°F)
    HT1B (1) - E2 (4)
    10 kΩ or higher

  1. Reconnect the HO2 sensor connector.


NG
REPLACE HEATED OXYGEN SENSOR
OK


2.INSPECT INTEGRATION RELAY
  1. Remove the integration relay from the engine room R/B No.1.
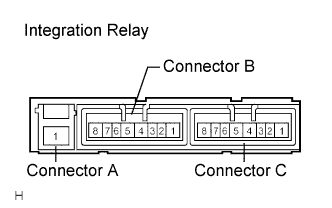


    A095606E01
  1. Measure the resistance according to the value(s) in the table below.

    Resistance:
    Tester Connections
    Specified Conditions
    A1 - B4
    10 kΩ or higher
    A1 - B4
    Below 1 Ω
    (when battery voltage applied to terminals B2 and B3)

  1. Reinstall the integration relay.


NG
REPLACE INTEGRATION RELAY
OK


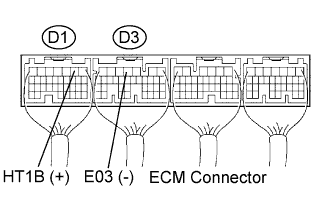
3.INSPECT ECM


    A018294E22
  1. Turn the ignition switch to the ON position.

  1. Measure the voltage between the terminals of the ECM connectors.

    Voltage:
    Tester Connections
    Specified Conditions
    HT1B (D1-2) - E03 (D3-4)
    9 to 14 V


NG
Go to step 4
OK

INSPECT ECM 

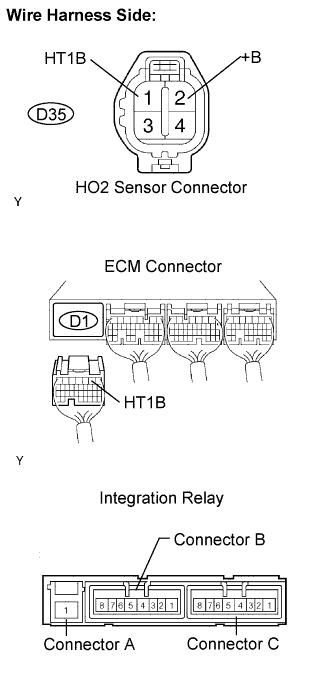
4.CHECK HARNESS AND CONNECTOR (HO2 SENSOR - ECM, HO2 SENSOR - INTEGRETION RELAY)


    A111143E01
  1. Check the harness and connectors between the ECM and HO2 sensor.

    1. Disconnect the D35 HO2 sensor connector.

    2. Disconnect the D1 ECM connector.

    3. Measure the resistance.

      Resistance (Check for open):
      Tester Connections
      Specified Conditions
      HT1B (D35-1) - HT1B (D1-2)
      Below 1 Ω

      Resistance (Check for short):
      Tester Connections
      Specified Conditions
      HT1B (D35-1) or HT1B (D1-2) - Body ground
      10 kΩ or higher

    4. Reconnect the HO2 sensor connector.

    5. Reconnect the ECM connector.

  1. Check the harness and connector between the HO2 sensor and Integration relay (MAIN relay).

    1. Disconnect the D35 HO2 sensor connector.

    2. Remove the integration relay from the engine room No.1.

    3. Measure the resistance.

      Resistance (Check for open):
      Tester Connections
      Specified Conditions
      +B (D35-2) - Integration relay (B4)
      Below 1 Ω

      Resistance (Check for short):
      Tester Connections
      Specified conditions
      +B (D35-2) or Integration relay (B4)
      - Body ground
      10 kΩ or higher

    4. Reconnect the HO2 sensor connector.

    5. Reinstall the integration relay (MAIN relay).


NG
REPAIR OR REPLACE HARNESS OR CONNECTOR
OK

INSPECT ECM