Home › ENGINE · 2TR-FE › ENGINE CONTROL SYSTEM › SFI SYSTEM (w/ Secondary Air Injection System)

DTC    P1613    Secondary Air Injection Driver Malfunction

for Preparation Click here


DESCRIPTION

Refer to DTC P0412 (Click here).

DTC No.
DTC Detection Condition
Trouble Area
P1613
  1. Either of following condition (a) or (b) is met:
    1. All of the following conditions are met (1 trip detection logic):
      1. While either of air pump or air switching valve does not operate
      2. Diagnostic signal from Air Injection Control Driver (AID) 80 %
      3. Battery voltage 8 V or more
    2. All of the following conditions are met (1 trip detection logic):
      1. Battery voltage 8 V or more
      2. Diagnostic signal from AID abnormal (duty signal excluding 0, 20, 40, 80, 100 %)
  1. AID
  2. Open in AID ground circuit
P1613
  1. All of following conditions are met (1 trip detection logic):
    1. While Air Injection System operating (Air Switching Valve (ASV) ON and air pump ON)
    2. Diagnostic signal from Air Injection Control Driver (AID) 0 %
    3. Battery voltage 8 V or more
  1. Short in diagnostic information signal circuit (AID - ECM)
  2. Open or short in air pump and air switching valve command signal circuit (AID - ECM)
  3. Open in AID ground circuit
  4. AID
  5. ECM
P1613
  1. All of following conditions are met (1 trip detection logic):
    1. Battery voltage 8 V or more
    2. Diagnostic signal from Air Injection Control Driver (AID) 100 %
  1. Open or short in AID power source circuit
  2. Open in diagnostic information signal circuit (AID - ECM)
  3. AID
  4. ECM

MONITOR DESCRIPTION

After the cold engine starts, the ECM transmits command signals to the Air Injection Control Driver (AID) to drive the air pump and Air Switching Valve (ASV). The AID detects an open or short in the air pump and ASV circuit according to the AID terminal voltage and sends a signal as the diagnostic information to the ECM.
If the Secondary Air Injection (AI) system circuit or the AID itself has a malfunction, the AID sends a malfunction signal (duty signal) as a diagnostic signal to the ECM (when the system is normal, a system normal signal is sent). The ECM sets the DTC based on the diagnostic information from the AID.
The ECM sets the DTC based on the diagnostic information from the AID.
  1. Example:
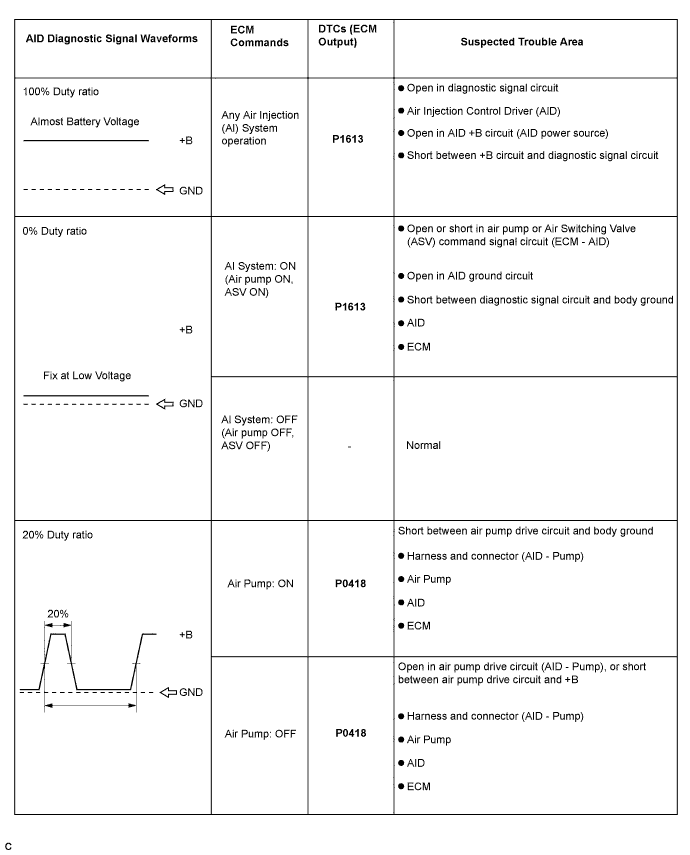
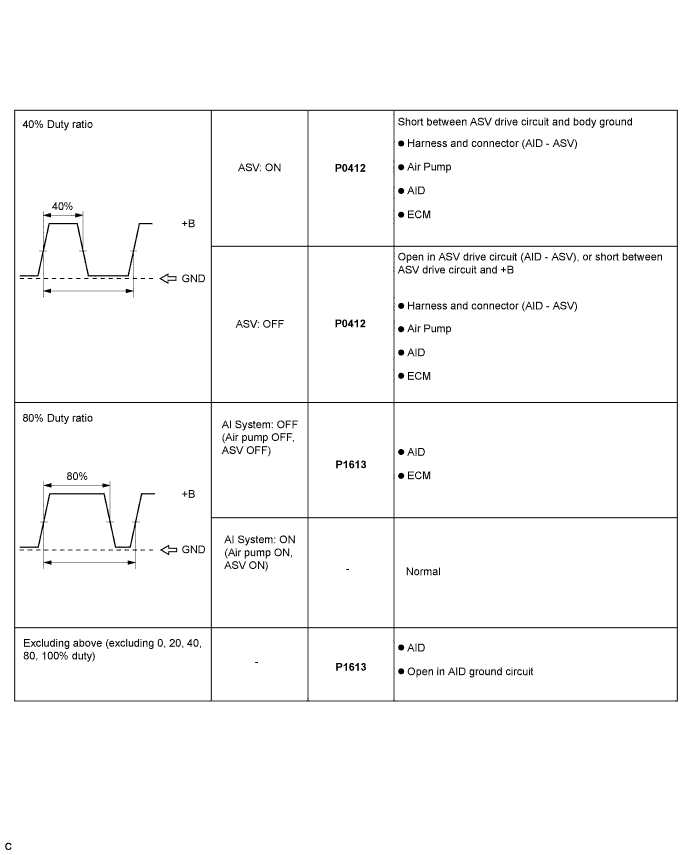
    1. The duty ratio of the diagnostic signal from the AID is 0 or 100 % (remains at 0 V or battery voltage).
    2. The duty ratio of the diagnostic signal from the AID is the ratio to output the impossible (excluding 0, 20, 40, 60, 80, 100 %).
    3. The AID outputs the normal signal (normal duty signal: 80 %) while the system is not operating.

WIRING DIAGRAM

Refer to DTC P0412 .

INSPECTION PROCEDURE

HINT:
The diagnostic information output from the AID can be confirmed by connecting an oscilloscope to the diagnostic information terminal of the AID.


  1. A065741E06
    Connect the intelligent tester to the DLC3.
  2. Connect an oscilloscope probe to the AIDI terminal of the ECM.
  3. Start the engine and turn the tester ON.

  4. Monitor the voltage output of the AID (duty ratio signal).

    Oscilloscope range: 
    Items
    Contents
    Terminals
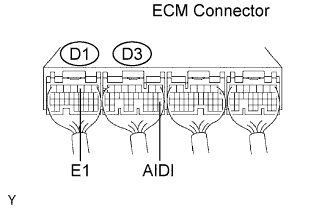
    CH1: AIDI (D3-20) - E1 (D1-3)
    Equipment Settings
    5 V/Division, 20 to 40 ms/Division
    Conditions
    Idling


    A111145E02


    A111146E02

HINT:
Read freeze frame data using the intelligent tester. The ECM records vehicle and driving condition information as freeze frame data the moment a DTC is stored. When troubleshooting, freeze frame data can be helpful in determining whether the vehicle was running or stopped, whether the engine was warmed up or not, whether the air-fuel ratio was lean or rich, as well as other data recorded at the time of a malfunction.

1.CHECK ANY OTHER DTCS OUTPUT (IN ADDITION TO DTC P1613)
  1. Connect the intelligent tester to the DLC3.

  1. Turn the ignition switch to the ON position and turn the tester ON.

  1. Select the following menu items: Powertrain / Engine and ECT / DTC.

  1. Read DTCs.

    Result:

    Display (DTC Output)
    Proceed To
    P0163
    A
    P0163 and other DTCs
    B

    HINT:
    If any DTCs other than P1613 are output, troubleshoot those DTCs first.


B
GO TO DTC CHART
A


2.CHECK POWER SOURCE OF AIR INJECTION CONTROL DRIVER


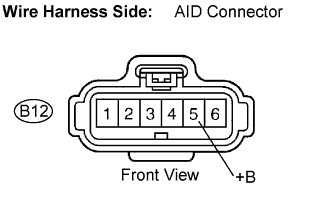
    B053781E04
  1. Disconnect the B12 AID connector.

  1. Turn the ignition switch to the ON position.

  1. Measure the voltage according to the value(s) in the table below.

    Voltage:
    Tester Connection
    Specified Condition
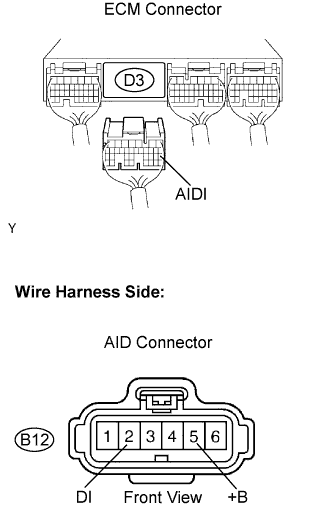
    +B (B12-5) - Body ground
    9 to 14 V (near battery voltage)

  1. Reconnect the AID connector.


NG
REPAIR OR REPLACE HARNESS OR CONNECTOR
OK


3.CHECK HARNESS AND CONNECTOR (AIR INJECTION CONTROL DRIVER - BODY GROUND)


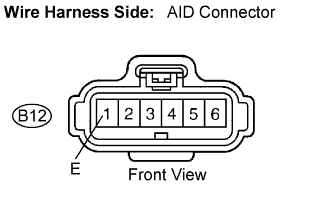
    B053781E05
  1. Disconnect the B12 AID connector.

  1. Measure the resistance according to the value(s) in the table below.

    Resistance:
    Tester Connection
    Specified Condition
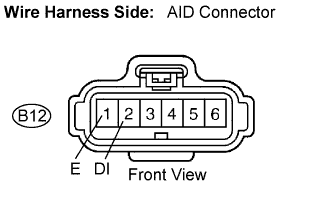
    E (B12-1) - Body ground
    Below 1 Ω

  1. Reconnect the AID connector.


NG
REPAIR OR REPLACE HARNESS OR CONNECTOR
OK


4.CHECK HARNESS AND CONNECTOR (AIR INJECTION CONTROL DRIVER - ECM)


    A110615E01
  1. Disconnect the B12 AID connector.

  1. Disconnect the D1 and D3 ECM connectors.

  1. Measure the resistance according to the value(s) in the table below.

    Resistance:
    Tester Connection
    Specified Condition
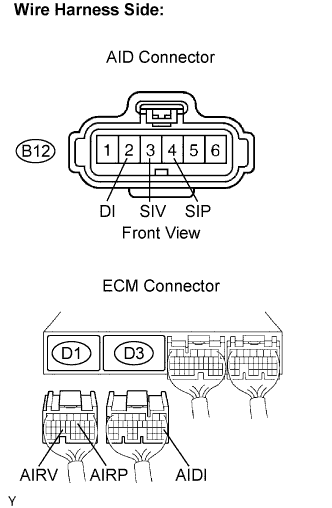
    DI (B12-2) - AIDI (D3-20)
    Below 1 Ω
    SIP (B12-4) - AIRP (D1-11)
    Below 1 Ω
    SIV (B12-3) - AIRV (D1-24)
    Below 1 Ω

  1. Connect the AID connector.

  1. Connect the ECM connectors.


NG
REPAIR OR REPLACE HARNESS OR CONNECTOR
OK


5.INSPECT AIR INJECTION CONTROL DRIVER (DI TERMINAL VOLTAGE)


    B053781E06
  1. Disconnect the B12 AID connector.

  1. Turn the ignition switch to the ON position.

  1. Measure the voltage according to the value(s) in the table below.

    Voltage:
    Tester Connection
    Specified Condition
    DI (B12-2) - E (B12-1)
    9 to 14 V (near battery voltage)

  1. Reconnect the AID connector.


NG
Go to step 6
OK

REPLACE AIR INJECTION CONTROL DRIVER 

6.CHECK HARNESS AND CONNECTOR (ECM - AIR INJECTION CONTROL DRIVER)


    A110616E01
  1. Disconnect the D3 ECM connector.

  1. Disconnect the B12 AID connector.

  1. Measure the resistance according to the value(s) in the table below.

    Resistance (check for open):
    Tester Connection
    Specified Condition
    DI (B12-2) - AIDI (D3-20)
    Below 1 Ω

    Resistance (check for short):
    Tester Connection
    Specified Condition
    DI (B12-2) or AIDI (D3-20) -
    +B (B12-5)
    10 kΩ or higher

  1. Reconnect the ECM connector.

  1. Reconnect the AID connector.


NG
REPAIR OR REPLACE HARNESS OR CONNECTOR
OK

REPLACE ECM