 |
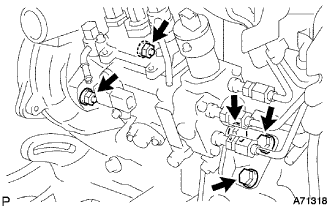
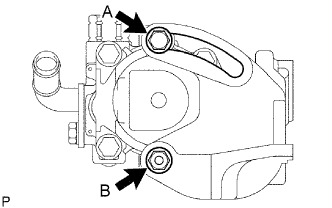
Install the injection or supply pump assembly to timing gear case, and temporarily tighten the 2 nuts.
FUEL INJECTION PUMP > INSTALLATION |
| 1. INSTALL INJECTION OR SUPPLY PUMP ASSEMBLY |
|
Install the injection or supply pump assembly to timing gear case, and temporarily tighten the 2 nuts.
Install injection pump stay No.1 to the injection or supply pump assembly rear end, and temporarily tighten the 3 bolts.
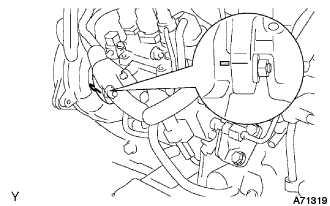 |
Rotate the pump body to make the marking of pump flange conform to the making of timing of gear case.
Tighten the 2 nuts to install the injection or supply pump assembly.
Tighten the 3 bolts to install the injection pump stay No.1.
Connect the 3 fuel hoses.
Connect the engine speed sensor connector.
Connect the spill control valve connector.
Connect the correction unit connector.
Connect the timer control valve connector.
Connect the fuel temperature sensor connector.
Connect the engine wire clamp.
| 2. INSTALL INJECTION PUMP DRIVE PULLEY |
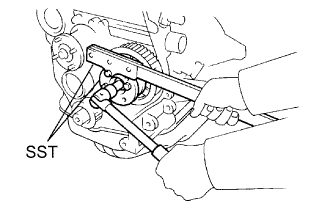 |
Using SST, install the injection pump drive pulley with the nut.
| 3. INSTALL INJECTION PIPE SET |
Connect the 2 lower clamps on the intake manifold.
Install the 4 injection pipes.
Secure the injection pipes with the 2 upper pipe clamps and 2 nuts.
| 4. INSTALL VENTURI ASSEMBLY |
Install a new gasket and venturi.
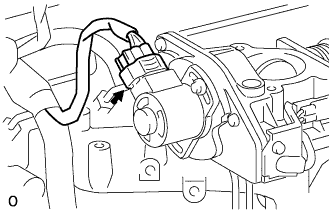 |
Connect the throttle control motor connector.
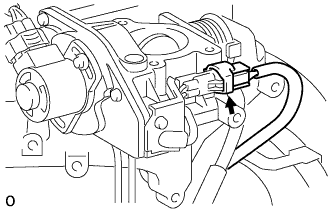 |
Connect the throttle open switch connector.
| 5. INSTALL INTAKE AIR CONNECTOR SUB-ASSEMBLY |
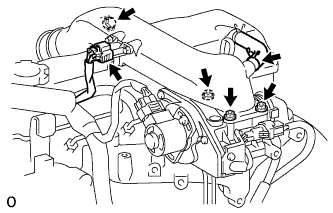 |
Install a new gasket and intake air connector with the bolt and 3 nuts.
Connect the turbo pressure sensor connector.
Connect the ventilation hose.
| 6. INSTALL AIR CLEANER HOSE NO.2 |
Install the air cleaner hose No.2 with the clamp.
| 7. INSPECT TIMING BELT |
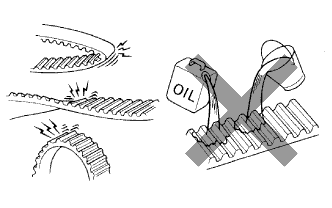 |
If there is premature parting:
If the belt teeth are cracked or damaged, check if either camshaft is locked.
If there is noticeable wear or cracks on the belt face, check if there are nicks on the side of the idler pulley lock and water pump.
If there is wear or damage to only one side of the belt, check the belt guide and the alignment of each pulley.
If there is noticeable wear on the belt teeth:
| 8. INSPECT TIMING BELT IDLER SUB-ASSEMBLY |
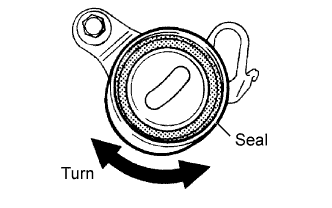 |
Visually check the seal portion of the timing belt idler No.1 for oil leakage.
If leakage is found, replace the timing belt idler No.1.
Check that the timing belt idler No.1 turns smoothly.
If necessary, replace the timing belt idler No.1.
| 9. INSPECT IDLER TENSION SPRING |
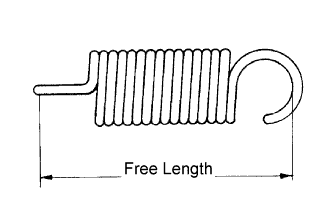 |
Measure the free length of the tension spring.
Measure the tension of the tension spring at the specified installed length.
| 10. INSPECT WATER PUMP ASSEMBLY |
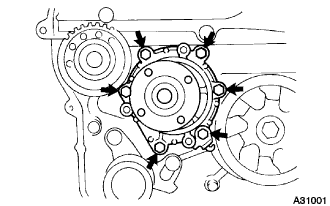 |
Remove the 6 bolts and tension spring bracket.
Remove the water pump and gasket.
| 11. SET NO.1 CYLINDER TO TDC/COMPRESSION |
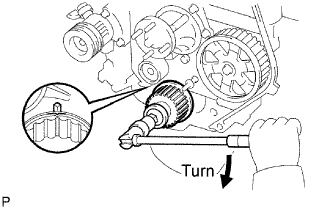 |
Using the crankshaft pulley bolt, align its groove with the timing pointer by turning the crankshaft clockwise.
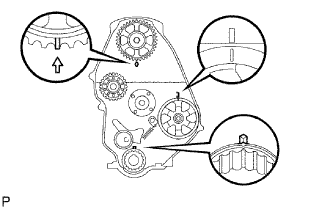 |
Set the timing and drive pulleys at each position.
| 12. INSTALL TIMING BELT |
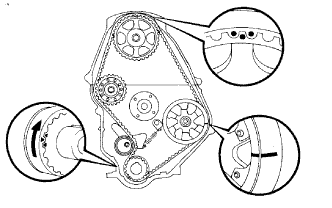 |
Remove any oil or water on each pulleys, and keep them clean.
Install the timing belt on the crankshaft timing and timing belt idlers.
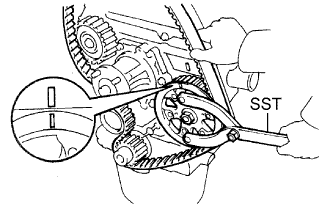 |
Using SST, slightly turn the injection pump drive pulley clockwise. Hang the timing belt on the pulley, and align the timing marks of the drive pulley and timing belt case.
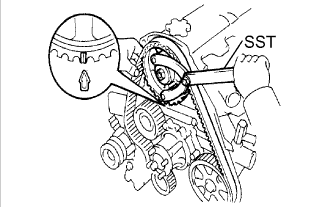 |
Using SST, slightly turn the camshaft timing pulley clockwise. Hang the timing belt on the timing pulley, and align the timing marks of the timing pulley and timing belt case.
Check that the timing belt has tension between the injection pump drive and camshaft timing pulleys.
Install the timing belt on the timing belt idler No.2.
| 13. CHECK VALVE TIMING |
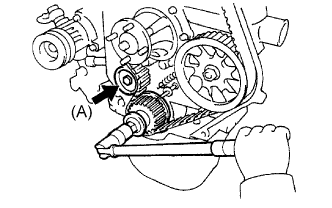 |
Loosen the timing belt idler No.1 bolt (A), and stretch the timing belt.
Slowly turn the crankshaft pulley 2 revolutions from TDC to TDC.
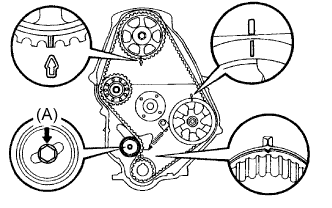 |
Check each pulley aligns with the timing marks as shown in the illustration.
If the timing marks do not align, remove the timing belt and reinstall it.
Tighten the timing belt idler No.1 bolt (A).
| 14. INSTALL TIMING BELT GUIDE |
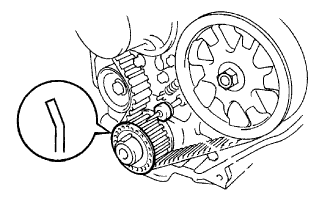 |
Install the belt guide with the cup side facing outward.
| 15. INSTALL TIMING CHAIN OR BELT COVER SUB-ASSEMBLY |
Remove the 2 nuts and wire harness clamp bracket.
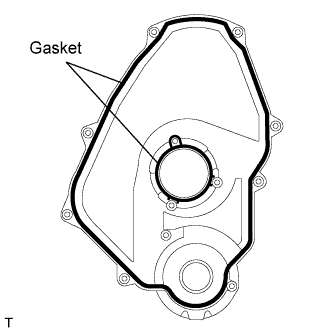 |
Install the 2 gaskets to the timing belt cover.
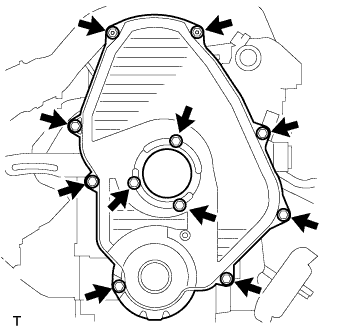 |
Install the timing belt cover with the 11 bolts.
Install the 2 nuts and wire harness clamp bracket.
| 16. INSTALL CRANKSHAFT PULLEY |
Align the pulley set key with the key groove of the pulley, and slide the pulley to the crankshaft.
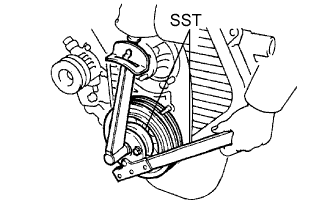 |
Using SST, install the pulley bolt.
| 17. INSTALL VANE PUMP DRIVE PULLEY |
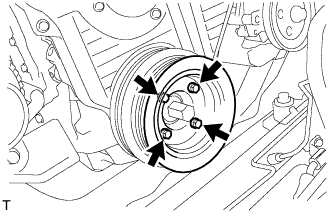 |
w/o Air conditioning:
Install the vane pump drive pulley and vane pump pulley spacer with the 4 bolts.
w/ Air conditioning:
Install the 2 vane pump drive pulleys with the 4 bolts.
| 18. INSTALL COMPRESSOR MOUNTING BRACKET NO.1 (W/ AIR CONDITIONING) |
Temporarily install the compressor mounting bracket with the 4 bolts.
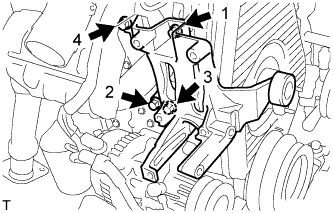 |
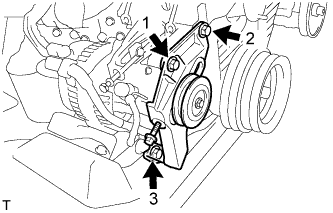
Using several steps, uniformly install and tighten the 4 bolts in the sequence shown in the illustration.
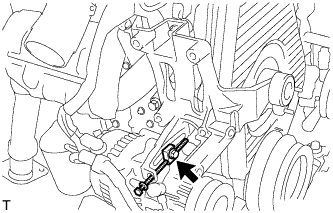 |
Temporarily tighten the bolt and spacer.
 |
Temporarily install the compressor mounting bracket with the 3 bolts.
Using several steps, uniformly install and tighten the 3 bolts in the sequence shown in the illustration.
| 19. INSTALL COMPRESSOR AND MAGNETIC CLUTCH (W/ AIR CONDITIONING) |
Temporarily install the compressor mounting bracket with the 4 bolts.
|
Using several steps, uniformly install and tighten the 4 bolts in the sequence shown in the illustration.
|
Temporarily tighten the bolt and spacer.
|
Temporarily install the compressor mounting bracket with the 3 bolts.
Using several steps, uniformly install and tighten the 3 bolts in the sequence shown in the illustration.
| 20. TEMPORARILY TIGHTEN FAN PULLEY |
Temporarily tighten the fan pulley with the 4 bolts.
| 21. INSTALL FAN AND GENERATOR V BELT (W/O AIR CONDITIONING) |
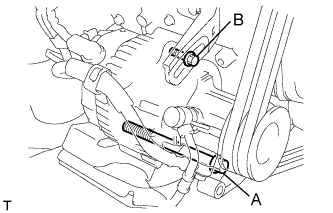 |
Install the V belt.
Using a bar, adjust the tension of the V belt.
Tighten the bolts A and B.
Check the tension of the V belt. (Click here)
| 22. INSTALL FAN AND GENERATOR V BELT (W/ AIR CONDITIONING) |
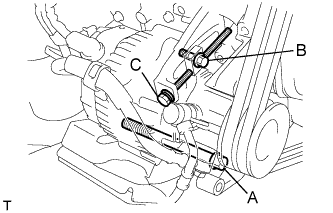 |
Install the V belt.
Tightening the bolt C, adjust the tension of the V belt.
Tighten the bolts A and B.
Check the tension of the V belt. (Click here)
| 23. TIGHTEN FAN PULLEY |
Install the 4 nuts, fan spacer and fan pulley.
| 24. INSTALL V (COOLER COMPRESSOR TO CRANKSHAFT PULLEY) BELT NO.1 (W/ AIR CONDITIONING) |
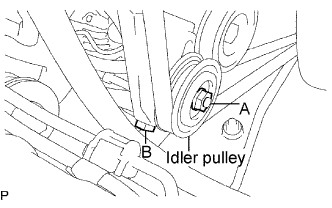 |
Install the V belt.
Tightening the bolt B, adjust the tension of the V belt.
Tighten nut A.
Check the tension of the V belt. (Click here)
| 25. INSTALL VANE PUMP V BELT |
 |
Install the V belt.
Using a bar, adjust the tension of the V-ribbed belt.
Tighten the bolt A and nut B.
Check the tension of the V belt. (Click here)
| 26. ADD ENGINE COOLANT |
Close the engine drain plug.
Close the radiator drain cock plug.
Slowly fill the cooling system with coolant.
Slowly pour coolant into the radiator reserve tank until it reaches the FULL line.
Install the radiator cap to the radiator reserve tank.
Press the inlet and outlet radiator hoses several times by hand while warming up the engine.
Stop the engine, and wait until the engine coolant cools down.
Add coolant to the FULL line of the radiator reservoir.
| 27. CHECK FOR ENGINE COOLANT LEAKS |
Check that the engine coolant level is between the LOW and FULL lines when the engine is cold. If the engine coolant is low, check for leaks and add "TOYOTA Super Long Life Coolant (SLLC)" or similar high quality ethylene glycol based non-silicate, non-amine, non-nitrite and non-borate coolant with long-life hybrid organic acid technology to the FULL line.
| 28. CHECK FOR FUEL LEAKS |
Check that there are no fuel leaks anywhere on the fuel system after doing maintenance.