 |
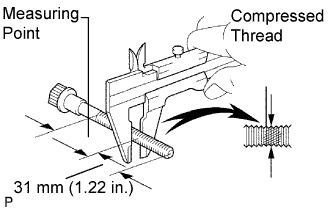
Using vernier calipers, measure the minimum outer diameter of the compressed thread at the measuring point.
- Standard outer diameter:
- 11.80 to 12.00 mm (0.4646 to 0.4724 in.)
- Minimum outer diameter:
- 11.60 mm (0.4567 in.)
CYLINDER HEAD > INSTALLATION |
| 1. INSPECT CYLINDER HEAD SET BOLT |
|
Using vernier calipers, measure the minimum outer diameter of the compressed thread at the measuring point.
| 2. INSTALL CYLINDER HEAD GASKET |
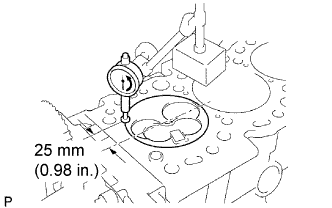 |
Check piston protrusion for each cylinder.
Clean the cylinder block with solvent.
Set the piston of the cylinder to be measured to slightly before TDC.
Place a dial indicator on the cylinder block, and set the measuring tip as shown in the illustration.
Set the dial indicator at 0 mm (0 in.).
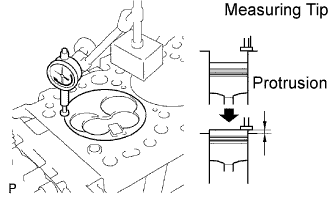 |
Find where the piston head protrudes most by slowly turning the crankshaft clockwise and counterclockwise.
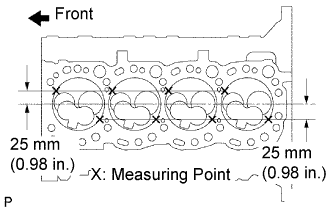 |
Measure the protrusion of each cylinder at 2 places as shown in the illustration, making a total of 8 measurements.
For the piston protrusion value of each cylinder, use the average of the 2 measurements of each cylinder.
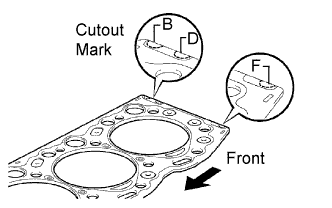 |
Select a new cylinder head gasket.
| Mark B | 1.40 to1.50 mm (0.0551 to 0.0591 in.) |
| Mark D | 1.50 to 1.60 mm (0.0591 to 0.0630 in.) |
| Mark F | 1.60 to 1.70 mm (0.0630 to 0.0669 in.) |
Select the largest piston protrusion value from the measurements made, then select a new appropriate gasket according to the table below.
| Piston protrusion mm (in.) | Gasket size |
| 0.68 to 0.77 (0.0268 to 0.0303) | Use B |
| 0.78 to 0.87 (0.0307 to 0.0343) | Use D |
| 0.88 to 0.97 (0.0346 to 0.0382) | Use F |
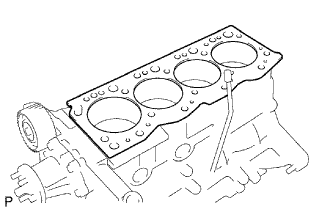 |
Place a new cylinder head gasket in position on the cylinder block.
| 3. INSTALL CYLINDER HEAD SUB-ASSEMBLY |
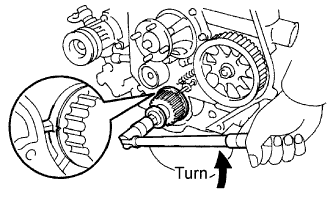 |
Using the crankshaft pulley bolt, turn the crankshaft 90° counterclockwise, and align the timing mark of the crankshaft timing pulley with the protrusion of the timing belt case.
Place the cylinder head in position on the cylinder head gasket.
 |
Install cylinder head bolts.
Apply a light coat of engine oil to the threads and under the heads of the cylinder head bolts.
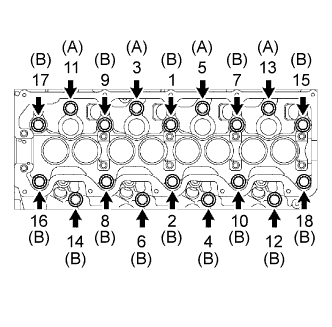
Install and uniformly tighten the 18 cylinder head bolts, in several steps, in the sequence shown.
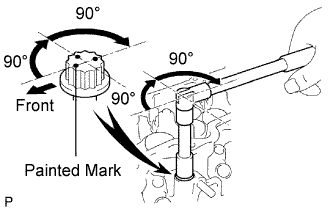 |
Mark the front of the cylinder head bolt with paint.
Retighten the cylinder head bolts 90° in the numerical order shown.
Retighten the cylinder head bolts by an additional 90°.
Check that the painted mark is now facing rearward.
| 4. INSTALL CYLINDER HEAD COVER SUB-ASSEMBLY |
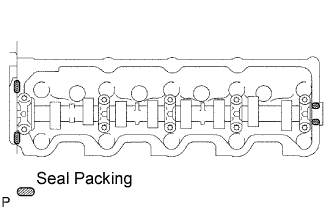 |
Remove the any oil packing (FIPG) material.
Apply seal packing to the cylinder head as shown in the illustration.
Install the gasket to the cylinder head cover.
Install the cylinder head cover with the 9 bolts and nut. Uniformly tighten the bolts and nuts in several steps.
Connect the ventilation hose.
| 5. INSTALL GLOW PLUG NO.1 CONNECTOR |
| 6. INSTALL INJECTION PIPE SET |
Connect the 2 lower clamps on the intake manifold.
Install the 4 injection pipes.
Secure the injection pipes with the 2 upper pipe clamps and 2 nuts.
| 7. INSTALL EXHAUST PIPE SUB-ASSEMBLY FRON NO.1 (for Long Wheelbase) |
Install a new gasket and exhaust pipe sub-assembly front No.1 with the 3 bolts.
Tighten the clamp bolt, and install the exhaust pipe support bracket No.1 to the exhaust pipe sub-assembly front No.1.
| 8. INSTALL EXHAUST PIPE SUB-ASSEMBLY FRON NO.1 |
Install a new gasket and exhaust pipe sub-assembly front No.1 with the 3 bolts.
Tighten the clamp bolt, install the exhaust pipe support bracket No.1 to the exhaust pipe sub-assembly front No.1.
| 9. INSTALL EXHAUST PIPE SUB-ASSEMBLY FRONT NO.2 (for Long Wheelbase) |
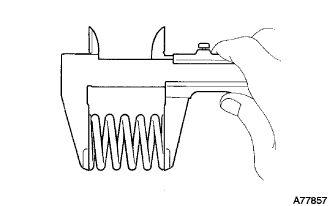 |
Inspect the compression spring.
Using vernier calipers, measure the free length of the compression springs.
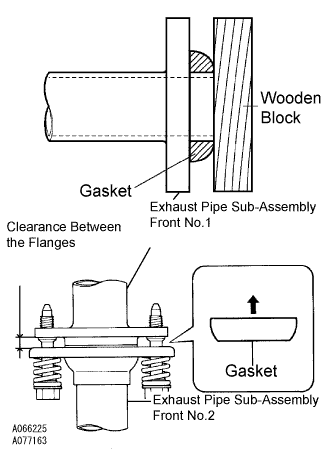 |
Install the gasket.
Fully insert a new gasket to the exhaust pipe sub-assembly front No.1 by hand.
Using a wooden block, uniformly strike the gasket so that the gasket and exhaust pipe sub-assembly front No.1 are properly fit.
Connect the exhaust pipe support, and install a new gasket and the exhaust pipe sub-assembly front No.2 with the 4 bolts, 2 nuts, and 2 compression springs.
| 10. INSTALL EXHAUST PIPE SUB-ASSEMBLY FRONT NO.2 (for Super Long Wheelbase) |
|
Inspect the compression spring.
Using vernier calipers, measure the free length of the compression springs.
|
Install the gasket.
Fully insert a new gasket to the exhaust pipe sub-assembly front No.1 by hand.
Using a wooden block, uniformly strike the gasket so that the gasket and exhaust pipe sub-assembly front No.1 are properly fit.
Connect the exhaust pipe support, and install a new gasket and the exhaust pipe sub-assembly front No.2 with the 4 bolts, 2 nuts, and 2 compression springs.
| 11. INSTALL EXHAUST MANIFOLD HEAT INSULATOR NO.1 |
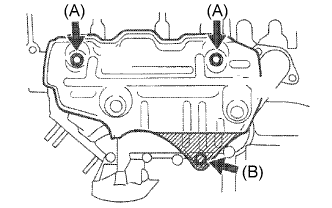 |
Install the heat insulator with the 3 bolts.
| 12. INSTALL VENTURI ASSEMBLY |
Install a new gasket and venturi.
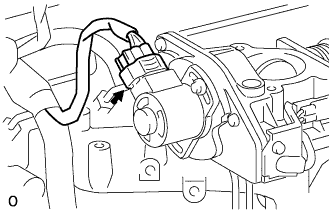 |
Connect the throttle control motor connector.
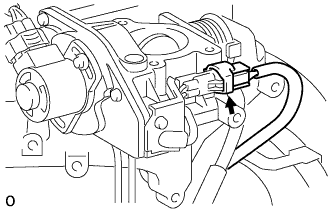 |
Connect the throttle open switch connector.
| 13. INSTALL INTAKE AIR CONNECTOR SUB-ASSEMBLY |
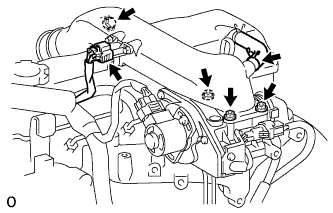 |
Install a new gasket and intake air connector with the bolt and 3 nuts.
Connect the turbo pressure sensor connector.
Connect the ventilation hose.
| 14. CONNECT AIR CLEANER HOSE NO.2 |
Install the air cleaner hose No.2 with the clamp.
| 15. INSTALL TIMING BELT |
| 16. CONNECT CABLE TO NEGATIVE BATTERY TERMINAL |
| 17. BLEED AIR FROM FUEL SYSTEM |
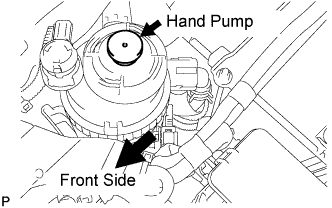 |
Using the hand pump, bleed air from the fuel system until pumping becomes difficult.
| 18. ADD ENGINE COOLANT |
Close the engine drain plug.
Close the radiator drain cock plug.
Slowly fill the cooling system with coolant.
Slowly pour coolant into the radiator reserve tank until it reaches the FULL line.
Install the radiator cap to the radiator reserve tank.
Press the inlet and outlet radiator hoses several times by hand while warming up the engine.
Stop the engine, and wait until the engine coolant cools down.
Add coolant to the FULL line of the radiator reservoir.
| 19. CHECK FOR ENGINE COOLANT LEAKS |
Fill the radiator with coolant and attach a radiator cap tester to the radiator.
Warm up the engine.
Using a radiator cap tester, increase the pressure inside the radiator to 118 kPa (1.2 kgf/cm2, 17.1 psi), and check that the pressure does not drop.
| 20. CHECK FOR FUEL LEAKS |
Check that there are no fuel leaks anywhere on the fuel system after doing maintenance.
| 21. CHECK FOR EXHAUST GAS LEAKS |
| 22. CHECK IDLE SPEED |
Warm up the engine.
When using an intelligent tester:
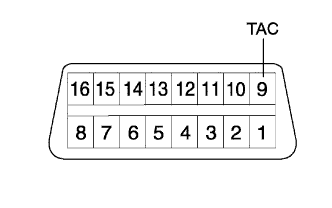
Connect the intelligent tester to the DLC3.
 |
When not using an intelligent tester:
Using SST, connect the tachometer test probe to terminal 9 (TAC) of the DLC3.
Check the idle speed.
| 23. INSPECT MAXIMUM ENGINE SPEED |
Start the engine.
Depress the accelerator pedal all the way.
Check the maximum speed.
| 24. PERFORM INITIALIZATION |