INSTALLATION
Removal / installation · Vehicles built from Jan 2017
Versions by build date: Oct 2014 – Mar 2016 Apr 2016 – Dec 2016 from Jan 2017
| 1.
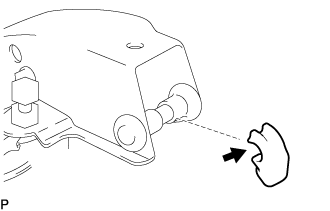
INSTALL CLUTCH PEDAL SPRING HOLDER |
 |
- Apply MP grease to the inside of a new clutch pedal spring holder.
Text in Illustration
 
|
MP grease
|
Install the clutch pedal spring holder.
| 2.
INSTALL CLUTCH PEDAL PAD |
|
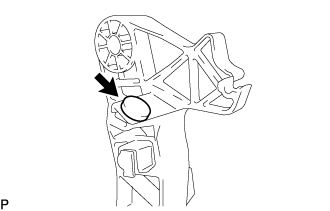
Install the clutch pedal pad to the clutch pedal.
| 3.
INSTALL CLUTCH PEDAL NO.1 CUSHION |
|
- Using needle-nose pliers, install the clutch pedal No.1 cushion to the clutch pedal.
| 4.
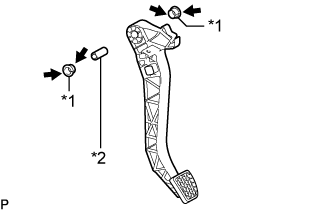
INSTALL CLUTCH PEDAL SHAFT COLLAR |
|
- Apply MP grease to the inner, outer and end surfaces of 2 new clutch pedal bushings.
Text in Illustration
*1
|
Clutch Pedal Bushing
|
*2
|
Clutch Pedal Shaft Collar
|
|
MP grease
|
Install the clutch pedal shaft collar and 2 clutch pedal bushings to the clutch pedal.
| 5.
INSTALL CLUTCH PEDAL SUB-ASSEMBLY |
|
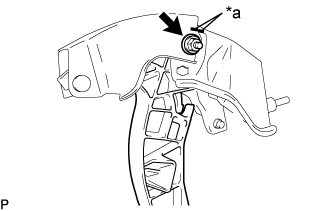
- Align the matchmarks on the clutch pedal and clutch pedal support.
Text in Illustration
*a
|
Matchmarks
|
Install the clutch pedal to the clutch pedal support with the pedal shaft, washer, and nut.
-
Torque:
- 34 N*m{
350 kgf*cm
, 25 ft.*lbf
}
| 6.
INSTALL TURN OVER SPRING SEAT COMPRESSION SPRING |
|
- Apply MP grease to the sliding portion of the spring.
Text in Illustration
|
MP grease
|
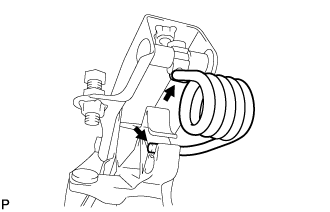
Install the turn over spring seat compression spring.
| 7.
INSTALL CLUTCH PEDAL SPRING (for 2KD-FTV) |
|
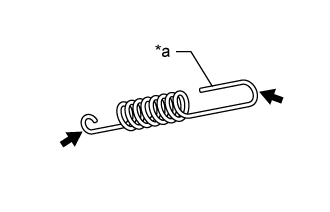
- Apply MP grease No.2 to the sliding portion of the spring.
Text in Illustration
*a
|
Sliding end
|
|
MP grease
|
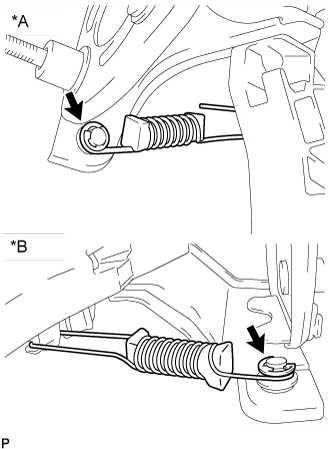
- Install the clutch pedal spring.
Text in Illustration
*A
|
for LHD
|
*B
|
for RHD
|
- NOTICE:
- Be sure to install the spring with its end facing upward.
Install a new E-ring.
| 8.
INSTALL CLUTCH PEDAL STOPPER BOLT (w/o Clutch Pedal Switch Assembly) |
|
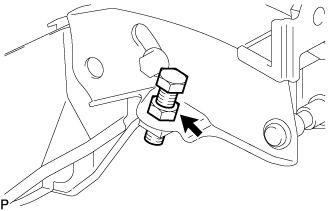
- Install the clutch pedal stopper bolt together with the nut so that its end touches the clutch pedal No.1 cushion.
- HINT:
- Tighten the lock nut to the specified torque when adjusting the clutch pedal.
| 9.
INSTALL CLUTCH SWITCH ASSEMBLY (w/ Clutch Pedal Switch Assembly)
|
|
Using a 14 mm union nut wrench, install the clutch switch assembly.
-
Torque:
- 16 N*m{
160 kgf*cm
, 12 ft.*lbf
}
- NOTICE:
- Use the formula to calculate special torque values for situations where a union nut wrench is combined with a torque wrench (Click here).
Connect the clutch switch connector.
| 10.
INSTALL CLUTCH PEDAL SUPPORT SUB-ASSEMBLY |
|
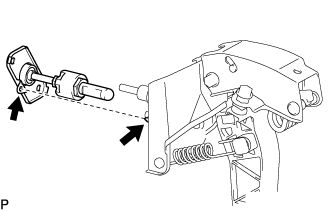
- Aligning the clip (clutch pedal support side) with the hole of the bracket on the vehicle, install the clutch pedal support.
- NOTICE:
- Make sure that the clip (clutch pedal support side) is securely engaged in the hole of the bracket on the vehicle.
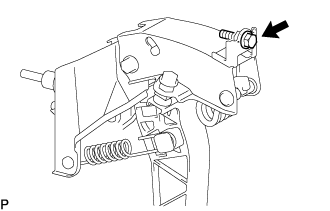
- Install the clutch pedal support with the bolt.
-
Torque:
- 31 N*m{
316 kgf*cm
, 23 ft.*lbf
}
- Apply MP grease to the sliding portions of the push rod clevis and clutch pedal.
Text in Illustration
|
MP grease
|
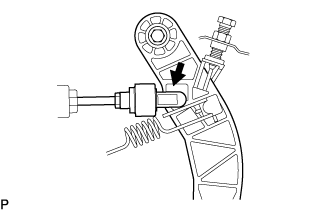
Install the push rod clevis to the cutout of the pedal from the right side of the vehicle and push it downward.
- NOTICE:
- Check that the push rod cannot be turned 30° or more in order to confirm that the clevis is securely engaged in the pedal.
w/ Clutch Pedal Switch Assembly:
Connect the clutch switch connector and attach the wire harness clamp.
| 11.
INSTALL CLUTCH MASTER CYLINDER ASSEMBLY |
|
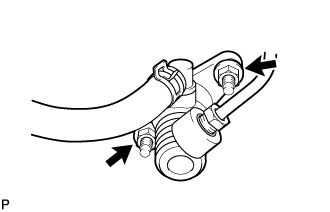
- Install the clutch master cylinder with the 2 nuts.
-
Torque:
- 14 N*m{
145 kgf*cm
, 10 ft.*lbf
}
| 12.
INSPECT AND ADJUST CLUTCH PEDAL HEIGHT |
|
(Click here)
| 13.
INSTALL NO.1 AIR DUCT (for RHD) |
|
| 14.
INSTALL WASHER TANK AND PUMP ASSEMBLY (for LHD)
|
|
w/ Rear Wiper:
Connect the 2 connectors and 2 washer hoses.
w/o Rear Wiper:
Connect the connector and washer hose.
Attach the hose clamp.
Install the windshield washer motor and pump assembly with the 2 bolts.
-
Torque:
- 5.4 N*m{
55 kgf*cm
, 48 in.*lbf
}
Connect the connector to the windshield washer motor and pump assembly.
| 15.
INSTALL INSTRUMENT PANEL FINISH PANEL LOWER CENTER
|
|
Attach the 8 claws to install the instrument panel finish panel lower center.
| 16.
INSTALL SHIFTING HOLE COVER ASSEMBLY
|
|
for Manual Transmission:
Attach the 6 claws to install the shifting hole cover assembly.
for Automatic Transmission:
Attach the 8 claws to install the shifting hole cover assembly.
| 17.
INSTALL SHIFT LEVER KNOB |
|
| 18.
INSTALL PARKING BRAKE HOLE COVER
|
|
Attach the 6 claws to install the parking brake hole cover.
| 19.
INSTALL NO.1 INSTRUMENT PANEL UNDER COVER SUB-ASSEMBLY
|
|
Attach the 3 claws to instrument panel under cover sub-assembly No. 1.
Install the the 2 clips.
| 20.
INSTALL INSTRUMENT PANEL FINISH PANEL LOWER
|
|
Connect the fuel lid lock control cable and bonnet (hood) control cable assembly to the instrument panel finish lower.
Attach the 4 clips to install the instrument panel finish panel lower.
Install the 2 clips.
| 21.
CONNECT BATTERY NEGATIVE CABLE |
|
| 22.
PERFORM INITIALIZATION |
|
Some systems need initialization when disconnecting the cable from the negative battery terminal. (Click here)