INSTALLATION
Removal / installation · Vehicles built Oct 2014 – Mar 2016
Versions by build date: Oct 2014 – Mar 2016 Apr 2016 – Dec 2016 from Jan 2017
| 1.
INSTALL CLUTCH RELEASE CYLINDER ASSEMBLY |
 |
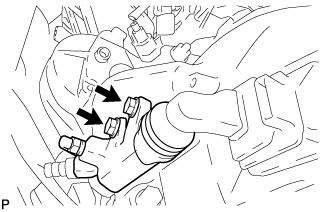
- Install the clutch release cylinder with the 2 bolts.
-
Torque:
- 12 N*m{
120 kgf*cm
, 9 ft.*lbf
}
| 2.
INSTALL CLUTCH HOSE NO.1 |
|
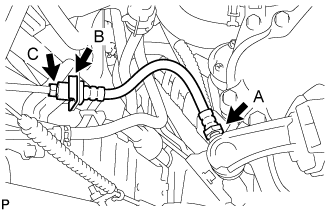
- Using a union nut wrench, install the clutch hose No.1 to the clutch release cylinder (Procedure A).
-
Torque:
- 23 N*m{
235 kgf*cm
, 17 ft.*lbf
}
- NOTICE:
- Use the formula to calculate special torque value for situations where a union nut wrench is combined with a torque wrench (Click here).
Connect the clutch hose No.1 to the bracket with a new clip (Procedure B).
Using a union nut wrench, connect the clutch tube to the clutch hose No.1 (Procedure C).
-
Torque:
- 25 N*m{
255 kgf*cm
, 18 ft.*lbf
}
- NOTICE:
- Use the formula to calculate special torque value for situations where a union nut wrench is combined with a torque wrench (Click here).
| 3.
ADD BRAKE FLUID
|
|
- Fluid:
- SAE J1703 or FMVSS No. 116 DOT3 or equivalent
| 4.
BLEED CLUTCH LINE |
|
Fill the brake reservoir tank with brake fluid and bleed the clutch system.
-
Torque:
- 11 N*m{
110 kgf*cm
, 8 ft.*lbf
}
| 5.
INSPECT FOR BRAKE FLUID LEAK |
|
- HINT:
- Check for leakage in the clutch system.
| 6.
INSPECT BRAKE FLUID LEVEL IN RESERVOIR
|
|
Check the fluid level and add fluid if necessary.
- Fluid:
- SAE J1703 or FMVSS No.116 DOT3 or equivalent