INSTALLATION
Removal / installation · Vehicles built from Jan 2015
- HINT:
- Perform "Inspection After Repairs" after replacing the camshaft, No. 2 camshaft or cylinder head sub-assembly (Click here).
| 1. INSTALL CYLINDER HEAD GASKET |

Remove any old packing (FIPG) material and be careful not to drop any oil on the contact surfaces of the cylinder head sub-assembly or cylinder block.
Apply seal packing to a new cylinder head gasket as shown in the illustration.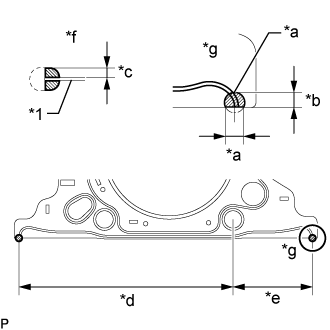

- Seal Packing:
- Toyota Genuine Seal Packing Black, Three Bond 1207 B or equivalent.
Text in Illustration *1
Cylinder Head Gasket
*a
7.0 to 9.0 mm (0.276 to 0.354 in.)
*b
5.0 to 7.0 mm (0.197 to 0.276 in.)
*c
3.0 to 5.0 mm (0.118 to 0.197 in.)
*d
166.25 mm (6.55 in.)
*e
62.25 mm (2.46 in.)
*f
Side View
*g
View A
- NOTICE:
- Be sure to clean and degrease the contact surfaces.
- Apply seal packing to the bead on the cylinder head gasket.
- Install the cylinder head gasket within 3 minutes and tighten the cylinder head set bolts within 15 minutes after applying seal packing.
- Be sure to clean and degrease the contact surfaces.
Place the gasket on the cylinder block surface with the lot No. stamp facing upward.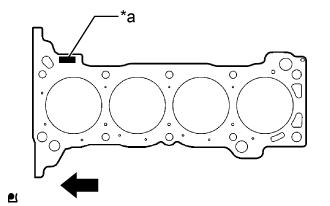
Text in Illustration *a
Lot No.

Engine Front
- NOTICE:
- Remove any oil from the contact surface.
- Make sure that the cylinder head gasket is installed in the correct direction.
- Remove any oil from the contact surface.
| 2. INSTALL CYLINDER HEAD SUB-ASSEMBLY |
- HINT:
- Perform "Inspection After Repairs" after replacing the cylinder head sub-assembly (Click here).
- The cylinder head set bolts are tightened in 3 successive steps.
- Perform "Inspection After Repairs" after replacing the cylinder head sub-assembly (Click here).
Place the cylinder head sub-assembly on the cylinder block.
- NOTICE:
- Make sure that no oil is on the mounting surface of the cylinder head sub-assembly.
- Place the cylinder head sub-assembly on the cylinder block gently so as not to damage the gasket with the bottom part of the head.
- Make sure that no oil is on the mounting surface of the cylinder head sub-assembly.
Install the plate washers to the cylinder head set bolts.
Apply a light coat of engine oil to the threads and under the heads of the cylinder head set bolts.
Step 1: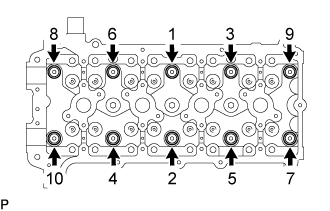
Using several steps, install and uniformly tighten the 10 cylinder head set bolts with plate washers in the sequence shown in the illustration.- Torque:
- 39 N*m{ 398 kgf*cm , 29 ft.*lbf }
Mark the front of each cylinder head set bolt head with paint.
Step 2:
Tighten the cylinder head set bolts 90° in the sequence shown in step 1.
Step 3:
Tighten the cylinder head set bolts another 90° in the sequence shown in step 1.
Check that the paint marks are now at a 180° angle to the front.
| 3. INSTALL VALVE STEM CAP |
Apply a light coat of engine oil to the valve stem ends.
Install the 16 valve stem caps to the cylinder head sub-assembly.
- NOTICE:
- Do not drop the valve stem caps into the cylinder head sub-assembly.
| 4. INSTALL VALVE LASH ADJUSTER ASSEMBLY |
Inspect each valve lash adjuster assembly before installing it (Click here).
Install the 16 valve lash adjuster assemblies to the cylinder head sub-assembly.
- NOTICE:
- Install each valve lash adjuster assembly to the same place it was removed from.
| 5. INSTALL NO. 1 VALVE ROCKER ARM SUB-ASSEMBLY |
Apply clean engine oil to the valve lash adjuster assembly tips and valve stem cap surfaces.
Install the 16 No. 1 valve rocker arm sub-assemblies as shown in the illustration.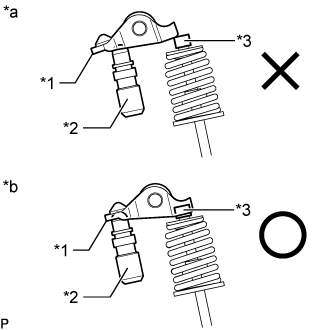
Text in Illustration *1
No. 1 Valve Rocker Arm Sub-assembly
*2
Valve Lash Adjuster Assembly
*3
Valve Stem Cap
*a
INCORRECT
*b
CORRECT
- NOTICE:
- Install the valve stem cap, valve lash adjuster assembly and No. 1 valve rocker arm sub-assembly to the same places they were removed from.
| 6. INSTALL CAMSHAFTS |
- HINT:
- Perform "Inspection After Repairs" after replacing the camshaft or No. 2 camshaft (Click here).
Apply clean engine oil to the camshaft cams and cylinder head journals.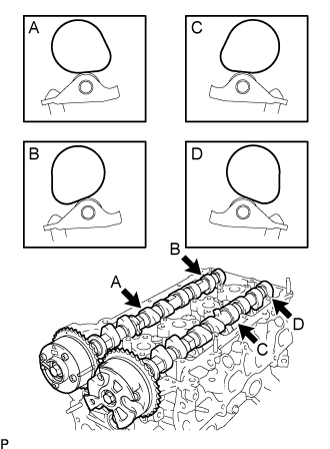
Position the camshaft and No. 2 camshaft as shown in the illustration.
Make sure that the No. 1 valve rocker arm sub-assemblies are installed as shown in the illustration.
Text in Illustration *1
No. 1 Valve Rocker Arm Sub-assembly
*2
Valve Lash Adjuster Assembly
*3
Valve Stem Cap
*a
INCORRECT
*b
CORRECT
| 7. INSTALL CAMSHAFT BEARING CAP |
Temporarily install the No. 1 camshaft bearing cap.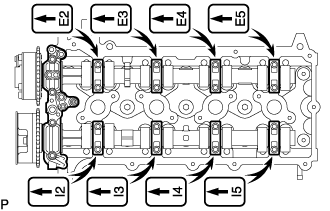
Confirm the location for each No. 2 camshaft bearing cap and install each one to the proper location.
Uniformly temporarily install the 20 bolts while keeping the camshaft level.
Tighten the 20 bolts in the order shown in the illustration.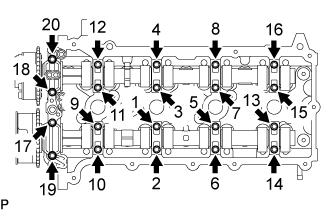
- Torque:
- 16 N*m{ 158 kgf*cm , 11 ft.*lbf }
| 8. INSTALL CHAIN SUB-ASSEMBLY |
| 9. INSTALL MANUAL TRANSMISSION ASSEMBLY (for Manual Transmission) |
| 10. INSTALL AUTOMATIC TRANSMISSION ASSEMBLY (for Automatic Transmission) |