INSTALLATION
Removal / installation · Vehicles built from Oct 2014
| 1. INSTALL TIMING GEAR CASE OR TIMING CHAIN CASE OIL SEAL |

Apply MP grease to the lip of a new timing chain case oil seal.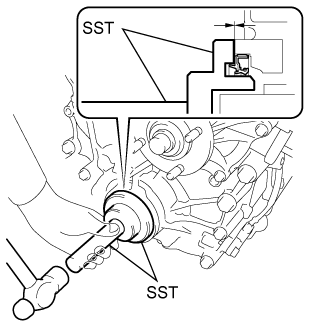

- NOTICE:
- Do not allow foreign matter to contact the lip of the timing chain case oil seal.
- Do not allow MP grease to contact the dust seal.
- Do not allow foreign matter to contact the lip of the timing chain case oil seal.
Temporarily install the timing chain case oil seal to the timing chain or belt cover sub-assembly.
Using SST and a hammer, tap in the timing chain case oil seal until its surface is flush with the chain cover edge.
- SST
- 09223-75010
09950-70010 (09951-07100)
- NOTICE:
- Keep the lip free from foreign matter.
- Do not tap the oil seal at an angle.
- Keep the lip free from foreign matter.
| 2. INSTALL CRANKSHAFT PULLEY |
Align the pulley set key with the key groove of the pulley, and slide on the pulley.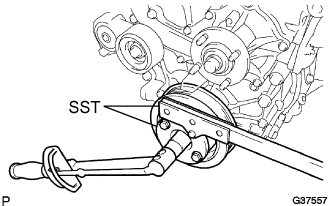
Using SST, install a new crankshaft pulley bolt.
- SST
- 09213-54015
(91651-60855)
09330-00021
- Torque:
- 260 N*m{ 2,651 kgf*cm , 192 ft.*lbf }
- NOTICE:
- Do not reuse the pulley bolt.
| 3. INSTALL FAN & GENERATOR V BELT |
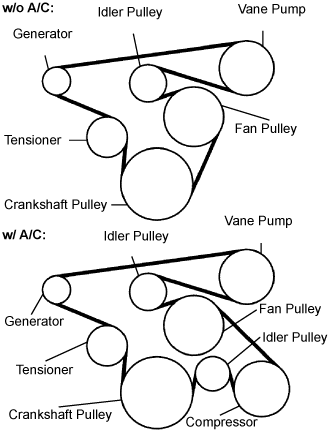 |
Install the drive belt to the pulleys except the drive belt tensioner pulley.
Use the hexagon-shaped part indicated by the arrow in the illustration to move the tensioner pulley downward and then install the drive belt to the tensioner pulley.
- NOTICE:
- The backside of the drive belt should face the tensioner pulley.
- Check that the drive belt is properly set to each pulley.
- The backside of the drive belt should face the tensioner pulley.
After a new belt has been installed, check that the tensioner indicator mark is within range A shown in the illustration.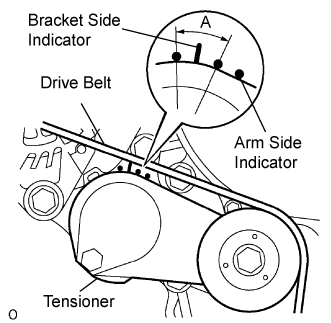
| 4. INSTALL ENGINE SERVICE HOLE SUB COVER SUB-ASSEMBLY |
Install the engine service hole sub cover with the 5 bolts.
- Torque:
- 13 N*m{ 133 kgf*cm , 10 ft.*lbf }
| 5. INSTALL FRONT DOOR SCUFF PLATE RH |
| 6. INSTALL FRONT SEAT ASSEMBLY RH (for Hi-back Seat Type) |
Perform the same procedure as above on the opposite side. (Click here)
| 7. INSTALL FRONT SEAT ASSEMBLY RH (for Low-back Seat Type) |
Perform the same procedure as above on the opposite side. (Click here)
| 8. INSPECT ENGINE OIL LEAKS |
| 9. INSTALL ENGINE UNDER COVER NO.1 (w/ Engine Under Cover No.1) |
- Torque:
- 13 N*m{ 133 kgf*cm , 10 ft.*lbf }