REMOVAL
Removal / installation · Vehicles built from Oct 2014
| 1. REMOVE FRONT SEAT ASSEMBLY RH (for Hi-back Seat Type) |

Perform the same procedure as above on the opposite side. (Click here)
| 2. REMOVE FRONT SEAT ASSEMBLY RH (for Low-back Seat Type) |
Perform the same procedure as above on the opposite side. (Click here)
| 3. REMOVE FRONT DOOR SCUFF PLATE RH |
| 4. REMOVE ENGINE SERVICE HOLE SUB COVER SUB-ASSEMBLY |
Roll up the carpet, and remove the 5 bolts and engine service hole sub cover.
| 5. REMOVE ENGINE UNDER COVER NO.1 (w/ Engine Under Cover No.1) |
| 6. REMOVE FAN & GENERATOR V BELT |
Use the hexagon-shaped part indicated by the arrow in the illustration to move the tensioner pulley downward and decrease the tension in the drive belt. Then remove the drive belt.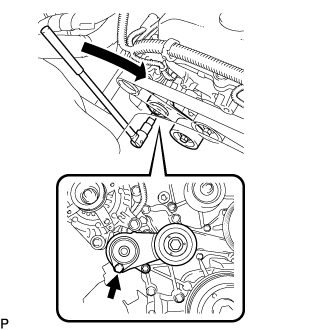

- NOTICE:
- When removing the drive belt, do not use the idle pulley's bolt.
- HINT:
- After removing the drive belt, move the tensioner upward to the maximum amount.
| 7. REMOVE CRANKSHAFT PULLEY |
Using SST, loosen the pulley bolt.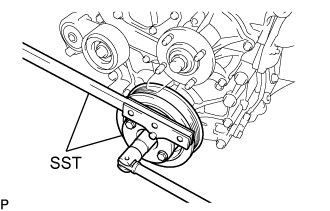
- SST
- 09213-54015
(91651-60855)
09330-00021
- HINT:
- Tighten the pulley bolt to 2 or 3 threads of the crankshaft.
Using SST, remove the pulley bolt and pulley.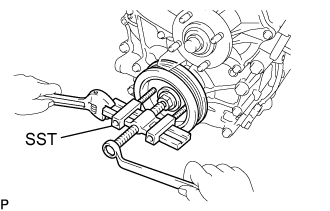
- SST
- 09950-50013
(09951-05010, 09952-05010, 09953-05010, 09954-05021)
- HINT:
- Apply grease to the thread and tip of the SST (center bolt) prior to use.
| 8. REMOVE TIMING GEAR CASE OR TIMING CHAIN CASE OIL SEAL |
Using a screwdriver with its tip taped, pry out the oil seal.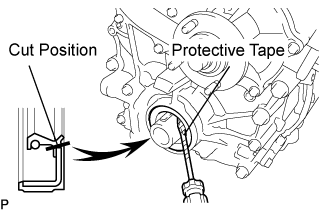
- NOTICE:
- After the removal, check the crankshaft for damage. If it is damaged, smooth the surface with 400-grit sandpaper.