INSTALLATION
Removal / installation · Vehicles built from Jan 2017
Versions by build date: Jan 2015 – Dec 2016 from Jan 2017
| 1. INSTALL NO. 2 CHAIN SUB-ASSEMBLY |

Install the No. 2 crankshaft timing sprocket as shown in the illustration.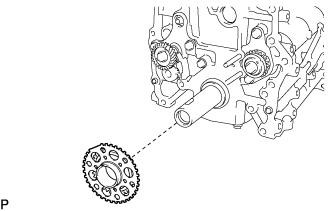

- NOTICE:
- Check that the No. 1 cylinder is at TDC and that the weights of the No. 1 and No. 2 balanceshafts are at the bottom side.
- HINT:
- Install the No. 2 crankshaft timing sprocket with the front mark facing forward.
As shown in the illustration, install the No. 2 chain sub-assembly on the No. 2 crankshaft timing sprocket and No. 2 balanceshaft driven gear with the painted marks aligned with the timing marks on the sprocket and gear.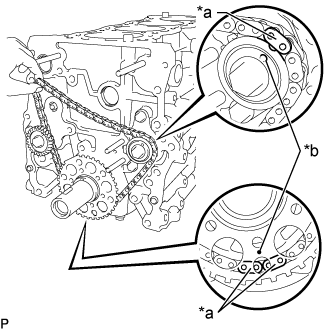
Text in Illustration *a
Mark Plate
*b
Timing Mark
Fit the other mark link of the No. 2 crankshaft timing sprocket behind the large timing mark of the balanceshaft drive gear sub-assembly.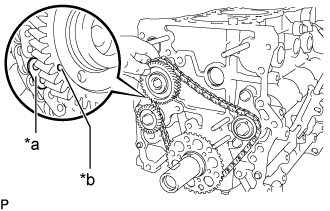
Text in Illustration *a
Mark Plate
*b
Timing Mark
Insert the balanceshaft drive gear shaft through the balanceshaft drive gear sub-assembly so that it fits into the thrust plate hole.
Align the small timing mark of the balanceshaft drive gear sub-assembly with the timing mark of the No. 1 balanceshaft driven gear.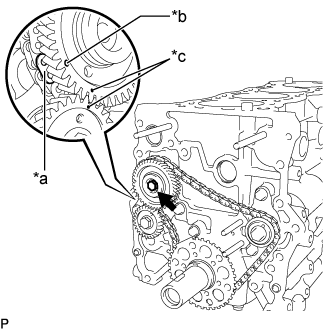
Text in Illustration *a
Mark Plate
*b
Large Timing Mark
*c
Small Timing Mark
Install the bolt to the balanceshaft drive gear sub-assembly and tighten it.
- Torque:
- 25 N*m{ 255 kgf*cm , 18 ft.*lbf }
Check that each timing mark is matched with the corresponding mark link.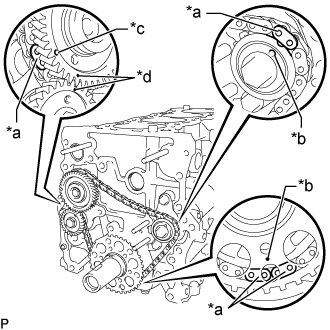
Text in Illustration *a
Mark Plate
*b
Timing Mark
*c
Large Timing Mark
*d
Small Timing Mark
- NOTICE:
- Check that the No. 1 cylinder is at TDC and that the weights of the No. 1 balanceshaft and No. 2 balanceshaft are at the bottom side.
| 2. INSTALL NO. 2 CHAIN TENSIONER ASSEMBLY |
Install the No. 2 chain tensioner assembly with the nut.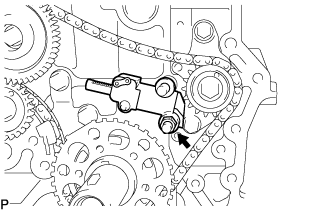
- Torque:
- 18 N*m{ 184 kgf*cm , 13 ft.*lbf }
- NOTICE:
- Assemble the No. 2 chain tensioner assembly with the pin installed, then remove the pin after assembly. When doing this, do not push the chain vibration damper against the No. 2 chain sub-assembly.
Move the stopper plate downward to release the lock, and push the plunger deep into the tensioner.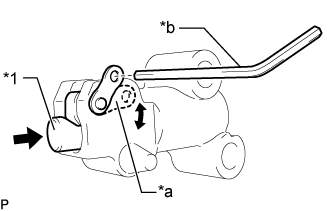
Text in Illustration *1
Plunger
*a
Stopper Plate
*b
Hexagon Wrench
Move the stopper plate upward to set the lock, and insert a hexagon wrench into the stopper plate hole.
| 3. INSTALL NO. 3 CHAIN VIBRATION DAMPER |
Install the No. 3 chain vibration damper with the 2 bolts.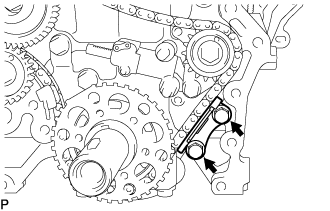
- Torque:
- 18 N*m{ 184 kgf*cm , 13 ft.*lbf }
| 4. INSTALL NO. 2 CHAIN VIBRATION DAMPER |
Install the No. 2 chain vibration damper with the bolt.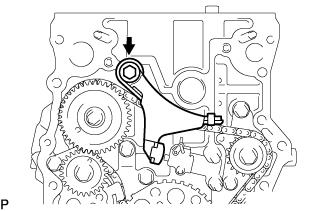
- Torque:
- 27 N*m{ 270 kgf*cm , 20 ft.*lbf }
| 5. INSTALL CRANKSHAFT TIMING GEAR OR SPROCKET |
Install the crankshaft timing gear or sprocket as shown in the illustration.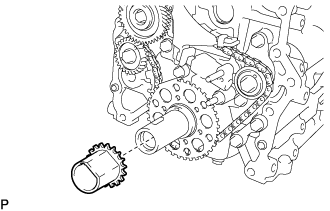
| 6. INSTALL NO. 1 CHAIN VIBRATION DAMPER |
Install the No. 1 chain vibration damper with the bolt and nut.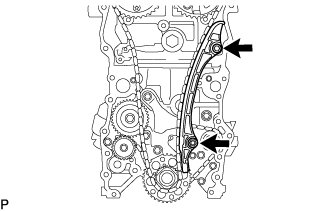
- Torque:
- for bolt:
- 21 N*m{ 214 kgf*cm , 15 ft.*lbf }
- for nut:
- 18 N*m{ 184 kgf*cm , 13 ft.*lbf }
Remove the pin from the No. 2 chain tensioner assembly and release the plunger.
| 7. INSTALL CHAIN SUB-ASSEMBLY |
As shown in the illustration, install the chain sub-assembly to the camshaft timing exhaust gear assembly and camshaft timing gear assembly with the mark plates aligned with the timing marks on the camshaft timing exhaust gear assembly and camshaft timing gear assembly.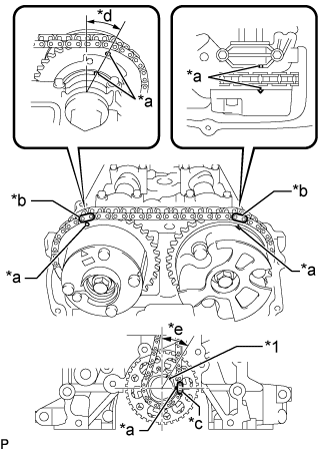
Text in Illustration *1
Key
*a
Timing Mark
*b
Mark Plate (Pink)
*c
Mark Plate (Yellow)
*d
Approximately 13°
*e
Approximately 30°
- HINT:
- The camshaft mark plate is pink.
- The crankshaft mark plate is yellow.
- The camshaft mark plate is pink.
Use a rope to tie the chain sub-assembly of the crankshaft timing gear or sprocket. Tie the rope near the crankshaft timing gear or sprocket.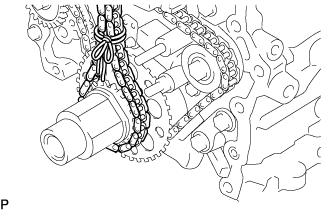
- NOTICE:
- After the chain tensioner has been installed, the rope must be removed.
- HINT:
- The rope is tied so that the chain sub-assembly will not jump a tooth.
| 8. INSTALL CHAIN TENSIONER SLIPPER |
Install the chain tensioner slipper with the bolt.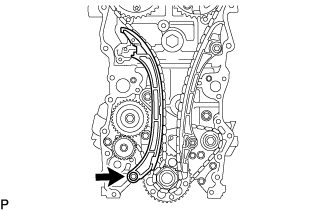
- Torque:
- 21 N*m{ 214 kgf*cm , 15 ft.*lbf }
| 9. INSTALL NO. 1 CHAIN TENSIONER ASSEMBLY |
Install a new gasket and the No. 1 chain tensioner assembly with the bolt and nut.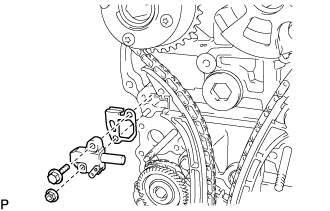
- Torque:
- 10 N*m{ 102 kgf*cm , 7 ft.*lbf }
Move the stopper plate upward to release the lock, and push the plunger deep into the tensioner.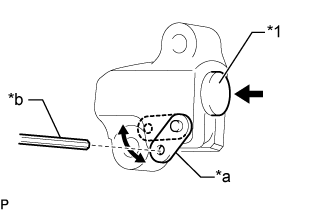
Text in Illustration *1
Plunger
*a
Stopper Plate
*b
Hexagon Wrench
Move the stopper plate downward to set the lock, and insert a hexagon wrench into the stopper plate hole.
| 10. INSTALL TIMING CHAIN GUIDE |
Install a new O-ring and the timing chain guide with the 2 bolts.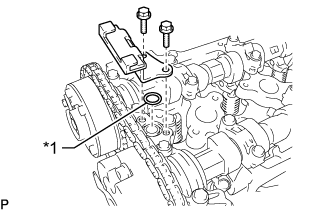
- Torque:
- 10 N*m{ 102 kgf*cm , 7 ft.*lbf }
Text in Illustration *1
O-ring
| 11. CHECK NO. 1 CYLINDER TO TDC/COMPRESSION |
Check that the No. 1 cylinder is set to TDC/compression.
Rotate the crankshaft two full rotations, and then check that all timing marks are in the position shown in the illustration.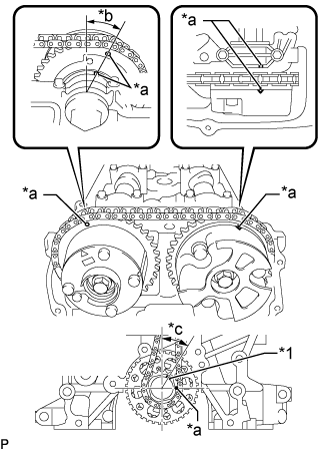
If the timing marks do not match, set the chain sub-assembly again.Text in Illustration *1
Key
*a
Timing Mark
*b
Approximately 13°
*c
Approximately 30°
| 12. INSTALL CYLINDER HEAD COVER CONNECTOR SUB-ASSEMBLY |
Install a new No. 2 camshaft bearing cap oil hole gasket and 3 new No. 3 camshaft bearing cap oil hole gaskets to the camshaft bearing cap.
Install the cylinder head cover connector sub-assembly with the 2 bolts.
- Torque:
- 10 N*m{ 102 kgf*cm , 7 ft.*lbf }
| 13. INSTALL TIMING CHAIN OR BELT COVER SUB-ASSEMBLY |
| 14. INSPECT IGNITION TIMING |
Warm up and stop the engine.
- NOTICE:
- A warmed up engine should have an engine coolant temperature of over 80°C (176°F), have an engine oil temperature of 60°C (140°F), and the engine rpm should be stabilized.
When using the intelligent tester:
Connect the intelligent tester to the DLC3.
Start the engine and idle it.
Turn the intelligent tester main switch on.
Enter the following items:
Powertrain / Engine and ECT / Data list / IGN Advance- Ignition timing:
- 5 to 15° BTDC at idle
- HINT:
- Refer to the intelligent tester operator's manual for further detail.
When not using the intelligent tester:
Connect the tester probe of a timing light to the wire of the ignition coil connector for the No.4 cylinder.
- NOTICE:
- Use a timing light that detects the first signal.
- After checking, be sure to wrap the wire harness with tape.
- Use a timing light that detects the first signal.
Turn the ignition switch to the ON position.
Using SST, connect terminals 13 (TC) and 4 (CG) of the DLC3.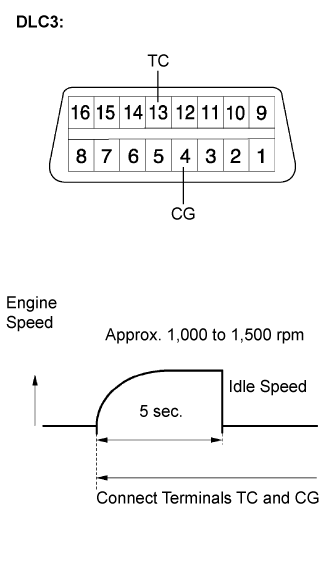
- SST
- 09843-18040
- NOTICE:
- Confirm the terminal numbers before connecting them. Connecting the wrong terminals can damage the engine.
- When checking the ignition timing, the transmission should be in the neutral.
- Confirm the terminal numbers before connecting them. Connecting the wrong terminals can damage the engine.
- HINT:
- After connecting terminals (TC and CG), engine rpm changes to approximately 1,000 to 1,500 rpm for 5 seconds, then returns to idle speed. This is because the ECM checks that the ISC (idle speed control system) operates properly.
- Perform the inspection of the ignition timing after engine rpm is returned to idle speed.
- After connecting terminals (TC and CG), engine rpm changes to approximately 1,000 to 1,500 rpm for 5 seconds, then returns to idle speed. This is because the ECM checks that the ISC (idle speed control system) operates properly.
Inspect the ignition timing
- Ignition timing:
- 3 to 7° BTDC at idle
Disconnect terminals 13 (TC) and 4 (CG) of the DLC3.
Inspect the ignition timing
- Ignition timing:
- 5 to 15° BTDC at idle
Check that the ignition timing advances immediately when the engine speed is increased.
Turn the ignition switch off.
Remove the timing light.
| 15. INSPECT ENGINE IDLE SPEED |
Warm up and stop the engine.
- NOTICE:
- A warmed up engine should have an engine coolant temperature of over 80°C (176°F), have an engine oil temperature of 60°C (140°F), and the engine rpm should be stabilized.
When using the intelligent tester:
Connect the intelligent tester to the DLC3.
- HINT:
- Refer to the intelligent tester operator's manual for further details.
Start the engine and idle it.
Turn the intelligent tester main switch on.
Enter the following items:
Powertrain / Engine and ECT / Data list / Engine SPD- Idle speed:
- 600 to 700 rpm
- NOTICE:
- When checking the idle speed, the transmission should be in the neutral position.
- Switch off all accessories and air conditioning before connecting the intelligent tester.
- When checking the idle speed, the transmission should be in the neutral position.
Turn the ignition switch off.
Disconnect the intelligent tester from the DLC3.
When not using the intelligent tester: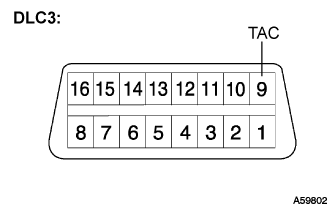
Install SST to terminal 9 (TAC) of DLC3, then connect a tachometer.
- SST
- 09843-18030
- NOTICE:
- Confirm the terminal numbers before connecting them. Connecting the wrong terminals can damage the engine.
Turn the ignition switch to the ON position.
Inspect the engine idling speed.
- Idle speed:
- 600 to 700 rpm
Turn the ignition switch off.
Disconnect the tachometer.
Remove the SST from terminal 9 (TAC).
- SST
- 09843-18030
| 16. INSPECT CO/HC |
- HINT:
- The ECM properly controls the CO/HC concentration in the emission gas.
Start the engine.
Run the engine at 2,500 rpm for approximately 180 seconds.
Insert the CO/HC meter testing probe at least 40 cm (1.3 ft) into the tail pipe while idling.
Check the CO/HC concentration with the engine idling and/or running at 2,500 rpm.
- HINT:
- If the CO/HC concentration does not comply with the regulations, troubleshoot in the order given below.
- Check the heated oxygen sensor operation (Click here).
- Check the heated air fuel ratio sensor operation (Click here).
- See the table below for possible causes, then inspect the applicable causes and repair them if necessary.
- If the CO/HC concentration does not comply with the regulations, troubleshoot in the order given below.
CO
HC
Problems
Causes
Normal
High
Rough idle
- Faulty ignitions:
- Incorrect timing
- Fouled, shorted or improperly gapped plugs
- Incorrect valve clearance
- Leaks in intake and exhaust valves
- Leaks in cylinders
Low
High
Rough idle (Fluctuating HC reading)
- Vacuum leaks:
- PCV hoses
- Intake manifold
- Throttle body
- Brake booster line
- Lean mixture causing misfire
High
High
Rough idle (Black smoke from exhaust)
- Restricted air filter
- Plugged PCV valve
- Faulty SFI systems:
- Faulty pressure regulator
- Defective engine coolant temperature sensor
- Defective mass air flow meter
- Faulty ECM
- Faulty injectors
- Faulty throttle body