INSTALLATION
Removal / installation · Vehicles built from Jan 2017
Versions by build date: Jan 2015 – Mar 2016 Apr 2016 – Dec 2016 from Jan 2017
| 1. INSTALL OIL PUMP RELIEF VALVE |

Coat the oil pump relief valve with engine oil.
Insert the oil pump relief valve and oil pump relief valve spring into the oil pump relief valve hole.
Install a new gasket to the oil pump relief valve plug.
Using a 27 mm socket wrench, install the oil pump relief valve plug.
- Torque:
- 49 N*m{ 500 kgf*cm , 36 ft.*lbf }
| 2. INSTALL TIMING CHAIN CASE OIL SEAL |
Using SST and a hammer, tap in a new timing chain case oil seal until its surface is flush with the edge of the timing chain or belt cover sub-assembly.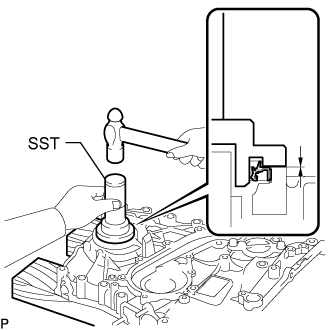

- SST
- 09223-75010
09950-70010 (09951-07100)
- NOTICE:
- Keep the lip free from foreign matter.
- Do not tap the oil seal at an angle.
- Keep the lip free from foreign matter.
Apply MP grease to the lip of the timing chain case oil seal.
| 3. INSTALL TIMING CHAIN OR BELT COVER SUB-ASSEMBLY |
Remove any old packing (FIPG material) and be careful not to drop any oil on the contact surfaces of the timing chain or belt cover sub-assembly, cylinder head sub-assembly and cylinder block sub-assembly.
Install 3 new O-rings to the timing chain or belt cover sub-assembly.
Align the width of the joint portion of the oil pump drive rotor and the crankshaft timing gear, and then install the timing chain or belt cover sub-assembly.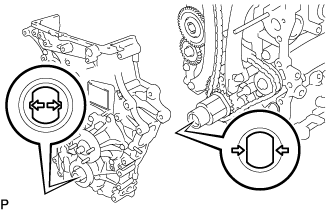
Apply seal packing as shown in the illustration.
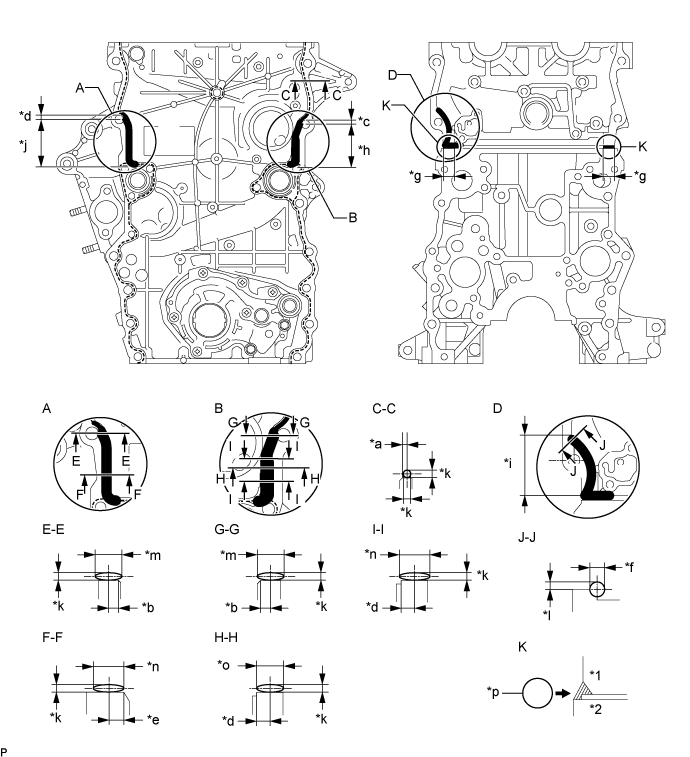
Text in Illustration *1
Cylinder Head Sub-Assembly
*2
Cylinder Block Sub-assembly
*a
2.0 mm (0.0787 in.)
*b
2.5 mm (0.0984 in.)
*c
5.0 mm (0.197 in.)
*d
6.0 mm (0.236 in.)
*e
7.0 mm (0.276 in.)
*f
8.0 mm (0.315 in.) or more
*g
20 mm (0.787 in.)
*h
54 mm (2.13 in.)
*i
56.5 mm (2.22 in.)
*j
58 mm (2.28 in.)
*k
2.5 to 4.0 mm (0.0984 to 0.157 in.)
*l
5.0 to 6.0 mm (0.197 to 0.236 in.)
*m
9.0 to 13 mm (0.354 to 0.512 in.)
*n
10 to 14 mm (0.394 to 0.551 in.)
*o
12 to 16 mm (0.472 to 0.630 in.)
*p
Seal Packing
- Seal packing:
- Toyota Genuine Seal Packing Black, Three Bond 1207B or equivalent
- NOTICE:
- When the contact surfaces are wet, wipe them with an oil-free cloth before applying seal packing.
- Install the timing chain or belt cover sub-assembly within 3 minutes and tighten the bolts within 15 minutes after applying seal packing.
- Do not add the engine oil for at least 4 hours after the installation.
- Do not start the engine for at least 4 hours after the installation.
- When the contact surfaces are wet, wipe them with an oil-free cloth before applying seal packing.
w/o Air Conditioning System:
Install the timing chain or belt cover sub-assembly with the 18 bolts and nut, and tighten the 18 bolts and nut in the sequence shown in the illustration.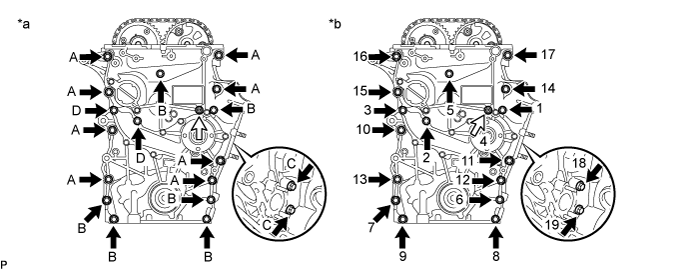
Text in Illustration *a
Types of nut and bolt
*b
Tightening Order

Bolt

Nut
- Torque:
- for Bolt A:
- 57 N*m{ 581 kgf*cm , 42 ft.*lbf }
- for Bolt B and Nut:
- 23 N*m{ 235 kgf*cm , 17 ft.*lbf }
- for Bolt C:
- 21 N*m{ 214 kgf*cm , 15 ft.*lbf }
- for Bolt D:
- 25 N*m{ 255 kgf*cm , 18 ft.*lbf }
- Bolt Length:
Item
Length
Thread Diameter
Bolt A
75 mm (2.95 in.)
10 mm (0.394 in.)
Bolt B
75 mm (2.95 in.)
8.0 mm (0.315 in.)
Bolt C
40 mm (1.57 in.)
8.0 mm (0.315 in.)
Bolt D
90 mm (3.54 in.)
8.0 mm (0.315 in.)
w/ Air Conditioning System:
Install the timing chain or belt cover sub-assembly with the 16 bolts and nut, and tighten the 16 bolts and nut in the sequence shown in the illustration.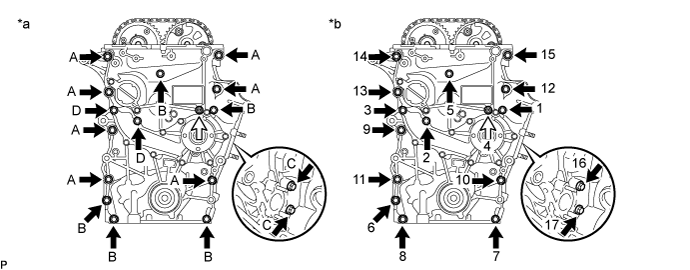
Text in Illustration *a
Types of nut and bolt
*b
Tightening Order
Bolt
Nut
- Torque:
- for Bolt A:
- 57 N*m{ 581 kgf*cm , 42 ft.*lbf }
- for Bolt B and Nut:
- 23 N*m{ 235 kgf*cm , 17 ft.*lbf }
- for Bolt C:
- 21 N*m{ 214 kgf*cm , 15 ft.*lbf }
- for Bolt D:
- 25 N*m{ 255 kgf*cm , 18 ft.*lbf }
- Bolt Length:
Item
Length
Thread Diameter
Bolt A
75 mm (2.95 in.)
10 mm (0.394 in.)
Bolt B
75 mm (2.95 in.)
8.0 mm (0.315 in.)
Bolt C
40 mm (1.57 in.)
8.0 mm (0.315 in.)
Bolt D
90 mm (3.54 in.)
8.0 mm (0.315 in.)
w/ Air Conditioning System: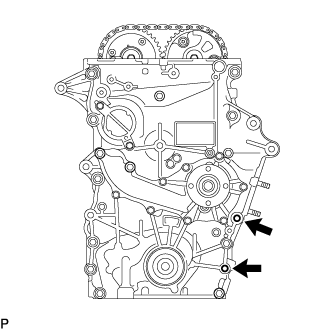
Remove the seal packing from the 2 bolt holes for the No. 1 compressor mounting bracket.- NOTICE:
- Do not use any cleaners to remove the seal packing.
| 4. INSTALL THERMOSTAT |
Install a new gasket to the thermostat.
Install the thermostat with the jiggle valve upward.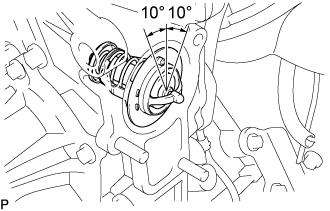
- HINT:
- The jiggle valve may be set within 10° of either side of the prescribed position.
| 5. INSTALL WATER INLET |
Install a new gasket and the water inlet with the bolt and 2 nuts.
- Torque:
- 28 N*m{ 286 kgf*cm , 21 ft.*lbf }
| 6. INSTALL OIL PAN SUB-ASSEMBLY |
Install the stud bolt.
Using an E6 "torx" socket wrench, install the stud bolts.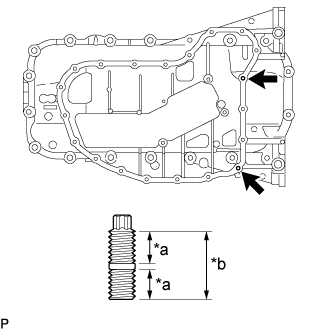
Text in Illustration *a
9.0 mm (0.354 in.)
*b
19.0 mm (0.748 in.)
- Torque:
- 3.0 N*m{ 31 kgf*cm , 27 in.*lbf }
Remove any old packing (FIPG material) and be careful not to drop any oil on the contact surfaces of the cylinder block sub-assembly and oil pan sub-assembly.
Apply seal packing as shown in the illustration.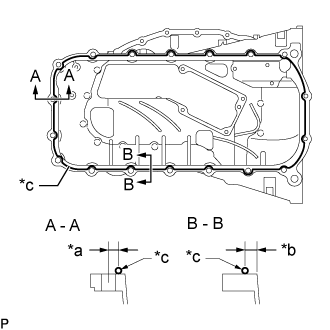
- Seal packing:
- Toyota Genuine Seal Packing Black, Three Bond 1207B or equivalent
- Standard seal diameter:
- 2.0 to 3.0 mm (0.0787 to 0.118 in.)
Text in Illustration *a
8.0 mm (0.315 in.)
*b
6.5 mm (0.256 in.)
*c
Seal Packing
- NOTICE:
- Install the oil pan sub-assembly within 3 minutes and tighten the bolts within 15 minutes after applying seal packing.
- Do not add the engine oil for at least 4 hours after the installation.
- Do not start the engine for at least 4 hours after the installation.
- Install the oil pan sub-assembly within 3 minutes and tighten the bolts within 15 minutes after applying seal packing.
Install a new gasket to the oil strainer sub-assembly.
Install the oil pan sub-assembly with the 16 bolts and 2 nuts, and tighten the 16 bolts and 2 nuts in the sequence shown in the illustration.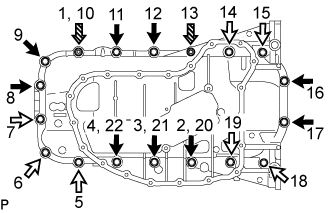
- Torque:
- 26 N*m{ 265 kgf*cm , 19 ft.*lbf }
- Bolt Length:
Item
Length
Bolt A
20 mm (0.787 in.)
Bolt B
40 mm (1.57 in.)
Text in Illustration
Bolt A
Bolt B

Nut
| 7. INSTALL NO. 2 OIL PAN SUB-ASSEMBLY |
Remove any old packing (FIPG material) and be careful not to drop any oil on the contact surfaces of the oil pan sub-assembly and No. 2 oil pan sub-assembly.
Apply seal packing as shown in the illustration.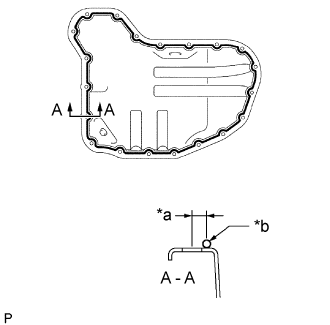
- Seal packing:
- Toyota Genuine Seal Packing Black, Three Bond 1207B or equivalent
- Standard seal diameter:
- 3.0 to 4.0 mm (0.118 to 0.157 in.)
Text in Illustration *a
6.0 mm (0.236 in.)
*b
Seal Packing
- NOTICE:
- Install the No. 2 oil pan sub-assembly within 3 minutes and tighten the bolts within 15 minutes after applying seal packing.
- Do not add the engine oil for at least 4 hours after the installation.
- Do not start the engine for at least 4 hours after the installation.
- Install the No. 2 oil pan sub-assembly within 3 minutes and tighten the bolts within 15 minutes after applying seal packing.
Install the No. 2 oil pan sub-assembly with the 18 bolts and 2 nuts, and tighten the 18 bolts and 2 nuts in the sequence shown in the illustration.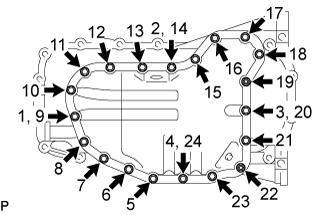
- Torque:
- 9.0 N*m{ 92 kgf*cm , 80 in.*lbf }
Install a new gasket and the oil pan drain plug.
- Torque:
- 38 N*m{ 382 kgf*cm , 28 ft.*lbf }
| 8. INSTALL CRANKSHAFT PULLEY |
Align the key groove of the crankshaft pulley with the crankshaft pulley reset key and install the crankshaft pulley.
Using SST, hold the crankshaft pulley in place and tighten a new crankshaft pulley set bolt.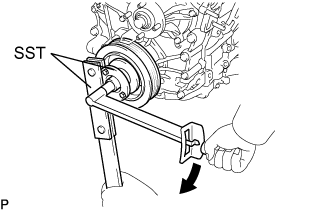
- SST
- 09213-54015
(91651-60855)
09330-00021
- Torque:
- 260 N*m{ 2651 kgf*cm , 192 ft.*lbf }
- NOTICE:
- Do not reuse the crankshaft pulley set bolt.
| 9. INSTALL CYLINDER HEAD COVER SUB-ASSEMBLY |
Remove any old packing (FIPG material) and be careful not to drop any oil on the contact surfaces of the cylinder head cover sub-assembly and cylinder head sub-assembly.
Apply seal packing as shown in the illustration.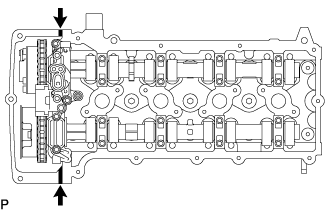
Text in Illustration
Seal Packing Application Area
- Seal packing:
- Toyota Genuine Seal Packing Black, Three Bond 1207B or equivalent
- Standard seal diameter:
- 4.0 mm (0.157 in.)
- NOTICE:
- Install the cylinder head cover sub-assembly within 3 minutes and tighten the bolts within 15 minutes after applying seal packing.
- Do not add the engine oil for at least 4 hours after the installation.
- Do not start the engine for at least 4 hours after the installation.
- Install the cylinder head cover sub-assembly within 3 minutes and tighten the bolts within 15 minutes after applying seal packing.
Install a new No. 1 camshaft bearing cap oil hole gasket to the cylinder head cover spacer.
Install a new gasket to the cylinder head cover sub-assembly.
Install the cylinder head cover sub-assembly, 2 plate washers and 2 seal washers with the 21 bolts and 2 nuts, and tighten the 21 bolts and 2 nuts in the sequence shown in the illustration.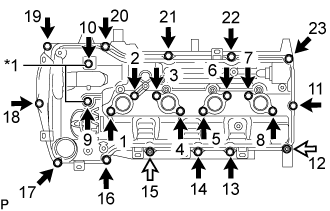
- Torque:
- 9.0 N*m{ 92 kgf*cm , 80 in.*lbf }
Text in Illustration *1
Plate Washer and Seal Washer
Bolt
Nut
- NOTICE:
- Make sure that the metal face of the seal washer is facing upward.
Connect the PCV hose to the PCV valve sub-assembly and slide the clip to secure the hose.
| 10. INSTALL CAMSHAFT TIMING OIL CONTROL VALVE ASSEMBLY |
Apply a light coat of engine oil to on O-ring of the camshaft timing oil control valve assembly.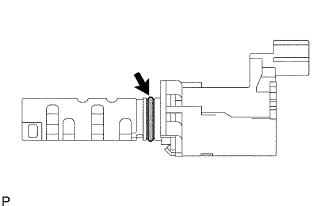
Install the camshaft timing oil control valve assembly with the bolt.
- Torque:
- 9.0 N*m{ 92 kgf*cm , 80 in.*lbf }
- NOTICE:
- When reusing the camshaft timing oil control valve assembly, inspect the O-ring.
- Make sure that the O-ring is not cracked or jammed when installing the camshaft timing oil control valve assembly.
- When reusing the camshaft timing oil control valve assembly, inspect the O-ring.
Connect the camshaft timing oil control valve connector.
| 11. INSTALL CAMSHAFT POSITION SENSOR |
Apply a light coat of engine oil to the O-ring of the camshaft position sensor.
Install the camshaft position sensor with the bolt.
- Torque:
- 9.0 N*m{ 92 kgf*cm , 80 in.*lbf }
- NOTICE:
- When reusing the camshaft position sensor, inspect the O-ring.
- Make sure that the O-ring is not cracked or jammed when installing the camshaft position sensor.
- When reusing the camshaft position sensor, inspect the O-ring.
Connect the camshaft position sensor connector.
| 12. INSTALL IGNITION COIL ASSEMBLY |
Install the 4 ignition coil assemblies with the 4 bolts.
- Torque:
- 9.0 N*m{ 92 kgf*cm , 80 in.*lbf }
| 13. INSTALL V-RIBBED BELT TENSIONER ASSEMBLY |
Temporarily install the V-ribbed belt tensioner assembly with the 2 bolts.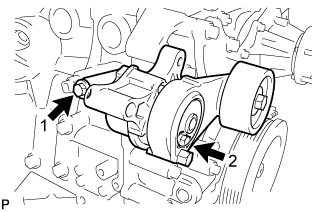
- HINT:
- Make sure that the V-ribbed belt tensioner assembly is in contact with the engine block.
- Check that the bolt holes of the V-ribbed belt tensioner assembly and timing chain cover are aligned.
- Make sure that the V-ribbed belt tensioner assembly is in contact with the engine block.
Install the V-ribbed belt tensioner assembly by tightening the 2 bolts in the order shown in the illustration.
- Torque:
- for bolt 1:
- 40 N*m{ 408 kgf*cm , 30 ft.*lbf }
- for bolt 2:
- 23 N*m{ 235 kgf*cm , 17 ft.*lbf }
| 14. INSTALL NO. 1 IDLER PULLEY SUB-ASSEMBLY |
Install the No. 1 idler pulley sub-assembly and collar with the bolt.
- Torque:
- 43 N*m{ 438 kgf*cm , 32 ft.*lbf }
- NOTICE:
- Check that the collar are assembled properly to the No. 1 idler pulley sub-assembly.
| 15. INSTALL CRANKSHAFT POSITION SENSOR |
| 16. INSTALL GENERATOR ASSEMBLY |
Install the generator assembly with the 3 bolts.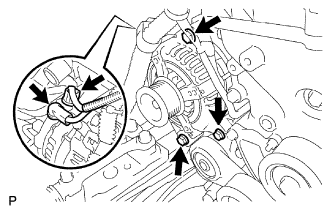
- Torque:
- 43 N*m{ 438 kgf*cm , 32 ft.*lbf }
Install the generator wire with the nut to terminal B.
- Torque:
- 9.8 N*m{ 100 kgf*cm , 87 in.*lbf }
Install the terminal cap.
Connect the generator connector.
| 17. INSTALL NO. 1 WATER BY-PASS PIPE |
Install a new gasket and the No. 1 water by-pass pipe with the 2 nuts and bolt.
- Torque:
- 18 N*m{ 178 kgf*cm , 13 ft.*lbf }
| 18. INSTALL FAN PULLEY |
Install the fan spacer and fan pulley with the 4 nuts.
- Torque:
- 25 N*m{ 255 kgf*cm , 18 ft.*lbf }
| 19. INSTALL INTAKE MANIFOLD |
| 20. CONNECT ENGINE WIRE |
Install the engine wire to the engine assembly.
| 21. INSTALL VANE PUMP ASSEMBLY |
Connect the vane pump assembly with the 2 bolts.
- Torque:
- 21 N*m{ 214 kgf*cm , 15 ft.*lbf }
Connect the oil pressure switch connector.
| 22. CONNECT UNION TO CONNECTOR TUBE HOSE |
Connect the union to connector tube hose to the intake manifold, and slide the clamp to secure the hose.
| 23. CONNECT FUEL VAPOR FEED HOSE ASSEMBLY |
Connect the fuel vapor feed hose assembly to the purge VSV, and slide the clamp to secure the hose.
| 24. INSTALL AIR PRESSURE SENSOR |
Install the air pressure sensor with the bolt.
- Torque:
- 5.0 N*m{ 51 kgf*cm , 44 in.*lbf }
Install the air pressure sensor together with the bracket with the 2 bolts.
- Torque:
- 8.0 N*m{ 82 kgf*cm , 71 in.*lbf }
Attach the wire harness clamp.
Connect the vacuum hose and clamp.
Connect the connector.
| 25. CONNECT NO. 2 RADIATOR HOSE |
Connect the No. 2 radiator hose to the No. 1 radiator pipe, and slide the clamp to secure the hose.
| 26. CONNECT NO. 4 RADIATOR HOSE |
Connect the No. 4 radiator hose to the engine, and slide the clamp to secure the hose.
| 27. INSTALL AUTOMATIC TRANSMISSION (for Automatic Transmission) |
| 28. INSTALL MANUAL TRANSMISSION (for Manual Transmission) |
| 29. CONNECT CABLE TO NEGATIVE BATTERY TERMINAL |
- NOTICE:
- When disconnecting the cable, some systems need to be initialized after the cable is reconnected (Click here).
| 30. ADD ENGINE OIL |
Add fresh engine oil.
- Standard Capacity:
Item
Specified Condition
Drain and refill without oil filter change
4.9 liters (5.2 US qts, 4.3 Imp. qts)
Drain and refill with oil filter change
5.3 liters (5.6 US qts, 4.7 Imp. qts)
Dry fill
6.7 liters (7.1 US qts, 5.9 Imp. qts)
Install the oil filler cap.
| 31. ADD ENGINE COOLANT |
Tighten the radiator drain cock plug by hand.
Tighten the cylinder block water drain cock plug.
- Torque:
- 13 N*m{ 130 kgf*cm , 9 ft.*lbf }
Fill the radiator reservoir assembly with engine coolant to the top of the inlet.
- Standard Capacity:
Item
Specified Condition
w/o Rear Heater
11.2 liters (11.8 US qts, 9.9 Imp. qts)
w/ Rear Heater
13.2 liters (13.9 US qts, 11.6 Imp. qts)
- NOTICE:
- Never use water as a substitute for engine coolant.
- HINT:
- TOYOTA vehicles are filled with TOYOTA SLLC at the factory. In order to avoid damage to the engine cooling system and other technical problems, only use TOYOTA SLLC or similar high quality ethylene glycol based non-silicate, non-amine, non-nitrite, non-borate coolant with long-life hybrid organic acid technology (coolant with long-life hybrid organic acid technology is a combination of low phosphates and organic acids).
Remove the 2-way that is located near the throttle body assembly.
When air is bled and the engine coolant drains out, install the 2-way.
Add coolant through the radiator reservoir assembly filler opening until the coolant reaches the B line and install the radiator reservoir cap sub-assembly. [*1]
Warm up the engine until the thermostat opens. While the thermostat is open, circulate the coolant for several minutes. [*2]
- CAUTION:
- Wear protective gloves.
- Be careful as the radiator hoses are hot.
- Keep your hands away from the radiator fans.
- Wear protective gloves.
- NOTICE:
- Immediately after starting the engine, if the radiator reservoir assembly does not have any engine coolant, perform the following: 1) stop the engine, 2) wait until the engine coolant has cooled down, and 3) add engine coolant.
- Do not start the engine when there is no engine coolant in the radiator reservoir assembly.
- Make sure that the needle does not show an abnormally high temperature.
- If there is not enough engine coolant, the engine may overheat.
- Immediately after starting the engine, if the radiator reservoir assembly does not have any engine coolant, perform the following: 1) stop the engine, 2) wait until the engine coolant has cooled down, and 3) add engine coolant.
- HINT:
- Press the No. 2 and No. 3 radiator hoses several times by hand, and then check the level of the engine coolant.
- The thermostat open timing can be confirmed by pressing the No. 3 radiator hose by hand, and checking when the engine coolant starts to flow inside the hose.
- Press the No. 2 and No. 3 radiator hoses several times by hand, and then check the level of the engine coolant.
Stop the engine, and wait until the engine coolant cools down to ambient temperature. [*3]
Check the engine coolant level in the radiator reservoir assembly. [*4]
- HINT:
- If the engine coolant level is below the LOW line, repeat step *1 through *4.
- If the engine coolant level is above the FULL line, drain engine coolant until the engine coolant level is between the FULL and LOW lines.
- If the engine coolant level is below the LOW line, repeat step *1 through *4.
| 32. INSPECT FOR FUEL LEAK |
| 33. INSPECT FOR OIL LEAK |
Start the engine. Make sure that there are no oil leaks from the areas that were worked on.
| 34. INSPECT FOR COOLANT LEAK |
- CAUTION:
- Do not remove the radiator cap while the engine and radiator are still hot. Pressurized, hot engine coolant and steam may be released and cause serious burns.
Fill the radiator with coolant and attach a radiator cap tester to the radiator.
Warm up the engine.
Using a radiator cap tester, increase the pressure inside the radiator to 137 kPa (1.4 kgf/cm2, 19.9 psi), and check that the pressure does not drop.
- HINT:
- If the pressure drops, check the hoses, radiator or water pump for leaks. If no external leaks are found, check the heater core, cylinder block and cylinder head.
| 35. INSPECT IDLE SPEED AND IGNITION TIMING |
Warm up and stop the engine.
- NOTICE:
- A warmed up engine should have an engine coolant temperature of over 80°C (176°F), have an engine oil temperature of 60°C (140°F), and the engine rpm should be stabilized.
When using the intelligent tester:
Connect the intelligent tester to the DLC3.
Start the engine and idle it.
Turn the intelligent tester main switch on.
Enter the following items:
Powertrain / Engine and ECT / Data list / IGN Advance- Ignition timing:
- 5 to 15° BTDC at idle
- HINT:
- Refer to the intelligent tester operator's manual for further detail.
When not using the intelligent tester:
Connect the tester probe of a timing light to the wire of the ignition coil connector for the No.4 cylinder.
- NOTICE:
- Use a timing light that detects the first signal.
- After checking, be sure to wrap the wire harness with tape.
- Use a timing light that detects the first signal.
Turn the ignition switch to the ON position.
Using SST, connect terminals 13 (TC) and 4 (CG) of the DLC3.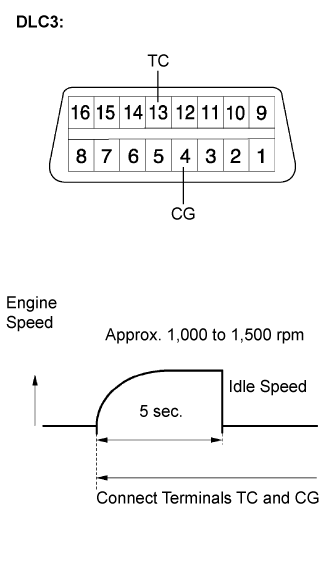
- SST
- 09843-18040
- NOTICE:
- Confirm the terminal numbers before connecting them. Connecting the wrong terminals can damage the engine.
- When checking the ignition timing, the transmission should be in the neutral.
- Confirm the terminal numbers before connecting them. Connecting the wrong terminals can damage the engine.
- HINT:
- After connecting terminals (TC and CG), engine rpm changes to approximately 1,000 to 1,500 rpm for 5 seconds, then returns to idle speed. This is because the ECM checks that the ISC (idle speed control system) operates properly.
- Perform the inspection of the ignition timing after engine rpm is returned to idle speed.
- After connecting terminals (TC and CG), engine rpm changes to approximately 1,000 to 1,500 rpm for 5 seconds, then returns to idle speed. This is because the ECM checks that the ISC (idle speed control system) operates properly.
Inspect the ignition timing
- Ignition timing:
- 3 to 7° BTDC at idle
Disconnect terminals 13 (TC) and 4 (CG) of the DLC3.
Inspect the ignition timing
- Ignition timing:
- 5 to 15° BTDC at idle
Check that the ignition timing advances immediately when the engine speed is increased.
Turn the ignition switch off.
Remove the timing light.
| 36. CHECK FUNCTION OF THROTTLE BODY |
| 37. INSPECT ABS SENSOR SIGNAL |
| 38. PERFORM INITIALIZATION |