INSTALLATION
Removal / installation · Vehicles built Apr 2016 – Dec 2016
Versions by build date: Jan 2015 – Mar 2016 Apr 2016 – Dec 2016 from Jan 2017
- NOTICE:
- As the engine assembly with transmission is extremely heavy, the engine lifter may suddenly drop if the instructions listed in the repair manual are not followed. Therefore, always follow the instructions listed in the repair manual when performing this procedure.
- HINT:
- Perform "Inspection After Repairs" after replacing the engine assembly, cylinder head sub-assembly, camshaft, No. 2 camshaft, camshaft timing gear assembly, camshaft timing exhaust gear assembly, piston sub-assembly or piston ring (Click here).
| 1. INSTALL ENGINE OIL LEVEL SENSOR |

Install the engine oil level sensor with the 4 bolts.
- Torque:
- 7.0 N*m{ 71 kgf*cm , 52 in.*lbf }
| 2. INSTALL FRONT NO. 1 ENGINE MOUNTING BRACKET LH |
- HINT:
- Perform this procedure only when replacement of the front No. 1 engine mounting bracket LH is necessary.
Install the front No. 1 engine mounting bracket LH with the 4 bolts.
- Torque:
- 51 N*m{ 520 kgf*cm , 38 ft.*lbf }
| 3. INSTALL FRONT NO. 1 ENGINE MOUNTING BRACKET RH |
- HINT:
- Perform this procedure only when replacement of the front No. 1 engine mounting bracket RH is necessary.
Install the front No. 1 engine mounting bracket RH with the 4 bolts.
- Torque:
- 51 N*m{ 520 kgf*cm , 38 ft.*lbf }
| 4. INSTALL ENGINE COOLANT TEMPERATURE SENSOR |
- HINT:
- w/ Dual VVT-i:
- Perform "Inspection After Repairs" after replacing the engine coolant temperature sensor (Click here).
Install a new gasket onto the engine coolant temperature sensor.
Using a 19 mm deep socket wrench, install the engine coolant temperature sensor.
- Torque:
- 20 N*m{ 200 kgf*cm , 14 ft.*lbf }
Connect the engine coolant temperature sensor connector.
| 5. INSTALL KNOCK CONTROL SENSOR |
- HINT:
- w/ Dual VVT-i:
- Perform "Inspection After Repairs" after replacing the knock control sensor (Click here).
Install the knock control sensor with the bolt as shown in the illustration.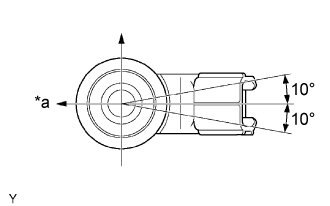

- Torque:
- 20 N*m{ 204 kgf*cm , 15 ft.*lbf }
Text in Illustration *a
Front
Connect the knock control sensor connector.
| 6. INSTALL ENGINE OIL PRESSURE SWITCH ASSEMBLY |
Apply adhesive to 2 or 3 threads of the engine oil pressure switch assembly.
- Adhesive:
- Toyota Genuine Adhesive 1344, Three Bond 1344 or equivalent
- NOTICE:
- Do not let adhesive adhere to the oil hole.
Install the engine oil pressure switch assembly.
- Torque:
- 15 N*m{ 153 kgf*cm , 11 ft.*lbf }
- NOTICE:
- Do not start the engine within 1 hour of installation.
| 7. INSTALL V-RIBBED BELT TENSIONER ASSEMBLY |
Temporarily install the V-ribbed belt tensioner assembly with the 2 bolts.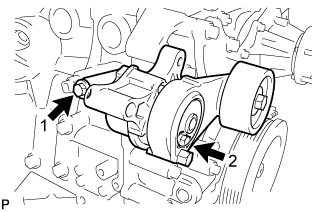
- HINT:
- Make sure that the V-ribbed belt tensioner assembly is in contact with the engine block.
- Check that the bolt holes of the V-ribbed belt tensioner assembly and timing chain cover are aligned.
- Make sure that the V-ribbed belt tensioner assembly is in contact with the engine block.
Install the V-ribbed belt tensioner assembly by tightening the 2 bolts in the order shown in the illustration.
- Torque:
- for bolt 1:
- 40 N*m{ 408 kgf*cm , 30 ft.*lbf }
- for bolt 2:
- 23 N*m{ 235 kgf*cm , 17 ft.*lbf }
| 8. INSTALL NO. 1 IDLER PULLEY SUB-ASSEMBLY |
Install the No. 1 idler pulley sub-assembly and collar with the bolt.
- Torque:
- 43 N*m{ 438 kgf*cm , 32 ft.*lbf }
- NOTICE:
- Check that the collar are assembled properly to the No. 1 idler pulley sub-assembly.
| 9. INSTALL NO. 1 COMPRESSOR MOUNTING BRACKET (w/ Air Conditioning System) |
- NOTICE:
- Install the No. 1 compressor mounting bracket exactly as described in the procedures below to properly secure and prevent damage to the fan and generator V belt.
Temporarily install the No. 1 compressor mounting bracket with the 3 bolts.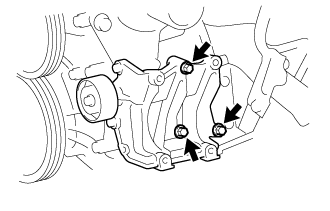
- HINT:
- Temporarily install the No. 1 compressor mounting bracket with the 3 bolts so that the bracket can be moved by hand.
Push the No. 1 compressor mounting bracket toward the cylinder block as shown in the illustration and tighten bolt B.
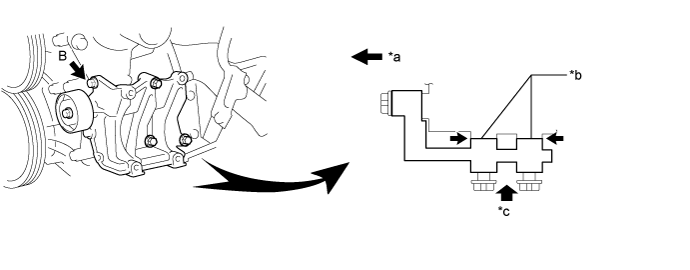
Text in Illustration *a
Front
*b
No Clearance
*c
Push
-
-
- Torque:
- for bolt B:
- 45 N*m{ 459 kgf*cm , 33 ft.*lbf }
- HINT:
- Make sure there is no clearance between the cylinder block and No. 1 compressor mounting bracket as shown in the illustration.
Uniformly tighten the 4 bolts in the order shown in the illustration.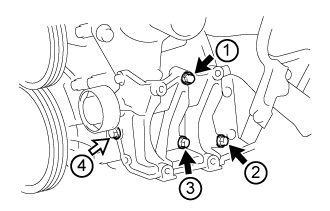
Text in Illustration 
Bolt A

Bolt C
- Torque:
- for bolt A:
- 45 N*m{ 459 kgf*cm , 33 ft.*lbf }
- for bolt C:
- 25 N*m{ 255 kgf*cm , 18 ft.*lbf }
| 10. INSTALL IDLE PULLEY ASSEMBLY (w/ Air Conditioning System) |
Temporarily install the idle pulley assembly with the bolt.
- NOTICE:
- Do not use any tools.
Tighten the bolt.
- Torque:
- 44 N*m{ 449 kgf*cm , 32 ft.*lbf }
| 11. INSTALL GENERATOR ASSEMBLY |
Install the generator assembly with the 3 bolts.
- Torque:
- 43 N*m{ 438 kgf*cm , 32 ft.*lbf }
Connect the wire harness clamp with the bolt.
Connect the wire harness to terminal B with the nut.
- Torque:
- 9.8 N*m{ 100 kgf*cm , 87 in.*lbf }
Install the terminal cap.
Connect the generator connector.
| 12. INSTALL THERMOSTAT |
Install a new gasket to the thermostat.
Install the thermostat with the jiggle valve upward.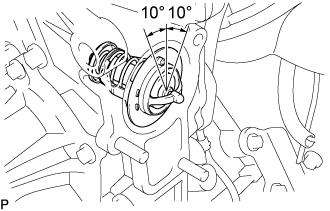
- HINT:
- The jiggle valve may be set within 10° of either side of the prescribed position.
| 13. INSTALL WATER INLET |
Install a new gasket and the water inlet with the bolt and 2 nuts.
- Torque:
- 28 N*m{ 286 kgf*cm , 21 ft.*lbf }
| 14. INSTALL NO. 1 WATER BY-PASS PIPE |
Install a new gasket and the No. 1 water by-pass pipe with the 2 nuts and bolt.
- Torque:
- 18 N*m{ 178 kgf*cm , 13 ft.*lbf }
| 15. INSTALL FAN PULLEY |
Install the fan spacer and fan pulley with the 4 nuts.
- Torque:
- 25 N*m{ 255 kgf*cm , 18 ft.*lbf }
| 16. INSTALL EXHAUST MANIFOLD |
Install a new gasket and the exhaust manifold with 8 new nuts.
- Torque:
- 36 N*m{ 367 kgf*cm , 27 ft.*lbf }
| 17. INSTALL AIR SWITCHING VALVE ASSEMBLY |
Install the valve with the 2 new nuts.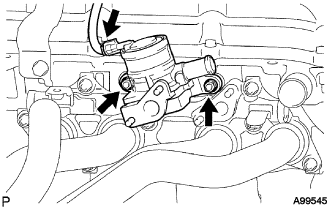
- Torque:
- 26 N*m{ 265 kgf*cm , 19 ft.*lbf }
Connect the connector.
w/ Manifold Absolute Pressure Sensor: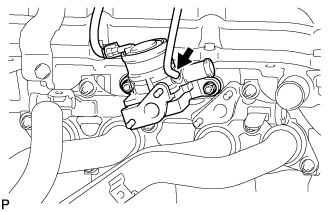
Connect the vacuum hose to the air switching valve assembly.
| 18. INSTALL NO. 4 INTAKE PIPE |
Install 2 new gaskets and the intake pipe No.4 with 4 new nuts and tighten the nuts in the order shown in the illustration. Then, tighten the nuts labeled 1 and 3 to the torque specification again.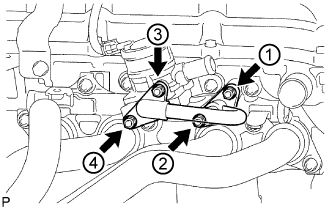
- Torque:
- 26 N*m{ 265 kgf*cm , 19 ft.*lbf }
Check that the nuts are tightened to the torque specification.
- NOTICE:
- Tightening the nuts only once is not enough to tighten them to the torque specification.
| 19. INSTALL NO. 1 EXHAUST MANIFOLD HEAT INSULATOR |
Install the heat insulator with the 4 bolts.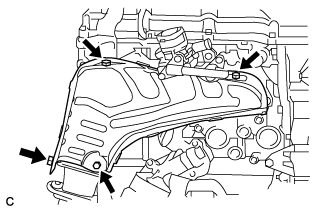
- Torque:
- 12 N*m{ 122 kgf*cm , 9 ft.*lbf }
| 20. INSTALL FUEL INJECTOR ASSEMBLY |
- HINT:
- w/ Dual VVT-i:
- Perform "Inspection After Repairs" after replacing the fuel injector assembly (Click here).
Apply a light coat of gasoline or spindle oil to new O-rings, and then install one onto each fuel injector assembly.
Apply a light coat of gasoline or spindle oil to the contact surfaces of the fuel delivery pipe sub-assembly and the O-ring of the fuel injector assembly.
Apply a light coat of gasoline or spindle oil to the O-ring again, and then install the fuel injector assembly into the fuel delivery pipe sub-assembly by turning it right and left.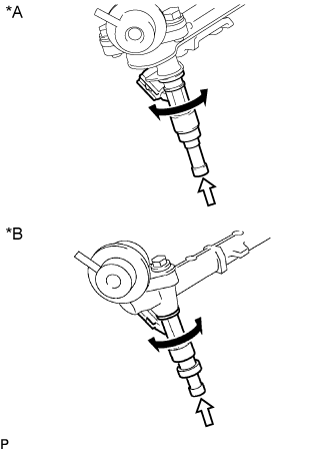
Text in Illustration *A
w/ Dual VVT-i
*B
w/o Dual VVT-i
Turn
Push
- NOTICE:
- Be careful not to twist the O-ring.
- After installing the fuel injector assembly, check that it turns smoothly. If not, reinstall it with a new O-ring.
- Be careful not to twist the O-ring.
| 21. INSTALL FUEL DELIVERY PIPE SUB-ASSEMBLY |
Apply a light coat of gasoline or spindle oil to new O-rings and install them to the injector spacers.
- NOTICE:
- Make sure that the O-rings are installed between the parts correctly.
Install the 4 injector spacers to the cylinder head sub-assembly.
Install 4 new injector vibration insulators to the cylinder head sub-assembly.
Install the 2 No. 1 delivery pipe spacers to the cylinder head sub-assembly.
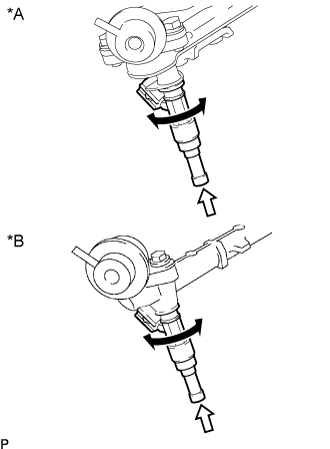
Temporarily install the fuel delivery pipe sub-assembly together with the 4 fuel injector assemblies with the 2 bolts.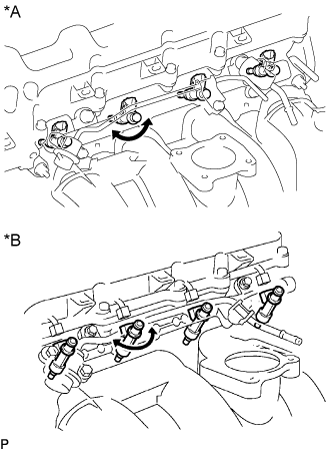
Text in Illustration *A
w/ Dual VVT-i
*B
w/o Dual VVT-i
- NOTICE:
- Do not drop the fuel injector assemblies when installing the fuel delivery pipe sub-assembly.
- Make sure that the fuel injector assembly turns smoothly.
- Do not drop the fuel injector assemblies when installing the fuel delivery pipe sub-assembly.
Tighten the 2 bolts.
- Torque:
- 12 N*m{ 122 kgf*cm , 9 ft.*lbf }
Apply a light coat of gasoline or spindle oil to a new O-ring.
Install the fuel pressure pulsation damper assembly with the 2 bolts.
- Torque:
- 9.0 N*m{ 92 kgf*cm , 80 in.*lbf }
Connect the 4 fuel injector connectors.
Connect the No. 2 fuel hose to the fuel pressure regulator assembly, and slide the clamp to secure the hose.
Connect the vacuum hose to the fuel pressure regulator assembly.
| 22. INSTALL SPARK PLUG |
Using a 16 mm spark plug wrench, install the 4 spark plugs.
- Torque:
- 18 N*m{ 184 kgf*cm , 13 ft.*lbf }
| 23. INSTALL IGNITION COIL ASSEMBLY |
Install the 4 ignition coil assemblies with the 4 bolts.
- Torque:
- 9.0 N*m{ 92 kgf*cm , 80 in.*lbf }
| 24. INSTALL INTAKE MANIFOLD |
| 25. INSTALL THROTTLE BODY ASSEMBLY |
- HINT:
- w/ Dual VVT-i:
- Perform "Inspection After Repairs" after replacing the throttle body assembly (Click here).
Install a new gasket onto the intake manifold.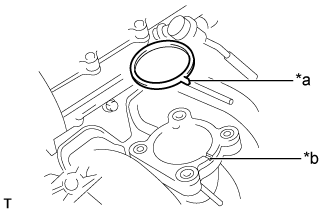
Text in Illustration *a
Protrusion
*b
Groove
- HINT:
- Align the protrusion of the gasket with the groove of the intake manifold.
Install the throttle body assembly with the 4 bolts.
- Torque:
- 10 N*m{ 102 kgf*cm , 7 ft.*lbf }
Connect the No. 2 water by-pass hose to the throttle body assembly, and slide the clamp to secure the hose.
Connect the water by-pass hose to the throttle body assembly, and slide the clamp to secure the hose.
Connect the throttle motor connector.
| 26. INSTALL PCV PIPE |
Install the PCV pipe with the bolt.
- Torque:
- 18 N*m{ 184 kgf*cm , 13 ft.*lbf }
| 27. INSTALL ENGINE HANGER |
Install the 2 engine hangers with the 2 bolts.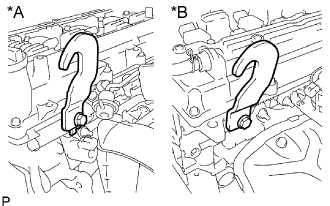
- Torque:
- 42 N*m{ 428 kgf*cm , 31 ft.*lbf }
Text in Illustration *A
LH Side
*B
RH Side
- NOTICE:
- Use new 2 bolts for the 2 engine hangers.
- HINT:
Engine Hangers
12281-75050
Bolt
91672-81025
| 28. REMOVE ENGINE FROM ENGINE STAND |
- NOTICE:
- Pay attention to the angle of the sling device as the engine assembly or engine hangers may be damaged or deformed if the angle is incorrect.
- With the exception of installing the engine assembly to an engine stand or removing the engine assembly from an engine stand, do not perform any work on the engine while it is suspended, as doing so is dangerous.
- Pay attention to the angle of the sling device as the engine assembly or engine hangers may be damaged or deformed if the angle is incorrect.
Attach a sling device and hang the engine with a chain block.
Lift the engine and remove it from the engine stand.
| 29. FIX ENGINE ASSEMBLY |
Using wooden blocks or plate lift attachments, set the engine on a flat surface.
- NOTICE:
- Place wooden blocks or plate lift attachments so that the engine is level.
- Never install attachments to the oil pan of the engine assembly or transmission as doing so may deform the oil pan.
- Perform this step while supporting the engine assembly using a sling device and chain block.
- Place wooden blocks or plate lift attachments so that the engine is level.
| 30. INSTALL ENGINE WIRE |
Install the engine wire to the engine assembly.
| 31. INSTALL FRONT SUSPENSION CROSSMEMBER SUB-ASSEMBLY |
Install the engine assembly to the front suspension crossmember sub-assembly.
Connect the engine mounting insulator with the 4 bolts.
- Torque:
- 55 N*m{ 561 kgf*cm , 41 ft.*lbf }
| 32. INSTALL REAR END PLATE |
Install the rear end plate with the bolt.
- Torque:
- 18 N*m{ 184 kgf*cm , 13 ft.*lbf }
Connect the No. 1 water by-pass pipe to the rear end plate with the bolt.
- Torque:
- 18 N*m{ 178 kgf*cm , 13 ft.*lbf }
| 33. INSTALL FLYWHEEL SUB-ASSEMBLY (for Manual Transmission) |
- HINT:
- If any one of the mounting bolts is broken or deformed, replace it.
Apply adhesive to 2 or 3 threads of the mounting bolt end.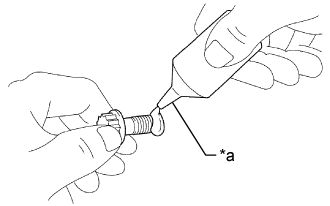
- Adhesive:
- Toyota Genuine Adhesive 1324, Three Bond 1324 or equivalent
Text in Illustration *a
Adhesive
Fix the crankshaft with SST.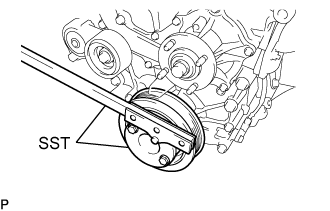
- SST
- 09213-54015
(91651-60855)
09330-00021
Temporarily install the flywheel with 10 new mounting bolts.
Install and uniformly tighten the 10 mounting bolts in several steps in the sequence shown in the illustration.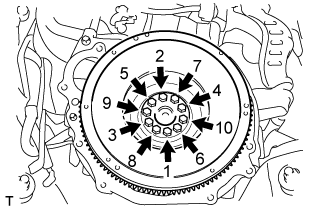
- Torque:
- 27 N*m{ 270 kgf*cm , 20 ft.*lbf }
Mark the top of the bolts with paint.
Tighten the 10 bolts 90° in the same sequence.
Check that the paint marks are now at a 90° angle to the top.
| 34. INSTALL CLUTCH DISC ASSEMBLY (for Manual Transmission) |
Insert SST into the clutch disc assembly, then insert them into the flywheel sub-assembly.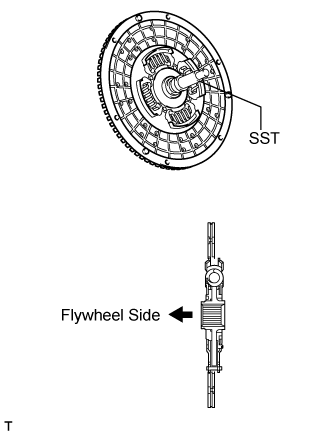
- SST
- 09301-00110
- NOTICE:
- Take care not to insert the clutch disc assembly in the wrong direction.
| 35. INSTALL CLUTCH COVER ASSEMBLY (for Manual Transmission) |
Align the matchmark on the clutch cover assembly with the one on the flywheel sub-assembly.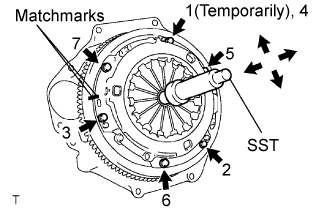
Following the procedures shown in the illustration, tighten the 6 bolts starting from the bolt located near the knock pin on the top.
- SST
- 09301-00110
- Torque:
- 19 N*m{ 195 kgf*cm , 14 ft.*lbf }
- HINT:
- Evenly tighten the bolts by following the order shown in the illustration.
- Tighten the bolts after checking that the disc is in the center by lightly moving the SST up and down, left and right.
- Evenly tighten the bolts by following the order shown in the illustration.
| 36. INSPECT AND ADJUST CLUTCH COVER ASSEMBLY (for Manual Transmission) |
Using a dial indicator with a roller instrument, check the diaphragm spring tip alignment.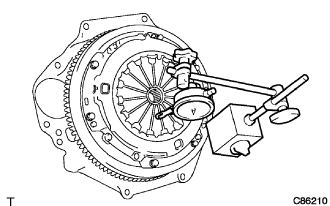
- Maximum non-alignment:
- 0.9 mm (0.035 in.)
If alignment is not as specified, adjust the diaphragm spring tip alignment using SST.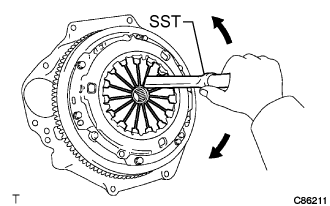
- SST
- 09333-00013
| 37. INSTALL DRIVE PLATE AND RING GEAR SUB-ASSEMBLY (for Automatic Transmission) |
Using SST, hold the crankshaft.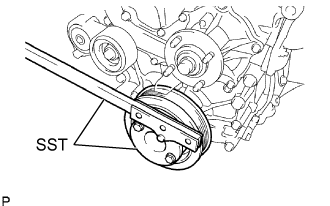
- SST
- 09213-54015
(91651-60855)
09330-00021
Install the front drive plate spacer, drive plate and ring gear sub-assembly and rear drive plate spacer to the crankshaft.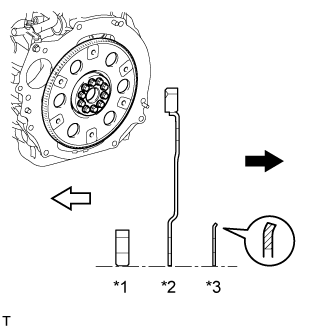
Text in Illustration *1
Front Drive Plate Spacer (Reversible)
*2
Drive Plate and Ring Gear Sub-assembly
*3
Rear Drive Plate Spacer
Transmission Side
Engine Side
- HINT:
- The front drive plate spacer is reversible.
- As the rear drive plate spacer and drive plate and ring gear sub-assembly are not reversible, be sure to install it so that it is facing in the direction shown in the illustration.
- The front drive plate spacer is reversible.
Clean the bolts and bolt holes.
Apply adhesive to 2 or 3 threads at the end of each of the 10 bolts.
- Adhesive:
- Toyota Genuine Adhesive 1324, Three Bond 1324 or equivalent
Install and uniformly tighten the 10 bolts in several steps in the sequence shown in the illustration.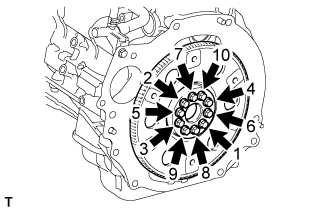
- Torque:
- 74 N*m{ 755 kgf*cm , 55 ft.*lbf }
- NOTICE:
- Do not start the engine for at least an hour after installing the drive plate and ring gear sub-assembly.
| 38. INSTALL MANUAL TRANSMISSION ASSEMBLY (for Manual Transmission) |
| 39. INSTALL AUTOMATIC TRANSMISSION ASSEMBLY (for Automatic Transmission) |
| 40. INSTALL STARTER ASSEMBLY |
- for 1.6 kW (Click here)
- for 2.0 kW (Click here)
| 41. INSTALL ENGINE ASSEMBLY WITH TRANSMISSION |
Place the engine on an engine lifter.
- HINT:
- Place the engine on wooden blocks or equivalent so that the engine is level.
Remove the 2 bolts and 2 engine hangers.
Operate the engine lifter and install the engine to the vehicle.
- CAUTION:
- Do not raise the engine more than necessary. If the engine is raised excessively, the vehicle may also be lifted up.
- NOTICE:
- Make sure that the engine is clear of all wiring and hoses.
- While raising the engine into the vehicle, do not allow it to contact the vehicle.
- Make sure that the engine is clear of all wiring and hoses.
Install the stabilizer brackets and 16 bolts of the front suspension crossmember.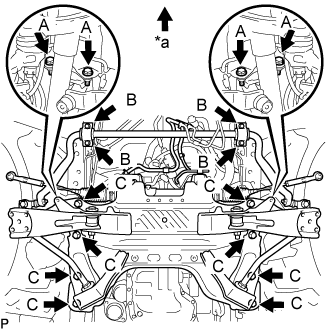
- Torque:
- for bolt A:
- 39 N*m{ 398 kgf*cm , 29 ft.*lbf }
- for bolt B:
- 36 N*m{ 367 kgf*cm , 27 ft.*lbf }
- for bolt C:
- 150 N*m{ 1530 kgf*cm , 111 ft.*lbf }
Text in Illustration *a
Front Side
Connect the rear engine mount.
- Torque:
- 98 N*m{ 999 kgf*cm , 72 ft.*lbf }
- NOTICE:
- Be sure to tighten the nut side.
Remove the engine lifter slowly.
| 42. CONNECT STEERING TORQUE SHAFT ASSEMBLY |
Align the matchmarks on the steering torque shaft assembly and the power steering link assembly.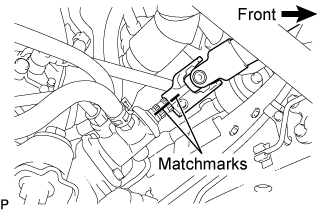
Install bolt (B) and tighten the 2 bolts.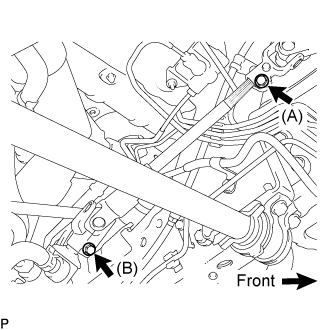
- Torque:
- 35 N*m{ 360 kgf*cm , 26 ft.*lbf }
| 43. CONNECT OIL COOLER HOSE (for Automatic Transmission) |
Connect the inlet oil cooler hose and outlet oil cooler hose to the oil cooler tube, and slide the 2 clamps to secure the hose.
| 44. CONNECT TRANSMISSION CONTROL CABLE ASSEMBLY (for Automatic Transmission) |
Turn the control shaft lever clockwise until it stops, and then return the control shaft lever counterclockwise 2 notches to N.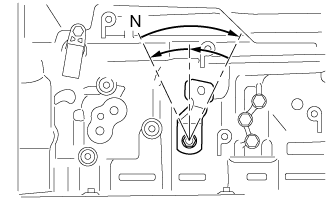
Connect the end of the transmission control shift cable assembly to the transmission control shaft lever LH.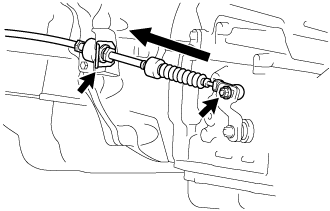
Move the shift lever to N, and with the cable end lightly pushed toward the front of the vehicle, install the transmission control cable assembly to the transmission control shaft lever LH with the nut.
- Torque:
- 15 N*m{ 148 kgf*cm , 11 ft.*lbf }
- HINT:
- Tighten the nut with no slack in the control cable.
Connect the transmission control shift cable assembly to the No. 1 transmission control cable bracket with a new clip.
| 45. INSTALL TRANSMISSION CONTROL CABLE ASSEMBLY (for Manual Transmission) |
Install 2 new clips to the transmission control cable bracket No.1.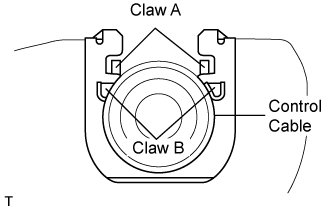
Install the transmission control cable assembly to the transmission control cable bracket No.1.
- NOTICE:
- Be sure that A claws of the clips are firmly engaged into the bracket grooves.
- Be sure the cable is set in the clip with both B claws erected to prevent slippage of the cable in the opposite direction.
- Be sure that A claws of the clips are firmly engaged into the bracket grooves.
Align the matchmarks on the control cable assembly and the outer lever.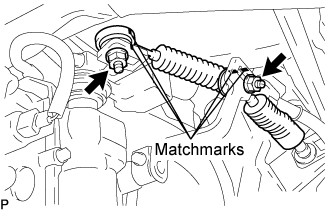
Install the transmission control cable assembly to the outer levers with the 2 nuts.
- Torque:
- 37 N*m{ 377 kgf*cm , 27 ft.*lbf }
| 46. INSTALL CLUTCH RELEASE CYLINDER ASSEMBLY (for Manual Transmission) |
Install the clutch release cylinder with the 2 bolts.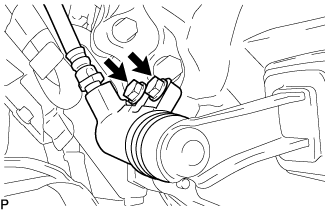
- Torque:
- 12 N*m{ 120 kgf*cm , 9 ft.*lbf }
| 47. CONNECT FRONT SHOCK ABSORBER ASSEMBLY LH |
| 48. CONNECT FRONT SHOCK ABSORBER ASSEMBLY RH |
- HINT:
- Use the same procedure described for the LH side.
| 49. CONNECT FRONT SUSPENSION SUB-ASSEMBLY UPPER LH |
Connect the front suspension upper arm to the steering knuckle with the nut.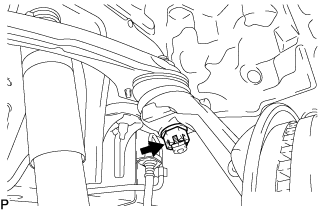
- Torque:
- 113 N*m{ 1,150 kgf*cm , 83 ft.*lbf }
Install a new cotter pin.
- NOTICE:
- If the holes for the cotter pin are not aligned, tighten the nut up to 60°.
- Do not damage the ball joint dust cover.
- If the holes for the cotter pin are not aligned, tighten the nut up to 60°.
| 50. CONNECT FRONT SUSPENSION SUB-ASSEMBLY UPPER RH |
- HINT:
- Use the same procedure described for the LH side.
| 51. INSTALL FRONT DISC BRAKE CALIPER ASSEMBLY LH |
Install the brake caliper assembly to the steering knuckle with the 2 bolts.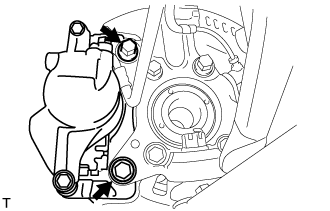
- Torque:
- 123 N*m{ 1,250 kgf*cm , 91 ft.*lbf }
| 52. INSTALL FRONT DISC BRAKE CALIPER ASSEMBLY RH |
- HINT:
- Use the same procedure described for the LH side.
| 53. INSTALL FRONT SPEED SENSOR LH |
Install the speed sensor to the steering knuckle with the 2 bolts.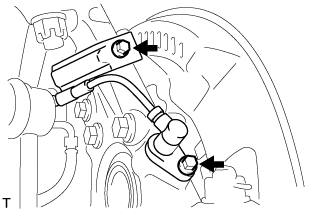
- Torque:
- 8.5 N*m{ 87 kgf*cm , 75 in.*lbf }
- NOTICE:
- Prevent foreign matter from adhering to the speed sensor.
- Be careful not to damage the speed sensor.
- Do not twist the sensor wire when installing the speed sensor.
- Prevent foreign matter from adhering to the speed sensor.
| 54. INSTALL FRONT SPEED SENSOR RH |
- HINT:
- Use the same procedure described for the LH side.
| 55. INSTALL PROPELLER WITH CENTER BEARING SHAFT ASSEMBLY (for Super Long Wheelbase) |
Remove the SST from the extension housing.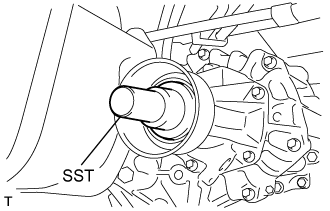
Install the propeller with center bearing shaft assembly in the extension housing.
Install the center support bearing assembly No.1, and temporarily tighten the 2 bolts.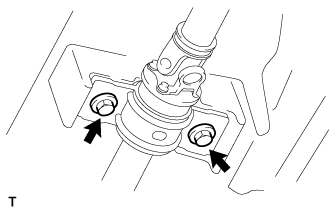
Align the matchmarks on the propeller shaft flange and differential flange.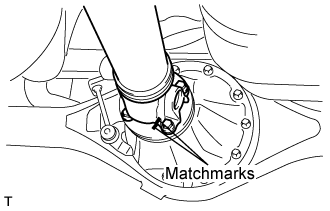
Install the propeller shaft assembly with the 4 nuts, 4 bolts and 4 washers.
- Torque:
- 74 N*m{ 755 kgf*cm , 54 ft.*lbf }
Check that the center line of the bracket is at right angles to the shaft axial direction.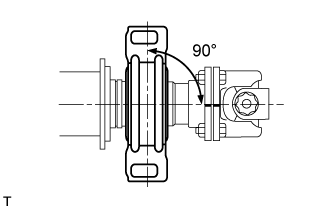
Adjust the center support bearing assembly No.1.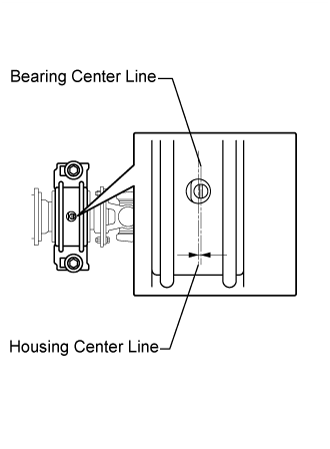
- HINT:
- With the vehicle unladen, adjust the center support bearing No.1 to maintain the angles, as shown.
- In the same conditions, check the center line in the axial direction. Adjust the bearing if necessary.
- The center bearing center line and center bearing housing center line must be adjusted to within -1.0 to 1.0 mm (-0.0394 to 0.0394 in.) of each other in the vehicle's longitudinal direction with the vehicle unladen.
- With the vehicle unladen, adjust the center support bearing No.1 to maintain the angles, as shown.
Tighten the 2 bolts.
- Torque:
- 36 N*m{ 369 kgf*cm , 27 ft.*lbf }
| 56. INSTALL PROPELLER SHAFT ASSEMBLY (for Long Wheelbase) |
Remove the SST from the extension housing.
Install the propeller shaft assembly in the extension housing.
Align the matchmarks on the propeller shaft flange and differential flange.
Install the propeller shaft assembly with the 4 nuts, 4 bolts and 4 washers.
- Torque:
- 74 N*m{ 755 kgf*cm , 54 ft.*lbf }
| 57. INSTALL CENTER EXHAUST PIPE ASSEMBLY (for Super Long Wheelbase) |
Install a new gasket to the exhaust pipe assembly center.
Connect the exhaust pipe assembly center to the exhaust pipe supports.
Install the exhaust pipe assembly center and exhaust pipe assembly tail with the 2 bolts.
- Torque:
- 48 N*m{ 489 kgf*cm , 35 ft.*lbf }
| 58. INSTALL FRONT EXHAUST PIPE ASSEMBLY (for Super Long Wheelbase) |
w/ Secondary air injection system:
Install the air fuel ratio sensor. (Click here)
- Torque:
- 44 N*m{ 449 kgf*cm , 32 ft.*lbf }
For Unleaded gasoline engine:
Install the oxygen sensor. (Click here)
- Torque:
- 44 N*m{ 449 kgf*cm , 32 ft.*lbf }
Inspect the compression spring.
Using vernier calipers, measure the free length of the compression springs.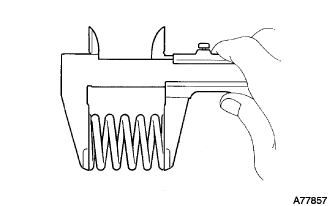
- Minimum length:
- 40.5 mm (1.594 in.)
- HINT:
- If the free length is less than the minimum, replace the compression spring.
Install the gasket.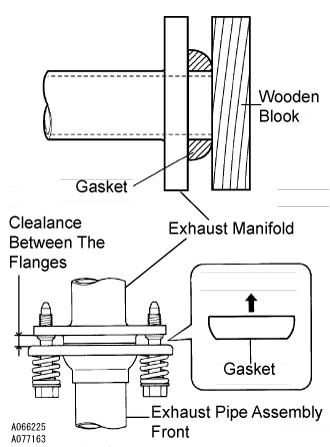
Fully insert a new gasket to the exhaust manifold by hand.
Using a wooden block, uniformly strike the gasket so that the gasket and exhaust manifold are properly fit.
- NOTICE:
- Be careful with the installation direction of the gasket.
- Do not reuse the gasket.
- Do not damage the gasket.
- To ensure a proper seal, do not use the exhaust pipe assembly front to force the gasket onto the exhaust manifold.
- Be careful with the installation direction of the gasket.
Install a new gasket to the exhaust pipe assembly front.
Connect the exhaust pipe assembly front to the exhaust pipe support.
Install the exhaust pipe assembly front with the 4 bolts, 2 nuts, and 2 compression springs.
- Torque:
- Exhaust manifold side:
- 43 N*m{ 438 kgf*cm , 32 ft.*lbf }
- Exhaust pipe assembly center side:
- 48 N*m{ 489 kgf*cm , 35 ft.*lbf }
- NOTICE:
- After installation, check that the clearance is almost the same at any point between the flanges of the exhaust manifold and exhaust pipe assembly front.
For Unleaded gasoline engine:
Connect the sensor connector(s).
| 59. INSTALL FRONT EXHAUST PIPE ASSEMBLY (for Long Wheelbase) |
w/ Secondary air injection system:
Install the fuel ratio sensor. (Click here)
- Torque:
- 44 N*m{ 449 kgf*cm , 32 ft.*lbf }
For unleaded gasoline engine:
Install the oxygen sensor. (Click here)
- Torque:
- 44 N*m{ 449 kgf*cm , 32 ft.*lbf }
Inspect the compression spring.
Using vernier calipers, measure the free length of the compression springs.
- Minimum length:
- 40.5mm(1.594 in.)
- HINT:
- If the free length is less than the minimum, replace the compression spring.
Install the gasket.
Fully insert a new gasket to the exhaust manifold by hand.
Using a wooden block, uniformly strike the gasket so that the gasket and exhaust manifold are properly fit.
- NOTICE:
- Be careful with the installation direction of the gasket.
- Do not reuse the gasket.
- Do not damage the gasket.
- To ensure a proper seal, do not use the exhaust pipe assembly front to force the gasket onto the exhaust manifold.
- Be careful with the installation direction of the gasket.
Install a new gasket to the exhaust pipe assembly front.
Connect the exhaust pipe assembly front to the exhaust pipe support.
Install the exhaust pipe assembly front with the 4 bolts, 2 nuts, and 2 compression springs.
- Torque:
- Exhaust manifold side:
- 43 N*m{ 438 kgf*cm , 32 ft.*lbf }
- Torque:
- Exhaust pipe assembly tail side:
- 48 N*m{ 489 kgf*cm , 35 ft.*lbf }
- NOTICE:
- After installation, check that the clearance is almost the same at any point between the flanges of the exhaust manifold and exhaust pipe assembly front.
For unleaded gasoline engine:
Connect the sensor connector(s).
| 60. CONNECT ENGINE WIRE |
Install the nut and connect the 4 connectors as shown in the illustration.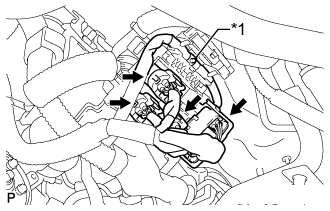
- Torque:
- 9.8 N*m{ 100 kgf*cm , 87 in.*lbf }
Text in Illustration *1
Nut
Connect the starter connector (Click here).
Connect the generator connector (Click here).
Connect the clamps of the engine wire and ground cable.
Connect the connectors of the ECM.
Connect the wire harness support of the ECM.
| 61. CONNECT COMPRESSOR AND MAGNETIC CLUTCH (w/ Air Conditioning System) |
Temporarily install the bolt A to connect the compressor and magnetic clutch.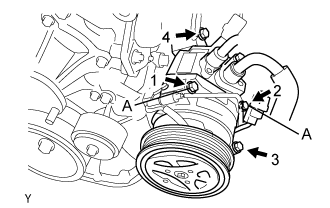
Connect the compressor and magnetic clutch completely by tightening the 4 bolts in the order shown in the illustration.
- Torque:
- 25 N*m{ 250 kgf*cm , 18 ft.*lbf }
- NOTICE:
- In order to prevent misalignment, which causes belt rattle, tightening of the bolts must be performed in the order shown.
Connect the compressor and magnetic clutch connector.
| 62. INSTALL ENGINE OIL LEVEL DIPSTICK GUIDE |
Install the engine oil level dipstick guide with the bolt to the front No. 1 engine mounting bracket LH.
- Torque:
- 20 N*m{ 204 kgf*cm , 15 ft.*lbf }
| 63. INSTALL ENGINE OIL LEVEL DIPSTICK |
| 64. INSTALL VANE PUMP ASSEMBLY |
Connect the vane pump assembly with the 2 bolts.
- Torque:
- 21 N*m{ 214 kgf*cm , 15 ft.*lbf }
Connect the oil pressure switch connector.
| 65. CONNECT NO. 2 FUEL HOSE |
Connect the No. 2 fuel hose to the fuel delivery pipe sub-assembly (Click here).
| 66. CONNECT NO. 1 FUEL HOSE |
Connect the No. 1 fuel hose to the fuel pressure pulsation damper assembly (Click here).
| 67. CONNECT NO. 5 AIR HOSE |
Connect the No. 5 air hose to the air switching valve assembly, and slide the clamp to secure the hose.
| 68. INSTALL INTAKE AIR CONNECTOR |
Temporarily install the intake air connector to the throttle body assembly.
Connect the vacuum hose to the intake air connector.
Connect the No. 2 PCV hose to the cylinder head cover sub-assembly, and slide the clamp to secure the hose.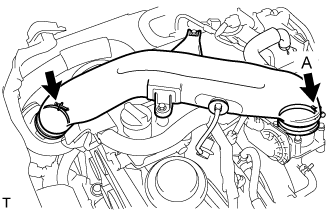
Install the intake air connector with the 2 bolts.
- Torque:
- 8.0 N*m{ 82 kgf*cm , 71 in.*lbf }
Tighten the 2 hose clamps.
- Torque:
- for clamp A:
- 5.0 N*m{ 51 kgf*cm , 44 in.*lbf }
| 69. INSTALL AIR PRESSURE SENSOR |
Install the air pressure sensor with the bolt.
- Torque:
- 5.0 N*m{ 51 kgf*cm , 44 in.*lbf }
Install the air pressure sensor together with the bracket with the 2 bolts.
- Torque:
- 8.0 N*m{ 82 kgf*cm , 71 in.*lbf }
Attach the wire harness clamp.
Connect the vacuum hose and clamp.
Connect the connector.
| 70. CONNECT UNION TO CONNECTOR TUBE HOSE |
Connect the union to connector tube hose to the intake manifold, and slide the clamp to secure the hose.
| 71. CONNECT FUEL VAPOR FEED HOSE ASSEMBLY |
Connect the fuel vapor feed hose assembly to the purge VSV, and slide the clamp to secure the hose.
| 72. CONNECT OUTLET HEATER WATER HOSE B |
Connect the outlet heater water hose B to the heater unit, and slide the clamp to secure the hose.
| 73. CONNECT INLET HEATER WATER HOSE A |
Connect the inlet heater water hose A to the heater unit, and slide the clamp to secure the hose.
| 74. CONNECT NO. 2 RADIATOR HOSE |
Connect the No. 2 radiator hose to the No. 1 radiator pipe, and slide the clamp to secure the hose.
| 75. CONNECT NO. 4 RADIATOR HOSE |
Connect the No. 4 radiator hose to the engine, and slide the clamp to secure the hose.
| 76. INSTALL FAN AND GENERATOR V BELT |
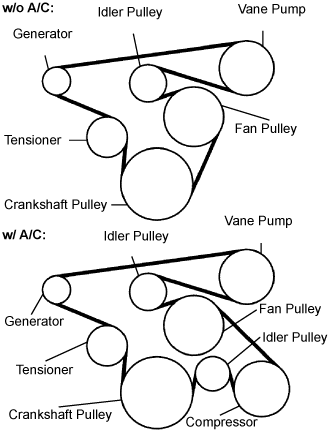 |
Install the drive belt to the pulleys except the drive belt tensioner pulley.
Use the hexagon-shaped part indicated by the arrow in the illustration to move the tensioner pulley downward and then install the drive belt to the tensioner pulley.
- NOTICE:
- The backside of the drive belt should face the tensioner pulley.
- Check that the drive belt is properly set to each pulley.
- The backside of the drive belt should face the tensioner pulley.
After a new belt has been installed, check that the tensioner indicator mark is within range A shown in the illustration.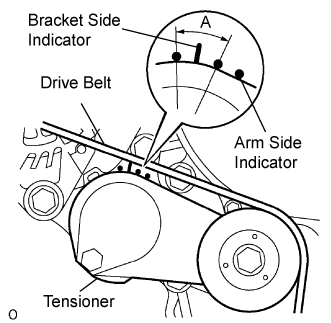
| 77. INSPECT FAN AND GENERATOR V BELT |
Visually check the belt for excessive wear, frayed cords, etc. If any defect has been found, replace the belt.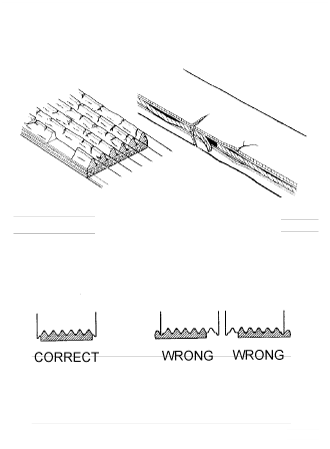
- HINT:
- Cracks on the rib side of a belt are considered acceptable. If the belt has chunks missing from the ribs, it should be replaced.
- After installing the V-ribbed belt, check that it fits properly in the ribbed grooves. Check to confirm that the belt has not slipped out of the grooves on the bottom of the crank pulley by hand.
- A "new belt" is a belt which has been used for less than 5 minutes with the engine running.
- A "used belt" is a belt which has been used for 5 minutes with the engine running.
- After installing a new belt, run the engine for approximately 5 minutes and then recheck the tension.
- Cracks on the rib side of a belt are considered acceptable. If the belt has chunks missing from the ribs, it should be replaced.
- HINT:
- Cracks on the rib side of a belt are considered acceptable. If the belt has chunks missing from the ribs, it should be replaced.
| 78. INSTALL ENGINE SERVICE HOLE SUB COVER SUB-ASSEMBLY |
Install the engine service hole cover with the 5 bolts.
- Torque:
- 13 N*m{ 133 kgf*cm , 10 ft.*lbf }
| 79. INSTALL FRONT DOOR SCUFF PLATE RH |
| 80. INSTALL FRONT SEAT ASSEMBLY RH (for Hi-back Seat Type) |
- HINT:
- Use the same procedure described for the LH side. (Click here)
| 81. INSTALL FRONT SEAT ASSEMBLY RH (for Low-back Seat Type) |
- HINT:
- Use the same procedure described for the LH side. (Click here)
| 82. CONNECT CABLE TO NEGATIVE BATTERY TERMINAL |
- NOTICE:
- When disconnecting the cable, some systems need to be initialized after the cable is reconnected (Click here).
| 83. ADD ENGINE OIL |
Add fresh engine oil.
- Standard Capacity:
Item
Specified Condition
Drain and refill without oil filter change
4.9 liters (5.2 US qts, 4.3 Imp. qts)
Drain and refill with oil filter change
5.3 liters (5.6 US qts, 4.7 Imp. qts)
Dry fill
6.7 liters (7.1 US qts, 5.9 Imp. qts)
Install the oil filler cap.
| 84. ADD ENGINE COOLANT |
Tighten the radiator drain cock plug by hand.
Tighten the cylinder block water drain cock plug.
- Torque:
- 13 N*m{ 130 kgf*cm , 9 ft.*lbf }
Fill the radiator reservoir assembly with engine coolant to the top of the inlet.
- Standard Capacity:
Item
Specified Condition
w/o Rear Heater
11.2 liters (11.8 US qts, 9.9 Imp. qts)
w/ Rear Heater
13.2 liters (13.9 US qts, 11.6 Imp. qts)
- NOTICE:
- Never use water as a substitute for engine coolant.
- HINT:
- TOYOTA vehicles are filled with TOYOTA SLLC at the factory. In order to avoid damage to the engine cooling system and other technical problems, only use TOYOTA SLLC or similar high quality ethylene glycol based non-silicate, non-amine, non-nitrite, non-borate coolant with long-life hybrid organic acid technology (coolant with long-life hybrid organic acid technology is a combination of low phosphates and organic acids).
Remove the 2-way that is located near the throttle body assembly.
When air is bled and the engine coolant drains out, install the 2-way.
Add coolant through the radiator reservoir assembly filler opening until the coolant reaches the B line and install the radiator reservoir cap sub-assembly. [*1]
Warm up the engine until the thermostat opens. While the thermostat is open, circulate the coolant for several minutes. [*2]
- CAUTION:
- Wear protective gloves.
- Be careful as the radiator hoses are hot.
- Keep your hands away from the radiator fans.
- Wear protective gloves.
- NOTICE:
- Immediately after starting the engine, if the radiator reservoir assembly does not have any engine coolant, perform the following: 1) stop the engine, 2) wait until the engine coolant has cooled down, and 3) add engine coolant.
- Do not start the engine when there is no engine coolant in the radiator reservoir assembly.
- Make sure that the needle does not show an abnormally high temperature.
- If there is not enough engine coolant, the engine may overheat.
- Immediately after starting the engine, if the radiator reservoir assembly does not have any engine coolant, perform the following: 1) stop the engine, 2) wait until the engine coolant has cooled down, and 3) add engine coolant.
- HINT:
- Press the No. 2 and No. 3 radiator hoses several times by hand, and then check the level of the engine coolant.
- The thermostat open timing can be confirmed by pressing the No. 3 radiator hose by hand, and checking when the engine coolant starts to flow inside the hose.
- Press the No. 2 and No. 3 radiator hoses several times by hand, and then check the level of the engine coolant.
Stop the engine, and wait until the engine coolant cools down to ambient temperature. [*3]
Check the engine coolant level in the radiator reservoir assembly. [*4]
- HINT:
- If the engine coolant level is below the LOW line, repeat step *1 through *4.
- If the engine coolant level is above the FULL line, drain engine coolant until the engine coolant level is between the FULL and LOW lines.
- If the engine coolant level is below the LOW line, repeat step *1 through *4.
| 85. INSPECT FUEL LEAK |
Make sure that there are no fuel leaks after performing maintenance on the fuel system.
Connect the GTS to the DLC3.
Turn the ignition switch to ON and turn the GTS on.
- NOTICE:
- Do not start the engine.
Enter the following menus: Powertrain / Engine and ECT / Active Test / Control the Fuel Pump / Speed.
Check that there are no fuel leaks from the fuel system.
If there are fuel leaks, repair or replace parts as necessary.Turn the ignition switch off.
Disconnect the GTS from the DLC3.
| 86. INSPECT FOR OIL LEAK |
Start the engine. Make sure that there are no oil leaks from the areas that were worked on.
| 87. CHECK MANUAL TRANSMISSION FLUID LEVEL (for Manual Transmission) |
Park the vehicle in a level place.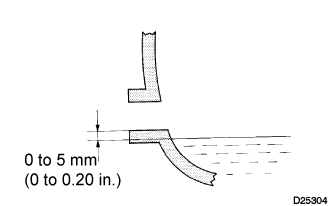
Remove the transmission filler plug and gasket.
Check that the oil surface is within 5 mm (0.20 in.) below the lowest point of the transmission filler plug opening.
- Oil grade:
- TOYOTA Genuine Manual Transmission Gear oil API GL-3 (GL-4) or equivalent
- Viscosity:
- SAE 75W-90
- Capacity:
- 2.2 liters (2.3 US qts, 1.9 Imp. qts)
- NOTICE:
- Problems may occur when the oil level is too high or too low.
- After replacing the oil, drive the vehicle and check the oil level again.
- Problems may occur when the oil level is too high or too low.
Check for oil leakage if the oil level is low.
Install the transmission filler plug and a new gasket.
- Torque:
- 37 N*m{ 377 kgf*cm , 27 ft.*lbf }
| 88. INSPECT FOR COOLANT LEAKS |
- CAUTION:
- Do not remove the radiator cap while the engine and radiator are still hot. Pressurized, hot engine coolant and steam may be released and cause serious burns.
Fill the radiator with coolant and attach a radiator cap tester to the radiator.
Warm up the engine.
Using a radiator cap tester, increase the pressure inside the radiator to 137 kPa (1.4 kgf/cm2, 19.9 psi), and check that the pressure does not drop.
- HINT:
- If the pressure drops, check the hoses, radiator or water pump for leaks. If no external leaks are found, check the heater core, cylinder block and cylinder head.
| 89. INSPECT SHIFT LEVER POSITION (for Automatic Transmission) |
When moving the shift lever from P to R with the ignition switch to ON and the brake pedal depressed, make sure that the shift lever moves smoothly and correctly to P.
Make sure that the shifting lever moves smoothly and can be moderately operated.
When starting the engine, make sure that the vehicle moves forward when shifting from N to D and moves rearward when shifting to R.
| 90. ADJUST AUTOMATIC TRANSMISSION FLUID (for Automatic Transmission) |
| 91. INSPECT FOR EXHAUST GAS LEAK |
| 92. INSPECT AUTOMATIC TRANSMISSION FLUID LEAK |
| 93. ADJUST FRONT WHEEL ALIGNMENT |
| 94. INSTALL ENGINE SIDE UNDER COVER RH (w/ Cover) |
- Torque:
- 13 N*m{ 133 kgf*cm , 10 ft.*lbf }
| 95. INSTALL ENGINE SIDE UNDER COVER LH (w/ Cover) |
- Torque:
- 13 N*m{ 133 kgf*cm , 10 ft.*lbf }
| 96. INSTALL NO. 2 ENGINE UNDER COVER (w/ Cover) |
- Torque:
- 13 N*m{ 133 kgf*cm , 10 ft.*lbf }
| 97. INSTALL NO. 1 ENGINE UNDER COVER (w/ Cover) |
- Torque:
- 13 N*m{ 133 kgf*cm , 10 ft.*lbf }
| 98. INSPECT IGNITION TIMING |
Warm up and stop the engine.
- NOTICE:
- A warmed up engine should have an engine coolant temperature of over 80°C (176°F), have an engine oil temperature of 60°C (140°F), and the engine rpm should be stabilized.
When using the intelligent tester:
Connect the intelligent tester to the DLC3.
Start the engine and idle it.
Turn the intelligent tester main switch on.
Enter the following items:
Powertrain / Engine and ECT / Data list / IGN Advance- Ignition timing:
- 5 to 15° BTDC at idle
- HINT:
- Refer to the intelligent tester operator's manual for further detail.
When not using the intelligent tester:
Connect the tester probe of a timing light to the wire of the ignition coil connector for the No.4 cylinder.
- NOTICE:
- Use a timing light that detects the first signal.
- After checking, be sure to wrap the wire harness with tape.
- Use a timing light that detects the first signal.
Turn the ignition switch to the ON position.
Using SST, connect terminals 13 (TC) and 4 (CG) of the DLC3.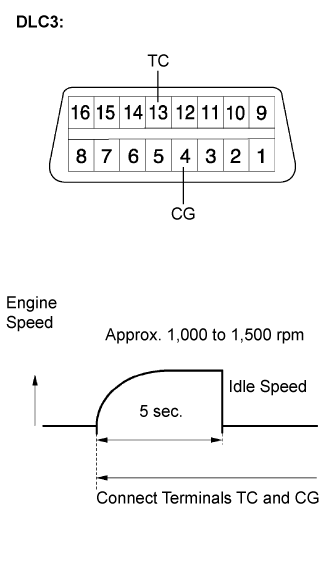
- SST
- 09843-18040
- NOTICE:
- Confirm the terminal numbers before connecting them. Connecting the wrong terminals can damage the engine.
- When checking the ignition timing, the transmission should be in the neutral.
- Confirm the terminal numbers before connecting them. Connecting the wrong terminals can damage the engine.
- HINT:
- After connecting terminals (TC and CG), engine rpm changes to approximately 1,000 to 1,500 rpm for 5 seconds, then returns to idle speed. This is because the ECM checks that the ISC (idle speed control system) operates properly.
- Perform the inspection of the ignition timing after engine rpm is returned to idle speed.
- After connecting terminals (TC and CG), engine rpm changes to approximately 1,000 to 1,500 rpm for 5 seconds, then returns to idle speed. This is because the ECM checks that the ISC (idle speed control system) operates properly.
Inspect the ignition timing
- Ignition timing:
- 3 to 7° BTDC at idle
Disconnect terminals 13 (TC) and 4 (CG) of the DLC3.
Inspect the ignition timing
- Ignition timing:
- 5 to 15° BTDC at idle
Check that the ignition timing advances immediately when the engine speed is increased.
Turn the ignition switch off.
Remove the timing light.
| 99. INSPECT ENGINE IDLE SPEED |
Warm up and stop the engine.
- NOTICE:
- A warmed up engine should have an engine coolant temperature of over 80°C (176°F), have an engine oil temperature of 60°C (140°F), and the engine rpm should be stabilized.
When using the intelligent tester:
Connect the intelligent tester to the DLC3.
- HINT:
- Refer to the intelligent tester operator's manual for further details.
Start the engine and idle it.
Turn the intelligent tester main switch on.
Enter the following items:
Powertrain / Engine and ECT / Data list / Engine SPD- Idle speed:
- 600 to 700 rpm
- NOTICE:
- When checking the idle speed, the transmission should be in the neutral position.
- Switch off all accessories and air conditioning before connecting the intelligent tester.
- When checking the idle speed, the transmission should be in the neutral position.
Turn the ignition switch off.
Disconnect the intelligent tester from the DLC3.
When not using the intelligent tester: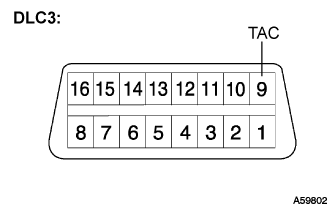
Install SST to terminal 9 (TAC) of DLC3, then connect a tachometer.
- SST
- 09843-18030
- NOTICE:
- Confirm the terminal numbers before connecting them. Connecting the wrong terminals can damage the engine.
Turn the ignition switch to the ON position.
Inspect the engine idling speed.
- Idle speed:
- 600 to 700 rpm
Turn the ignition switch off.
Disconnect the tachometer.
Remove the SST from terminal 9 (TAC).
- SST
- 09843-18030
| 100. INSPECT CO/HC |
- HINT:
- The ECM properly controls the CO/HC concentration in the emission gas.
Start the engine.
Run the engine at 2,500 rpm for approximately 180 seconds.
Insert the CO/HC meter testing probe at least 40 cm (1.3 ft) into the tail pipe while idling.
Check the CO/HC concentration with the engine idling and/or running at 2,500 rpm.
- HINT:
- If the CO/HC concentration does not comply with the regulations, troubleshoot in the order given below.
- Check the heated oxygen sensor operation (Click here).
- Check the heated air fuel ratio sensor operation (Click here).
- See the table below for possible causes, then inspect the applicable causes and repair them if necessary.
- If the CO/HC concentration does not comply with the regulations, troubleshoot in the order given below.
CO
HC
Problems
Causes
Normal
High
Rough idle
- Faulty ignitions:
- Incorrect timing
- Fouled, shorted or improperly gapped plugs
- Incorrect valve clearance
- Leaks in intake and exhaust valves
- Leaks in cylinders
Low
High
Rough idle (Fluctuating HC reading)
- Vacuum leaks:
- PCV hoses
- Intake manifold
- Throttle body
- Brake booster line
- Lean mixture causing misfire
High
High
Rough idle (Black smoke from exhaust)
- Restricted air filter
- Plugged PCV valve
- Faulty SFI systems:
- Faulty pressure regulator
- Defective engine coolant temperature sensor
- Defective mass air flow meter
- Faulty ECM
- Faulty injectors
- Faulty throttle body
| 101. INSPECT FUNCTION OF THROTTLE BODY |
Check the throttle control motor operating sounds.
Turn the ignition switch to the ON position.
When pressing the accelerator pedal, listen to the running sounds of the motor. Make sure no friction noise comes from the motor.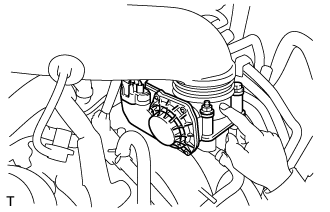
If friction noise exists, replace the throttle body.
Check the throttle position sensor.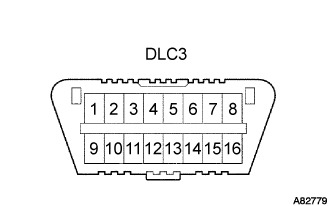
Connect the intelligent tester to the DLC3.
Turn the ignition switch to the ON position.
Turn the intelligent tester main switch on.
Enter the following menus: Power train / Engine / Data List / Throttle Sensor Position and Throttle Position Sensor Position #2.
Depress the accelerator pedal. When the throttle valve is fully opened, check that the value of the "Throttle Sensor Position" is within the specification.
- Standard throttle valve opening percentage:
- 60% or more
- NOTICE:
- When checking the standard throttle valve opening percentage, the shift lever should be in the N position.
- HINT:
- If the percentage is less than 60%, replace the throttle body.
| 102. INSPECT ABS SENSOR SIGNAL |