INSTALLATION
Removal / installation · Vehicles built Oct 2014 – Dec 2014
Versions by build date: Oct 2014 – Dec 2014 Jan 2015 – Dec 2016 from Jan 2017
| 1. INSTALL WIRE HARNESS CLAMP BRACKET |

Install the bolt and wire harness clamp bracket.
| 2. INSTALL ENGINE OIL PRESSURE SWITCH ASSEMBLY |
Clean the threads of the oil pressure switch, and apply adhesive to them.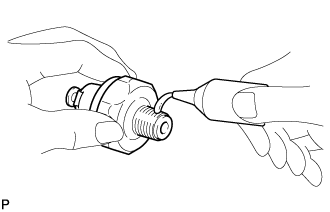

- Adhesive:
- Toyota Genuine Adhesive 1344, Three Bond 1344 or equivalent
Using a 24 mm deep socket wrench, install the oil pressure switch.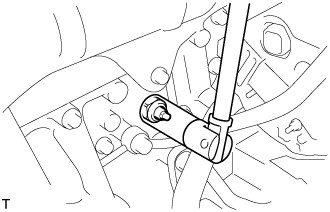
- Torque:
- 15 N*m{ 155 kgf*cm , 11 ft.*lbf }
| 3. INSTALL OIL FILTER BRACKET SUB-ASSEMBLY |
Install a new gasket and oil filter bracket with the 10 bolts and 2 nuts.
- Torque:
- 30 N*m{ 300 kgf*cm , 22 ft.*lbf }
| 4. INSTALL OIL FILTER SUB-ASSEMBLY |
Check and clean the oil filter installation surface.
Apply clean engine oil to the rubber gasket of a new oil filter.
Instal the oil filter, and tighten it by hand until the rubber gasket contacts the installation surface.
Using SST, tighten it by an additional 3/4 turn to seat the filter.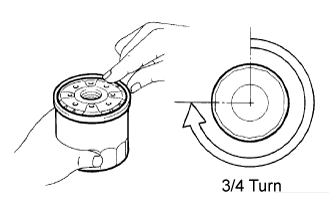
- SST
- 09228-44011
| 5. INSTALL EXHAUST MANIFOLD |
Install a new gasket to the cylinder head.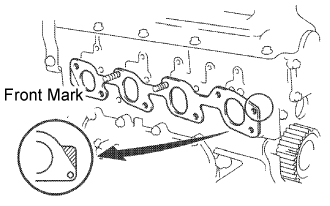
- HINT:
- Be sure to install a new gasket in the correct direction as shown in the illustration.
Install the exhaust manifold with the 6 bolts and 2 new nuts. Uniformly tighten the bolts and nuts in several steps.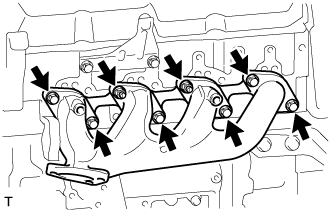
- Torque:
- 52 N*m{ 530 kgf*cm , 38 ft.*lbf }
| 6. INSTALL EXHAUST MANIFOLD HEAT INSULATOR NO.1 |
Install the heat insulator with the 3 bolts.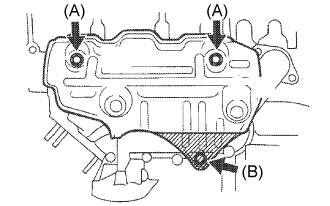
- Torque:
- Bolt (A):
- 18 N*m{ 185 kgf*cm , 13 ft.*lbf }
- Bolt (B):
- 19 N*m{ 195 kgf*cm , 14 ft.*lbf }
| 7. INSTALL OIL LEVEL GAGE GUIDE |
Install the oil level gage guide to the cylinder head.
| 8. INSTALL OIL LEVEL GAGE SUB-ASSEMBLY |
Install the oil level gage sub-assembly to the cylinder head.
| 9. INSTALL ENGINE MOUNTING BRACKET FRONT NO.1 RH |
Install the 6 bolts and engine mounting bracket front No.1 RH.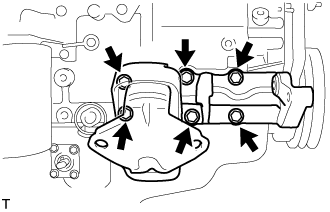
- Torque:
- 49 N*m{ 500 kgf*cm , 36 ft.*lbf }
| 10. INSTALL GENERATOR W/ VACUUM PUMP ASSEMBLY |
Temporarily tighten the bolt and generator w/ vacuum pump assembly.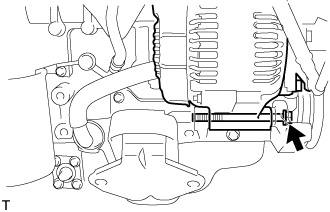
Install the clip with the hose connected.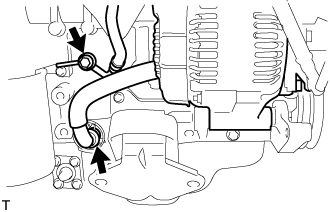
Install the bolt with the hose connected.
- Torque:
- 14 N*m{ 140 kgf*cm , 10 ft.*lbf }
| 11. INSTALL PUMP BRACKET |
Install the 6 bolts and pump bracket.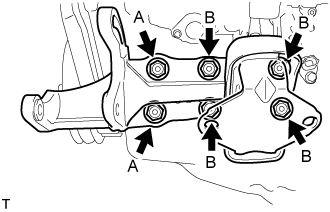
- Torque:
- Bolt (A):
- 78 N*m{ 795 kgf*cm , 58 ft.*lbf }
- Bolt (B):
- 57 N*m{ 581 kgf*cm , 42 ft.*lbf }
| 12. INSTALL EXHAUST PIPE SUPPORT BRACKET NO.1 |
Install the 2 bolts, exhaust pipe support bracket No.1 and stiffener plate RH.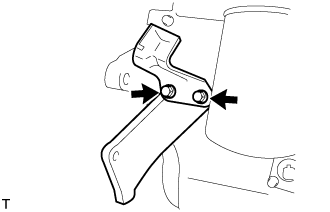
- Torque:
- 37 N*m{ 377 kgf*cm , 27 ft.*lbf }
| 13. INSTALL ENGINE OIL LEVEL SENSOR |
Install the 4 bolts and engine oil level sensor.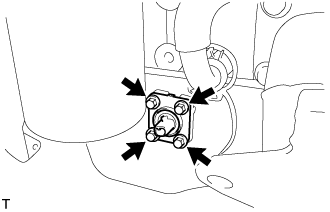
- Torque:
- 7.0 N*m{ 71 kgf*cm , 62 in.*lbf }
| 14. INSTALL CYLINDER BLOCK WATER DRAIN COCK SUB-ASSEMBLY |
Clean the threads of the water drain cock, and apply adhesive to them.
- Adhesive:
- Toyota Genuine Adhesive 1324, Three Bond 1324 or equivalent
Install the water drain cock.
- Torque:
- 57 N*m{ 581 kgf*cm , 42 ft.*lbf }
| 15. INSTALL WATER BY-PASS HOSE UNION |
Clean the threads of the water by-pass hose union, and apply adhesive to them.
- Adhesive:
- Toyota Genuine Adhesive 1324, Three Bond 1324 or equivalent
Install the water by-pass hose union.
- Torque:
- 39 N*m{ 400 kgf*cm , 29 ft.*lbf }
| 16. INSTALL INTAKE MANIFOLD |
Install a new gasket to the cylinder head with the protrusion facing upward.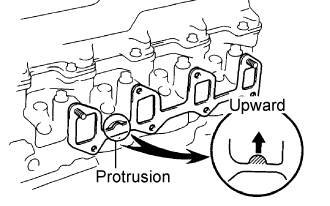
Install the intake manifold with the 6 bolts and 2 nuts. Uniformly tighten the bolts and nuts in several steps.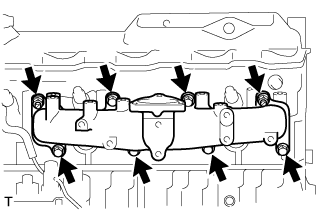
- Torque:
- 24 N*m{ 240 kgf*cm , 17 ft.*lbf }
| 17. INSTALL WATER OUTLET HOUSING |
Install a new gasket, the water outlet and outlet hosing assembly with the 3 bolts.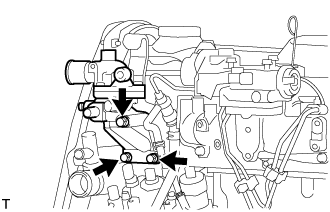
- Torque:
- 19 N*m{ 195 kgf*cm , 14 ft.*lbf }
| 18. INSTALL CRANK POSITION SENSOR |
Coat a O-ring with engine oil.
Install the crank position sensor with the bolt.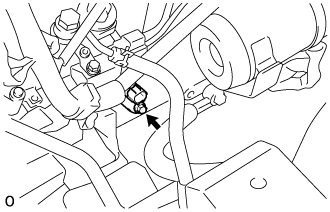
- Torque:
- 5.0 N*m{ 51 kgf*cm , 44 in.*lbf }
Connect the crank position sensor connector.
| 19. INSTALL INJECTION OR SUPPLY PUMP ASSEMBLY |
Install the injection or supply pump assembly to timing gear case, and temporarily tighten the 2 nuts.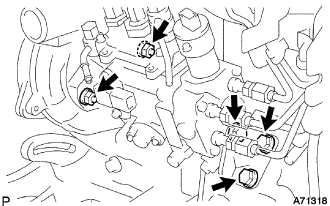
Install injection pump stay No.1 to the injection or supply pump assembly rear end, and temporarily tighten the 3 bolts.
Rotate the pump body to make the marking of pump flange conform to the making of timing of gear case.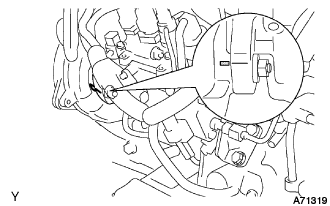
Tighten the 2 nuts to install the injection or supply pump assembly.
- Torque:
- 21 N*m{ 210 kgf*cm , 15 ft.*lbf }
Tighten the 3 bolts to install the injection pump stay No.1.
- Torque:
- Injection pump stay No.1 x Cylinder Block:
- 21 N*m{ 210 kgf*cm , 15 ft.*lbf }
- Injection pump stay No.1 x Injection Pump:
- 18 N*m{ 185 kgf*cm , 13 ft.*lbf }
Connect the 3 fuel hoses.
Connect the engine speed sensor connector.
Connect the spill control valve connector.
Connect the correction unit connector.
Connect the timer control valve connector.
Connect the fuel temperature sensor connector.
Connect the engine wire clamp.
| 20. INSTALL INJECTION PUMP DRIVE PULLEY |
Using SST, install the injection pump drive pulley with the nut.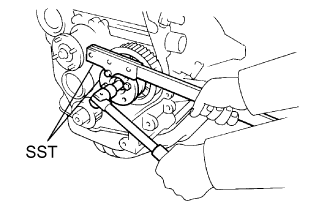
- SST
- 09213-14010
(91651-60865)
09330-00021
- Torque:
- 64 N*m{ 650 kgf*cm , 47 ft.*lbf }
| 21. INSTALL GLOW PLUG ASSEMBLY |
Using a 12 mm deep socket wrench, install the 4 glow plugs.
- Torque:
- 13 N*m{ 130 kgf*cm , 10 ft.*lbf }
| 22. INSTALL NOZZLE HOLDER & NOZZLE SET |
Place 4 new injection nozzle seat gaskets and 4 injection nozzle seats into the injection nozzle holes of the cylinder head.
Using SST, install the 4 nozzle holder and nozzle sets.
- SST
- 09268-64010
(09268-64020)
- Torque:
- 64 N*m{ 650 kgf*cm , 47 ft.*lbf }
| 23. INSTALL NOZZLE LEAKAGE PIPE ASSEMBLY |
Install 4 new ring packing washers and the leakage pipe assembly with the 4 nuts.
- Torque:
- 30 N*m{ 300 kgf*cm , 22 ft.*lbf }
Connect the fuel hose to the leakage pipe.
| 24. INSTALL GLOW PLUG NO.1 CONNECTOR |
- Torque:
- 1.0 N*m{ 10 kgf*cm , 9 in.*lbf }
| 25. INSTALL INJECTION PIPE SET |
Connect the 2 lower clamps on the intake manifold.
Install the 4 injection pipes.
- Torque:
- 25 N*m{ 250 kgf*cm , 18 ft.*lbf }
Secure the injection pipes with the 2 upper pipe clamps and 2 nuts.
- Torque:
- 5.0 N*m{ 50 kgf*cm , 44 in.*lbf }
| 26. INSTALL VENTURI ASSEMBLY |
Install a new gasket and venturi.
Connect the throttle control motor connector.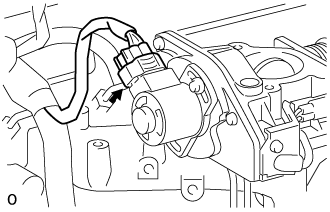
Connect the throttle open switch connector.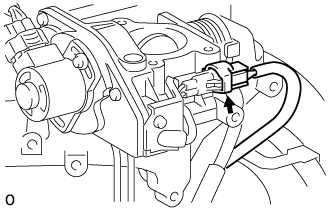
| 27. INSTALL INTAKE AIR CONNECTOR BRACKET |
Install the 2 bolts and intake air connector bracket.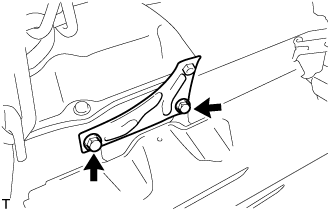
- Torque:
- 18 N*m{ 184 kgf*cm , 13 ft.*lbf }
| 28. INSTALL INTAKE AIR CONNECTOR SUB-ASSEMBLY |
Install a new gasket and intake air connector with the bolt and 3 nuts.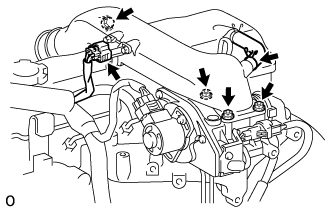
- Torque:
- bolt:
- 18 N*m{ 184 kgf*cm , 13 ft.*lbf }
- Nut:
- 12 N*m{ 122 kgf*cm , 9 ft.*lbf }
Connect the turbo pressure sensor connector.
Connect the ventilation hose.
| 29. INSTALL TIMING BELT |
| 30. INSTALL COMPRESSOR MOUNTING BRACKET (w/ Air Conditioning) |
Temporarily install the compressor mounting bracket with the 4 bolts.
Using several steps, uniformly install and tighten the 4 bolts in the sequence shown in the illustration.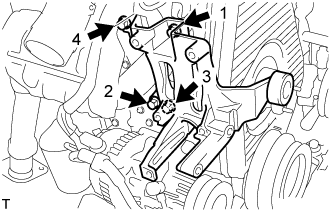
- Torque:
- 85 N*m{ 870 kgf*cm , 63 ft.*lbf }
Temporarily tighten the bolt and spacer.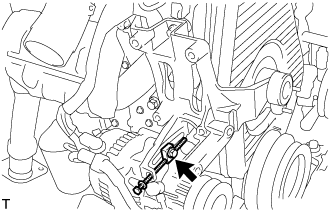
Temporarily install the compressor mounting bracket with the 3 bolts.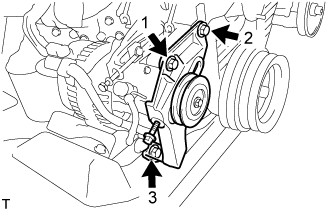
Using several steps, uniformly install and tighten the 3 bolts in the sequence shown in the illustration.
- Torque:
- 47 N*m{ 475 kgf*cm , 36 ft.*lbf }
| 31. INSTALL FAN BELT ADJUSTING BAR (w/o Air Conditioning) |
Install the 2 bolts and fan belt adjusting bar.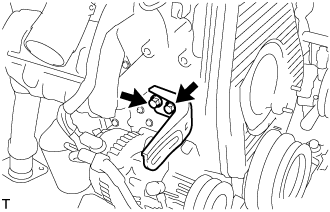
- Torque:
- 45 N*m{ 460 kgf*cm , 33 ft.*lbf }
Temporarily install the bolt.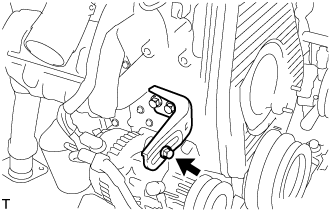
| 32. CONNECT ENGINE MOUNTING INSULATOR FRONT |
Connect the engine mounting insulator front with the 4 bolts.
- Torque:
- 55 N*m{ 561 kgf*cm , 41 ft.*lbf }
| 33. CONNECT VANE PUMP ASSEMBLY |
Temporarily install the vane pump assembly with the 2 bolts.
Install the pulley to the pump shaft.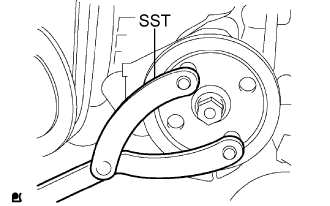
Using SST, stop the pulley rotation and torque the nut.
- SST
- 09960-10010
(09962-01000, 09963-01000)
- Torque:
- 43 N*m{ 440 kgf*cm , 32 ft.*lbf }
| 34. INSTALL ENGINE WIRE |
| 35. INSTALL REAR END PLATE |
Install the 2 bolts and rear end plate.
- Torque:
- 27 N*m{ 275 kgf*cm , 19 ft.*lbf }
| 36. INSTALL FLYWHEEL SUB-ASSEMBLY |
Using SST, hold the crankshaft.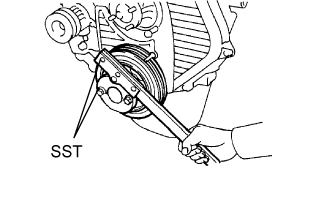
- SST
- 09213-54015
(91651-60855)
09330-00021
Clean the bolts and bolt holes.
Apply adhesive to 2 or 3 threads of the bolts.
- Adhesive:
- Toyota Genuine Adhesive 1324, Three Bond 1324 or equivalent
Install the flywheel on the crankshaft.
Install and uniformly tighten the 8 bolts in several steps, in the sequence shown.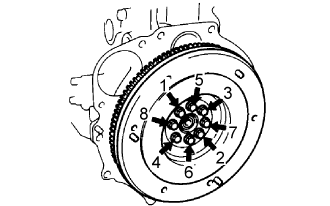
- Torque:
- 123 N*m{ 1,250 kgf*cm , 90 ft.*lbf }
- NOTICE:
- Do not start the engine within an hour after installing.
| 37. INSTALL CLUTCH DISC ASSEMBLY |
Insert SST into the clutch disc assembly, then insert them into the flywheel sub-assembly.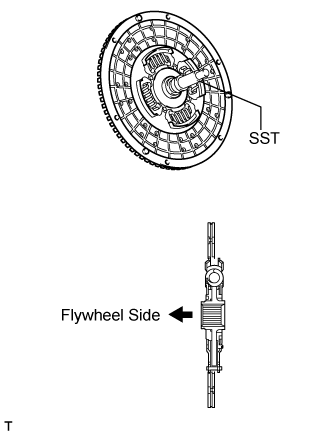
- SST
- 09301-00110
- NOTICE:
- Take care not to insert the clutch disc assembly in the wrong direction.
| 38. INSTALL CLUTCH COVER ASSEMBLY |
Align the matchmarks on the clutch cover assembly with the one on the flywheel sub-assembly.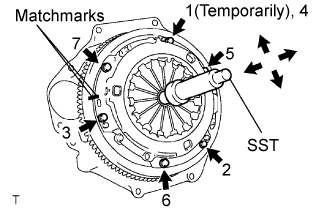
Following the procedures shown in the illustration, tighten the 6 bolts starting from the bolt located near the knock pin on the top.
- SST
- 09301-00110
- Torque:
- 19 N*m{ 195 kgf*cm , 14 ft.*lbf }
- HINT:
- Evenly tighten the bolts by following the order shown in the illustration.
- Tighten the bolts after checking that the disc is in the center by lightly moving the SST up and down, left and right.
- Evenly tighten the bolts by following the order shown in the illustration.
| 39. INSPECT AND ADJUST CLUTCH COVER ASSEMBLY |
Using a dial indicator with a roller instrument, check the diaphragm spring tip alignment.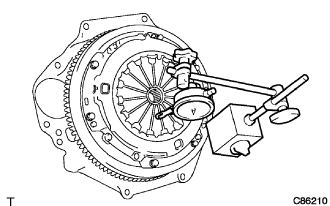
- Maximum non-alignment:
- 0.9 mm (0.035 in.)
If alignment is not as specified, adjust the diaphragm spring tip alignment using SST.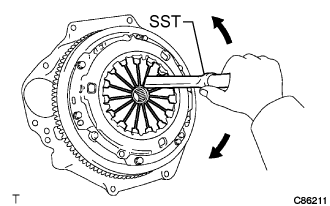
- SST
- 09333-00013
| 40. INSTALL MANUAL TRANSMISSION UNIT ASSEMBLY |
| 41. INSTALL STARTER ASSEMBLY (for 2.2 kW Type) |
Install the starter with the 2 bolts and nut.
- Torque:
- 69 N*m{ 700 kgf*cm , 51 ft.*lbf }
Install the stay with the 2 bolts and nut.
- Torque:
- 69 N*m{ 104 kgf*cm , 51 ft.*lbf }
Connect the 30 terminal with the nut.
- Torque:
- 9.8 N*m{ 100 kgf*cm , 7 ft.*lbf }
Install the terminal cap.
Connect the starter connector.
| 42. INSTALL STARTER ASSEMBLY (for 2.7 kW Type) |
Install the starter with the 2 bolts, nut and stay.
- Torque:
- 69 N*m{ 700 kgf*cm , 51 ft.*lbf }
Install the starter stay with the 2 bolts and nut.
- Torque:
- Bolt:
- 37 N*m{ 380 kgf*cm , 27 ft.*lbf }
- Nut:
- 12.5 N*m{ 130 kgf*cm , 9 ft.*lbf }
Connect the 30 terminal with the nut.
- Torque:
- 21 N*m{ 215 kgf*cm , 16 ft.*lbf }
Install the terminal cap.
Connect the starter connector.
| 43. INSTALL ENGINE W/ TRANSMISSION ASSEMBLY |
Using the engine lifter, install the engine w/ transmission assembly to the vehicle.
Install the 4 bolts and stabilizer bracket.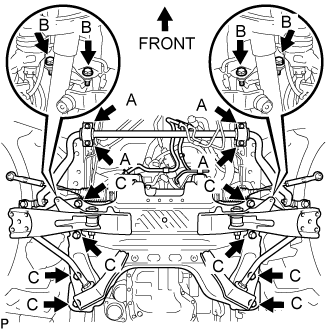
- Torque:
- Bolt (A):
- 36 N*m{ 367 kgf*cm , 27 ft.*lbf }
Install the 16 bolts and front suspension cross member.
- Torque:
- Bolt (B):
- 39 N*m{ 398 kgf*cm , 29 ft.*lbf }
- Bolt (C):
- 150 N*m{ 1,530 kgf*cm , 111 ft.*lbf }
Connect the rear engine mounting.
- Torque:
- 98 N*m{ 1,000 kgf*cm , 72 ft.*lbf }
- NOTICE:
- Tighten the nuts when install the engine mounting.
Remove the engine lifter.
| 44. CONNECT STEERING TORQUE SHAFT ASSEMBLY |
Align the matchmarks on the steering torque shaft assembly and the steering bevel gear assembly.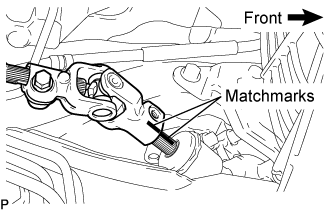
Install the bolt.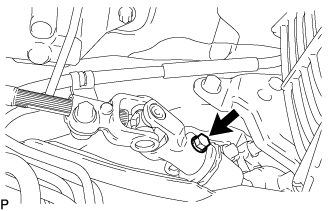
- Torque:
- 35 N*m{ 360 kgf*cm , 26 ft.*lbf }
Align the matchmarks on the steering torque shaft assembly and the power steering link assembly.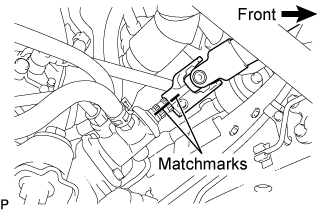
Install bolt (B) and tighten the 2 bolts.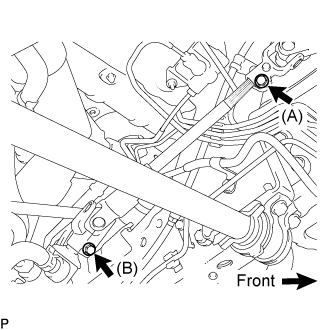
- Torque:
- 35 N*m{ 360 kgf*cm , 26 ft.*lbf }
| 45. CONNECT CLUTCH RELEASE CYLINDER ASSEMBLY |
Install the clutch release cylinder with the 2 bolts.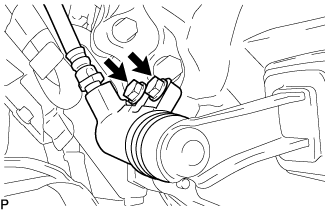
- Torque:
- 12 N*m{ 120 kgf*cm , 9 ft.*lbf }
| 46. CONNECT WIRE HARNESS |
Connect the 2 connectors and clamp.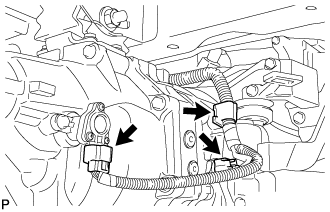
| 47. CONNECT TRANSMISSION CONTROL CABLE ASSEMBLY |
Install 2 new clips to the transmission control cable bracket No.1.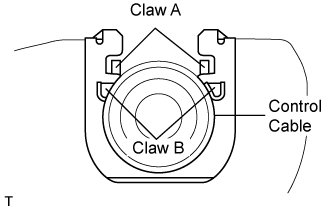
Install the transmission control cable assembly to the transmission control cable bracket No.1.
- NOTICE:
- Be sure that A claws of the clips are firmly engaged into the bracket grooves.
- Be sure the cable is set in the clip with both B claws erected to prevent slippage of the cable in the opposite direction.
- Be sure that A claws of the clips are firmly engaged into the bracket grooves.
Align the matchmarks on the control cable assembly and the outer lever.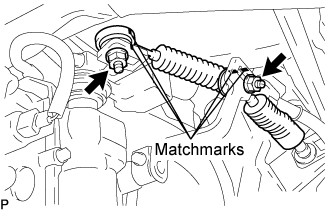
Install the transmission control cable assembly to the outer levers with the 2 nuts.
- Torque:
- 37 N*m{ 377 kgf*cm , 27 ft.*lbf }
| 48. CONNECT SHOCK ABSORBER ASSEMBLY FRONT LH |
| 49. CONNECT SHOCK ABSORBER ASSEMBLY FRONT RH |
- HINT:
- Use the same procedures described for the LH side.
| 50. CONNECT FRONT SUSPENSION ARM SUB-ASSEMBLY UPPER LH |
Connect the front suspension upper arm to the steering knuckle with the nut.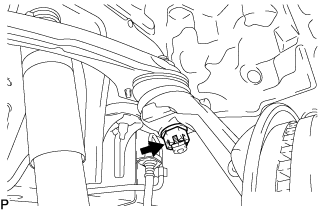
- Torque:
- 113 N*m{ 1,150 kgf*cm , 83 ft.*lbf }
Install a new cotter pin.
- NOTICE:
- If the holes for the cotter pin are not aligned, tighten the nut up to 60°.
- Do not damage the ball joint dust cover.
- If the holes for the cotter pin are not aligned, tighten the nut up to 60°.
| 51. CONNECT FRONT SUSPENSION ARM SUB-ASSEMBLY UPPER RH |
- HINT:
- Use the same procedures described for the LH side.
| 52. INSTALL FRONT DISC BRAKE CALIPER ASSEMBLY LH |
Install the brake caliper assembly to the steering knuckle with the 2 bolts.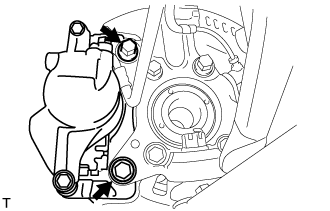
- Torque:
- 123 N*m{ 1,250 kgf*cm , 91 ft.*lbf }
| 53. INSTALL FRONT DISC BRAKE CALIPER ASSEMBLY RH |
- HINT:
- Use the same procedures described for the LH side.
| 54. INSTALL SPEED SENSOR FRONT LH (w/ ABS) |
Connect the front speed sensor with the 2 bolts and 2 clips.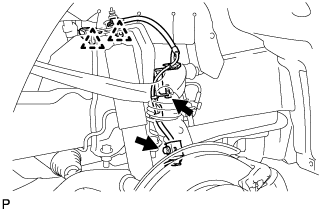
- Torque:
- 8.0 N*m{ 82 kgf*cm , 71 in.*lbf }
- NOTICE:
- Do not twist the sensor wire when installing.
- Keep the sensor tip free from foreign matter.
- Do not twist the sensor wire when installing.
| 55. INSTALL SPEED SENSOR FRONT RH (w/ ABS) |
- HINT:
- Use the same procedures described for the LH side.
| 56. INSTALL PROPELLER SHAFT ASSEMBLY (for Long Wheelbase) |
Remove the SST from the extension housing.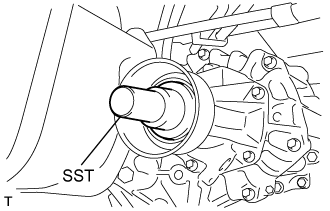
Install the propeller shaft assembly in the extension housing.
Align the matchmarks on the propeller shaft flange and differential flange.
Install the propeller shaft assembly with the 4 nuts, 4 bolts and 4 washers.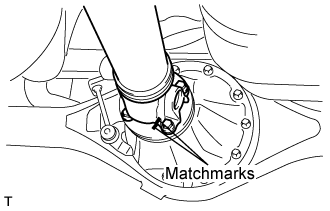
- Torque:
- 74 N*m{ 755 kgf*cm , 54 ft.*lbf }
| 57. INSTALL PROPELLER SHAFT ASSEMBLY (for Super Long Wheelbase) |
Remove the SST from the extension housing.
Install the propeller with center bearing shaft assembly in the extension housing.
Install the center support bearing assembly No.1, and temporarily tighten the 2 bolts.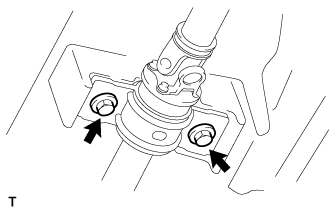
Align the matchmarks on the propeller shaft flange and differential flange.
Install the propeller shaft assembly with the 4 nuts, 4 bolts and 4 washers.
- Torque:
- 74 N*m{ 755 kgf*cm , 54 ft.*lbf }
Check that the center line of the bracket is at right angles to the shaft axial direction.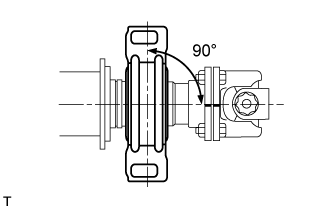
Adjust the center support bearing assembly No.1.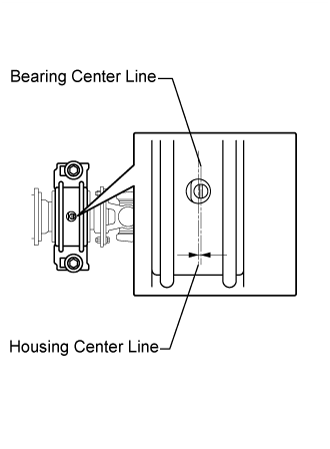
- HINT:
- With the vehicle unladen, adjust the center support bearing No.1 to maintain the angles, as shown.
- In the same conditions, check the center line in the axial direction. Adjust the bearing if necessary.
- The center bearing center line and center bearing housing center line must be adjusted to within -1.0 to 1.0 mm (-0.0394 to 0.0394 in.) of each other in the vehicle's longitudinal direction with the vehicle unladen.
- With the vehicle unladen, adjust the center support bearing No.1 to maintain the angles, as shown.
Tighten the 2 bolts.
- Torque:
- 36 N*m{ 369 kgf*cm , 27 ft.*lbf }
| 58. INSTALL EXHAUST PIPE SUB-ASSEMBLY FRONT NO.1 (for Long Wheelbase) |
Install a new gasket and exhaust pipe sub-assembly front No.1 with the 3 bolts.
- Torque:
- 62 N*m{ 632 kgf*cm , 46 ft.*lbf }
Tighten the clamp bolt, and install the exhaust pipe support bracket No.1 to the exhaust pipe sub-assembly front No.1.
| 59. INSTALL EXHAUST PIPE SUB-ASSEMBLY FRONT NO.1 (for Super Long Wheelbase) |
Install a new gasket and exhaust pipe sub-assembly front No.1 with the 3 bolts.
- Torque:
- 62 N*m{ 632 kgf*cm , 46 ft.*lbf }
Tighten the clamp bolt, install the exhaust pipe support bracket No.1 to the exhaust pipe sub-assembly front No.1.
| 60. INSTALL EXHAUST PIPE SUB-ASSEMBLY FRONT NO.2 (for Long Wheelbase) |
Inspect the compression spring.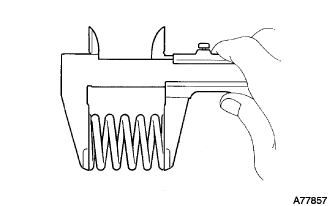
Using vernier calipers, measure the free length of the compression springs.
- Minimum length:
- 40.5 mm (1.594 in.)
- HINT:
- If the free length is less than the minimum, replace the compression spring.
Install the gasket.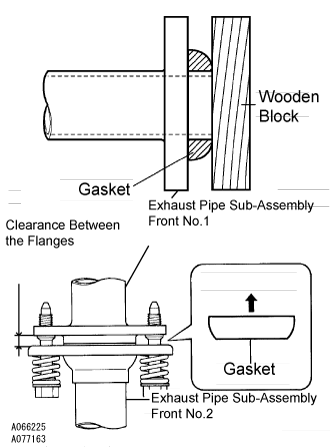
Fully insert a new gasket to the exhaust pipe sub-assembly front No.1 by hand.
Using a wooden block, uniformly strike the gasket so that the gasket and exhaust pipe sub-assembly front No.1 are properly fit.
- NOTICE:
- Be careful with the installation direction of the gasket.
- Do not damage the outer face.
- Do not reuse the gasket.
- To ensure a proper seal, do not use the exhaust pipe sub-assembly front No.2 to force the gasket onto the exhaust pipe sub-assembly front No.1.
- Be careful with the installation direction of the gasket.
Connect the exhaust pipe support, and install a new gasket and the exhaust pipe sub-assembly front No.2 with the 4 bolts, 2 nuts, and 2 compression springs.
- Torque:
- Exhaust pipe sub-assembly front No.1 side:
- 43 N*m{ 438 kgf*cm , 32 ft.*lbf }
- Exhaust pipe assembly tail side:
- 48 N*m{ 489 kgf*cm , 35 ft.*lbf }
- NOTICE:
- After installation, check that the clearance is almost same at any point between the flanges of the exhaust pipe sub-assembly front No.2 and exhaust pipe sub-assembly front No.1.
| 61. INSTALL EXHAUST PIPE SUB-ASSEMBLY FRONT NO.2 (for Super Long Wheelbase) |
Inspect the compression spring.
Using vernier calipers, measure the free length of the compression springs.
- Minimum length:
- 40.5 mm (1.594 in.)
- HINT:
- If the free length is less than the minimum, replace the compression spring.
Install the gasket.
Fully insert a new gasket to the exhaust pipe sub-assembly front No.1 by hand.
Using a wooden block, uniformly strike the gasket so that the gasket and exhaust pipe sub-assembly front No.1 are properly fit.
- NOTICE:
- Be careful with the installation direction of the gasket.
- Do not damage the gasket.
- Do not reuse the gasket.
- To ensure a proper seal, do not use the exhaust pipe sub-assembly front No.2 to force the gasket onto the exhaust pipe sub-assembly front No.1.
- Be careful with the installation direction of the gasket.
Connect the exhaust pipe support, and install a new gasket and the exhaust pipe sub-assembly front No.2 with the 4 bolts, 2 nuts, and 2 compression springs.
- Torque:
- Exhaust pipe sub-assembly front No.1 side:
- 43 N*m{ 438 kgf*cm , 32 ft.*lbf }
- Exhaust pipe assembly center side:
- 48 N*m{ 489 kgf*cm , 35 ft.*lbf }
- NOTICE:
- After installation, check that the clearance is almost same at any point between the flanges of the exhaust pipe sub-assembly front No.2 and exhaust pipe sub-assembly front No.1 .
| 62. CONNECT ENGINE WIRE |
Install the connector and nut, as shown the illustration.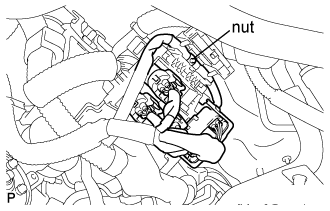
Install the nut then remove the starter wire harness.
- Torque:
- 9.8 N*m{ 100 kgf*cm , 87 in.*lbf }
Connect the clamp and ground cable of the engine wire.
Connect the ECM connector (Click here).
| 63. CONNECT VANE PUMP OIL RESERVOIR ASSEMBLY |
Install the vane pump oil reservoir assembly with the 2 bolts.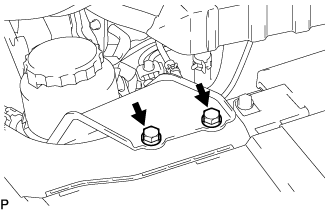
- Torque:
- 8.0 N*m{ 82 kgf*cm , 71 in.*lbf }
| 64. INSTALL COMPRESSOR AND MAGNETIC CLUTCH |
| 65. CONNECT AIR CLEANER HOSE NO.2 |
Install the air cleaner hose No.2 with the clamp.
| 66. CONNECT INJECTION PUMP TO FUEL FILTER FUEL HOSE OR PIPE |
| 67. CONNECT RADIATOR HOSE NO.4 |
| 68. CONNECT RADIATOR HOSE INLET |
| 69. INSTALL FAN & GENERATOR V BELT (w/o Air Conditioning) |
Install the V belt.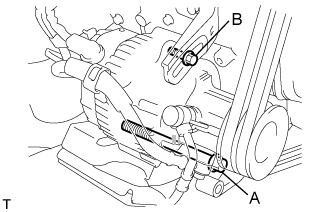
Using a bar, adjust the tension of the V belt.
Tighten the bolts A and B.
- Torque:
- Bolt A:
- 75 N*m{ 765 kgf*cm , 55 ft.*lbf }
- Bolt B:
- 18 N*m{ 185 kgf*cm , 13 ft.*lbf }
Check the tension of the V belt. (Click here)
| 70. INSTALL FAN & GENERATOR V BELT (w/ Air Conditioning) |
Install the V belt.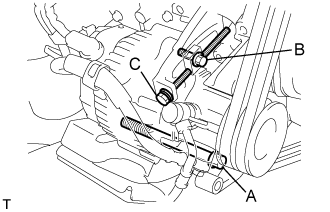
Tightening the bolt C, adjust the tension of the V belt.
Tighten the bolts A and B.
- Torque:
- Bolt A:
- 75 N*m{ 765 kgf*cm , 55 ft.*lbf }
- Bolt B:
- 18 N*m{ 185 kgf*cm , 13 ft.*lbf }
Check the tension of the V belt. (Click here)
| 71. INSTALL V (COOLER COMPRESSOR TO CRANKSHAFT PULLEY) BELT NO.1 |
Install the V belt.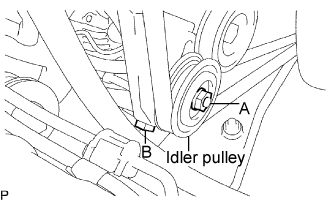
Tightening the bolt B, adjust the tension of the V belt.
Tighten nut A.
- Torque:
- 39 N*m{ 400 kgf*cm , 29 ft.*lbf }
Check the tension of the V belt. (Click here)
| 72. INSTALL VANE PUMP V BELT |
Install the V belt.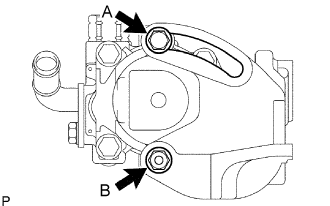
Using a bar, adjust the tension of the V-ribbed belt.
Tighten the bolt A and nut B.
- Torque:
- Bolt (A):
- 48 N*m{ 489 kgf*cm , 35 ft.*lbf }
- Nut (B):
- 64 N*m{ 635 kgf*cm , 47 ft.*lbf }
Check the tension of the V belt. (Click here)
| 73. INSTALL ENGINE SERVICE HOLE SUB COVER SUB-ASSEMBLY |
Install the 5 bolts and engine service hole cover.
- Torque:
- 13 N*m{ 133 kgf*cm , 10 ft.*lbf }
| 74. INSTALL FRONT DOOR SCUFF PLATE RH |
| 75. INSTALL FRONT SEAT ASSEMBLY RH (for Hi-back Seat Type) |
| 76. INSTALL FRONT SEAT ASSEMBLY RH (for Low-back Seat Type) |
| 77. CONNECT CABLE TO NEGATIVE BATTERY TERMINAL |
| 78. PLACE FRONT WHEELS FACING STRAIGHT AHEAD |
| 79. ADD ENGINE OIL |
| 80. ADD ENGINE COOLANT |
Fill the radiator reservoir assembly with coolant to the top of the inlet.
- Standard Capacity:
Item
Specified Condition
w/o Heater
12.3 liters (13.0 US qts, 10.8 Imp. qts)
w/ Front Heater
13.3 liters (14.1 US qts, 11.7 Imp. qts)
w/ Front and Rear Heaters
15.3 liters (16.2 US qts, 13.5 Imp. qts)
- NOTICE:
- Do not substitute plain water for engine coolant.
- HINT:
- Use of improper coolants may damage the engine cooling system.
- Use only Toyota Super Long Life Coolant or similar high quality ethylene glycol based non-silicate, non-amine, non-nitrite, and non-borate coolant with long-life hybrid organic acid technology (coolant with long-life hybrid organic acid technology consists of a combination of low phosphates and organic acids).
- Use of improper coolants may damage the engine cooling system.
Add coolant up to the B line mark in the radiator reservoir assembly and install the reservoir cap.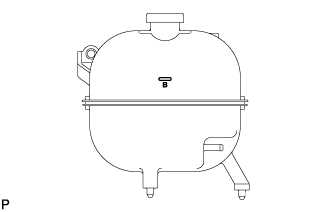
Warm up the engine until the thermostat opens.
While the thermostat is open, circulate the coolant for several minutes.
- HINT:
- The thermostat open timing can be confirmed by pressing the inlet radiator hose by hand, and checking when the engine coolant starts to flow inside the hose.
After the engine cools down, check that the coolant level is between the LOW and FULL level marks.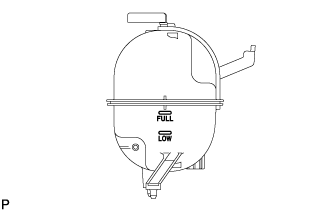
| 81. BLEED AIR FROM FUEL SYSTEM |
Using the hand pump, bleed air from the fuel system until pumping becomes difficult.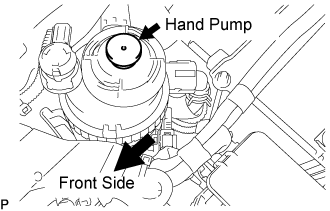
| 82. CHECK FUEL LEAK |
Check that there are no fuel leaks anywhere on the fuel system after doing maintenance.
- HINT:
- When checking for fuel leaks, make sure that there is pressure in the fuel line.
| 83. CHECK FOR ENGINE OIL LEAKS |
| 84. CHECK FOR ENGINE COOLANT LEAKS |
- CAUTION:
- Do not remove the radiator cap while the engine and radiator are still hot. Pressurized, hot engine coolant and steam may be released and cause serious burns.
Fill the radiator with coolant and attach a radiator cap tester to the radiator.
Warm up the engine.
Using a radiator cap tester, increase the pressure inside the radiator to 118 kPa (1.2 kgf/cm2, 17.1 psi), and check that the pressure does not drop.
- HINT:
- If the pressure drops, check the hoses, radiator or water pump for leaks. If no external leaks are found, check the heater core, cylinder block, and cylinder head.
| 85. CHECK TRANSMISSION OIL |
Park the vehicle in a level place.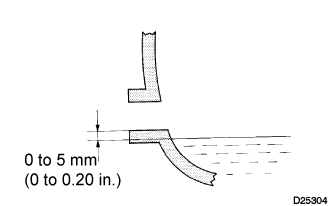
Remove the transmission filler plug and gasket.
Check that the oil surface is within 5 mm (0.20 in.) below the lowest point of the transmission filler plug opening.
- Oil grade:
- API GL-4
- Viscosity:
- SAE 75W-90
- Capacity:
- 2.2 liters (2.3 US qts, 1.9 Imp. qts)
- NOTICE:
- Problems may occur when the oil level is too high or too low.
- After replacing the oil, drive the vehicle and check the oil level again.
- Problems may occur when the oil level is too high or too low.
Check for oil leakage if the oil level is low.
Install the transmission filler plug and a new gasket.
- Torque:
- 37 N*m{ 377 kgf*cm , 27 ft.*lbf }
| 86. CHECK FOR EXHAUST GAS LEAKS |
| 87. ADJUST FRONT WHEEL ALIGNMENT |
| 88. CHECK IDLE SPEED |
Warm up the engine.
When using an intelligent tester:
Connect the intelligent tester to the DLC3.
- Idle speed:
- 720 to 820 rpm (A/C OFF)
750 to 850 rpm (A/C ON)
- HINT:
- Refer to the intelligent tester operator's manual for further details.
When not using an intelligent tester: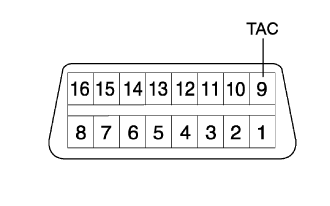
Using SST, connect the tachometer test probe to terminal 9 (TAC) of the DLC3.
- SST
- 09843-18040
Check the idle speed.
- Idle speed:
- 720 to 820 rpm (A/C OFF)
750 to 850 rpm (A/C ON)
- NOTICE:
- Switch off all accessories.
| 89. INSPECT MAXIMUM ENGINE SPEED |
Start the engine.
Depress the accelerator pedal all the way.
Check the maximum speed.
- Maximum speed:
- 4,850 to 4,950 rpm
| 90. CHECK ABS SENSOR SIGNAL |
| 91. PERFORM INITIALIZATION |